Saints or Sinners / Snacks or Snafus
10 August 2013 • by Bob • Humor, Rants
Over the past few years I have sat quietly and watched a lot of people argue across myriad political issues on Facebook. There are people who love portions of our government and its policies, while others detest them. The current scandal-of-the-day is that some see Manning and Snowden as heroes, while others consider them traitors.
 |  |
I have tried my best to keep my silence, because the last thing that anyone needs is another person adding their opinions to a cyber-sphere that is already saturated by divisiveness, ignorance, and paranoia. But eventually an issue arises where I simply cannot remain silent; sometimes our government has unquestionably gone too far.

With all the dangers and terrors in this world from which we need protection, how is it possible that German Kinder Eggs must be banned by the Federal Hazardous Substances Act?

Somehow I am sure that Communists are to blame. ;-)
Why Does Expression Web 4 Want to Modify My PHP.INI File?
15 July 2013 • by Bob • Expression, PHP
As you may have seen in my previous blog posts, I tend to use several of Microsoft's various editors when I am working on web projects: Visual Studio, WebMatrix, and even FrontPage on occasion. But every once in a while I also use FrontPage's successor: Expression Web 4.
Expression Web 4 and PHP
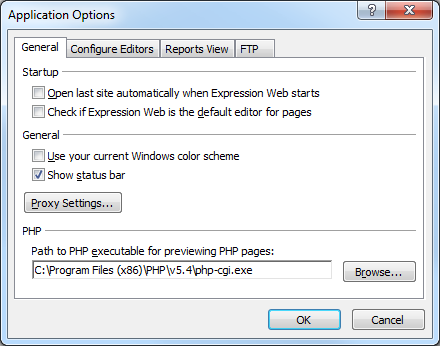
One of the great features about Expression Web was that it contained support for local PHP development before WebMatrix and IIS Express had entered the picture, and it was pretty easy to configure; all that you needed to do was to enter the path to your PHP executable in the Expression Web's Application Options, which you will find under Expression Web's Tools menu:
All that being said, I was working on a PHP project in Expression Web 4 recently, and when I clicked the button to preview my page in a browser, the following error message appeared:
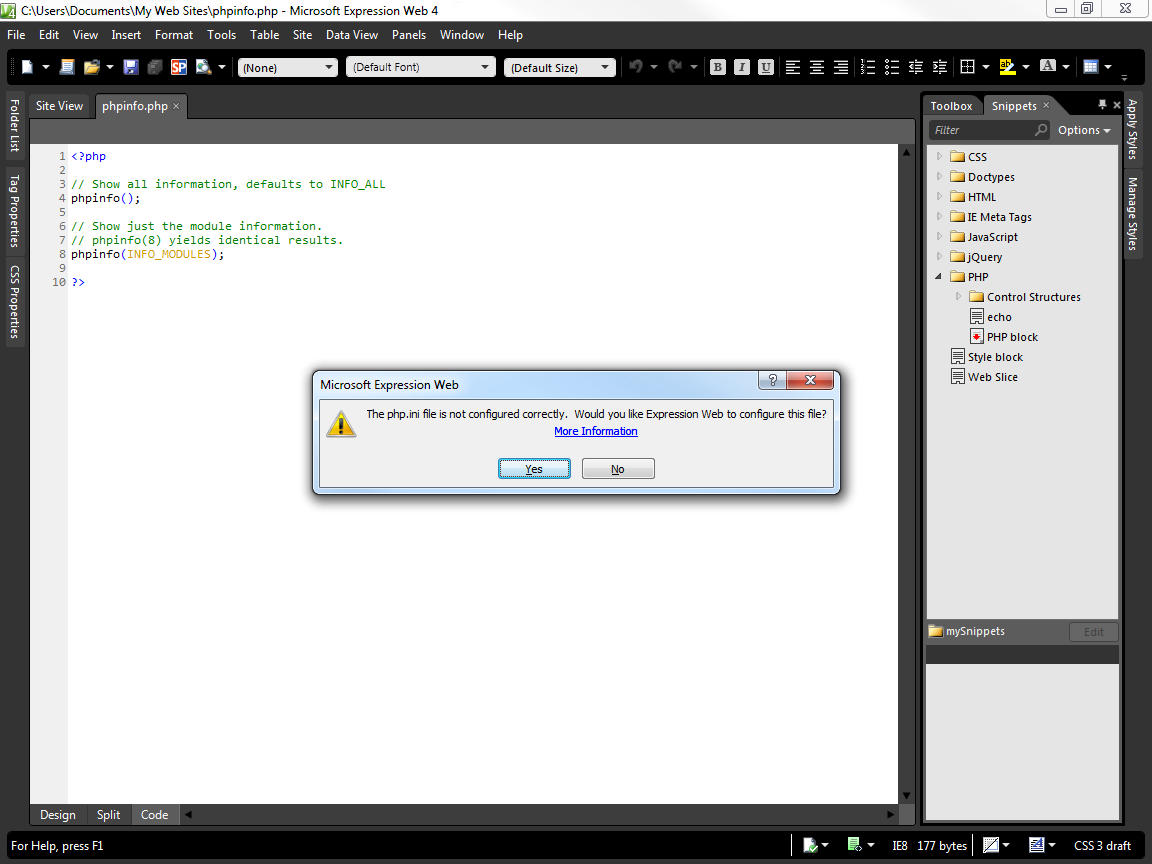 |
| "The php.ini file is not configured correctly. Would you like Expression Web to configure this file?" |
I had not seen this error before, and it was a little unnerving to me because I had spent a lot of time customizing my PHP.ini file and I didn't want Expression Web (or any other application) making a bunch of unknown changes to my PHP.ini file.
That being said, I was curious what would happen if I answered Yes to that question. With that in mind, I tested several scenarios, and I thought the results of my experiments would make a great blog.
Expression Web 4 and PHP.INI Scenario Testing
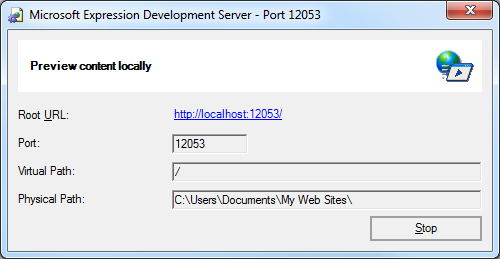
First of all, clicking the No button for the PHP configuration dialog box listed above will not break anything, and Expression Web 4 will still open your web page for testing with PHP in the Expression Development Server (which is basically the ASP.NET "Cassini" development server).
If you click the More Information link in the PHP configuration dialog box, that will take you to the following page in the Expression Web help file:
Previewing a PHP page
http://msdn.microsoft.com/library/cc294950(v=expression.40).aspx
When I clicked the Yes button in the PHP configuration dialog box, Expression Web 4 made a few changes to my INI file that it deemed necessary for local development, and I tested three different scenarios which I will document here:
Scenario #1:
Starting with a PHP.ini file that was created when I installed PHP 5.4 through the Web Platform Installer (WebPI), I only noticed one directive in the PHP.ini file that was changed by Expression Web 4:
display_errors=On
(Note: This directive was originally set to "Off".)
And I only noticed one directive in the PHP.ini file that was added:
cgi.force_redirect=0
Scenario #2:
I ran a script that crawled through my full PHP.ini file which reset every "On" value to "Off" (and vice-versa), and then it reset every "0" value to "1" (and vice-versa). After those changes were completed, Expression Web 4 added only modified the following two directives in the file:
display_errors=On
-and-
cgi.force_redirect=0
Scenario #3:
If I removed everything from my PHP.ini file and I restarted my testing with a completely blank PHP.ini file, Expression Web 4 only added the following lines to the file:
[php]
cgi.force_redirect=0
More Information
So in the end, Expression Web 4 made very few changes to my PHP.INI file despite the ominous-sounding dialog that I listed earlier; just the same, it's always a good idea to back up your PHP.INI file before you let any application make changes to it. (This way you can compare the resulting files after any changes have been made and restore settings if necessary.)
Additional information about the two directives which Expression Web 4 modified can be found on the PHP website at the following URLs:
- cgi.force_redirect:
http://www.php.net/manual/en/ini.core.php#ini.cgi.force-redirect - display_errors:
http://www.php.net/manual/en/errorfunc.configuration.php#ini.display-errors
By the way - as of the writing of this blog, Expression Web 4 with Service Pack 2 is available as free download from Microsoft at the following URL:
Microsoft Expression Web 4 (Free Version)
http://www.microsoft.com/downloads/details.aspx?FamilyID=00e6f791-6450-4894-9b3a-2f5b58617a38
Free stuff is always nice. ;-]
Note: This blog was originally posted at http://blogs.msdn.com/robert_mcmurray/
What's New in IIS 8.5?
11 July 2013 • by Bob • IIS, IIS 8.5, Windows Server 2012 R2
Microsoft released the Windows 8.1 Preview on June 26, but some of the articles that the IIS team was working on for IIS 8.5 needed a little more work before we published them. That being said, those articles were published on IIS.net earlier today, and here is a quick preview of those articles and the new features in IIS 8.5 which they describe:
- Dynamic Website Activation in IIS 8.5
This feature allows IIS to scale to an even larger set of websites than before by only loading websites after an HTTP request has been received; this significantly reduces the startup time and initial resource allocation for IIS, and it prevents resources from being unnecessarily consumed for websites that are accessed infrequently. - Enhanced Logging for IIS 8.5
IIS now provides built-in functionality for adding custom logging fields to your W3C log files that are populated with values that are from request headers, response headers, or server variables. This functionality allows you to log a great deal of custom information about each HTTP request; for example, you could include the information an HTTP header like X-Forwarded-For, which would allow you to decode the request path through all firewalls/proxies, or you could insert information from a custom module into a server variable and have IIS add that information directly to your logs. - Idle Worker Process Page-Out in IIS 8.5
In previous versions of IIS, inactive worker processes were terminated when they reached their recycle interval, but IIS 8.5 allows you to configure your application pools so that inactive worker processes are swapped out to the page file; since IIS can restore a suspended worker process into service much faster than starting up a new worker process, this functionality significantly improves the user experience when a request is received for a suspended application. - Logging to Event Tracing for Windows in IIS 8.5
IIS 8.5 expands the logging capabilities for HTTP events to include Event Tracing for Windows (ETW); this functionality allows you monitor your IIS events in real-time, which can be extremely useful for troubleshooting and debugging/developing applications.
For examples of these technologies in action, you can watch one of the following presentations:
- Internet Information Services: What’s New in Window Server 2012 R2 (from TechEd USA)
- Internet Information Services: What’s New in Window Server 2012 R2 (from TechEd Europe)
Special thanks go to Gary Ericson for putting together and publishing these articles on IIS.net, and a big round of thanks to the IIS team for adding all of these new features!
(One quick note in closing: functionality similar to IIS 8.5's Enhanced Logging was available in the past by installing separate modules, but IIS 8.5 now makes this functionality available out-of-the-box.)
Note: This blog was originally posted at http://blogs.msdn.com/robert_mcmurray/
The Eye of the Beholder
02 July 2013 • by Bob • Art, Rants
I have a very easy measuring scale for determining what I consider art: "If I Can Do It, It's Not Art." This may not seem like a complex rule to live by; but when you consider it, it's rather profound. There are a lot of people who will pass off their work as art even though it is actually a bunch of junk.
I have been to a lot of art museums because - I actually like art. But I have witnessed a lot of pieces that are not art; they are elaborate hoaxes by conmen who rebrand their particular style of garbage construction as creative genius.
For example, when I went to the the Neue Pinakothek in Munich, Germany, one of the paintings hanging on the wall was a large canvas where the artist had painted a one-inch red dot in the center of the canvas. This was titled "Red Object #2," or maybe "Red Object #3..." I can't really remember. The point being that this painting was obviously part of a whole study the artist had done on... red objects. Of course I'm looking at this creation and I'm thinking, "I can do that; I could have done that with a crayon."

I've gone to the Seattle Art Museum several times, and I find it absolutely amazing what some people consider 'art'. Now don't get me wrong, there are some amazing pieces of artwork inside the Seattle Art Museum. But there was one canvas where the artist had simply painted an already white canvas with the color white. That's it - just white paint; nothing else. Once again I'm thinking, "I can do that."

At a different museum that I went to in Germany, the Lenbachhaus, it was very evident that an artist had stood at the end of several canvases that were lying on the ground and simply threw buckets of red paint at them. Once again, I can do that - it's not art.

I realize that the perception of art is subjective, and there is a lot of truth to the statement that "Beauty is in the Eye of the Beholder." But I always fall back on my personal standard that if it's something that I can do, it's not really art - it's just what people pass off as art. (For an example of how I think most modern artists come up with their ideas, you need to watch the movie The Wheeler Dealers with James Garner and see how the character Stanislas creates his artwork.)

Another perfect example of the ways in which we think about art can be typified by an experience that I had when I visited the Kimbell Art Museum in Fort Worth, Texas. The museum was presenting an exhibition on impressionism, and I'm a big fan for many of the classical French impressionists: Renoir, Monet, etc. During my visit I entered one of the rooms, and there was an enormous painting by Gauguin hanging on the wall. I'm not a big fan of his artwork; however, I at least consider it art because I can't do what he does.

But as I analyzed this particular painting, I was thinking to myself, "I just don't get it; he only used four colors." I started to think about this painting based on my personal scale; I could have done this, so it can't be art. I (embarrassingly) spent several minutes studying this piece, and I tried hard to determine what it was about this painting that other people can see and I must be missing.
It's like the story of The Emperor's New Clothes; at some point you begin to worry what's wrong with you. If everybody else can see it and you can't, perhaps it's a character flaw. Maybe you're just not cultured enough. And this was the mindset that I had while I was wasting away my afternoon studying that single piece of art.

After I had been standing there for 5 to 10 minutes, a ten-year-old boy entered the room with his mother in tow. He took one look at the painting, laughed, and exclaimed loudly, "That's crap!", and then he walked off.
At that point I realized that I had been duped. I learned that I needed to stick to my instincts and measure every piece by my personal standard that if I can do it, it's not art. This philosophy actually helped me enjoy the rest of the day at the museum. I could walk into a room, I could look at a Renoir and say, "Now that's a piece of art." Or I could look at another Gauguin and say, "That's crap."
IntelliSense for jQuery in WebMatrix
28 June 2013 • by Bob • Scripting, WebMatrix
I recently had the opportunity to take a day-long class about jQuery from the good folks at Wintellect. The class went great, and I wrote all of my code for the class in WebMatrix. You might recall from my previous blogs that I am a big fan of WebMatrix, but at first there was one thing that was missing from WebMatrix's arsenal of cool features; in order for WebMatrix to really be useful as an editor for jQuery, I really wanted to have IntelliSense support for jQuery. Thankfully, even though IntelliSense support for jQuery is not built-in, adding IntelliSense for jQuery is extremely easy, and I thought that would make a great subject for today's blog.
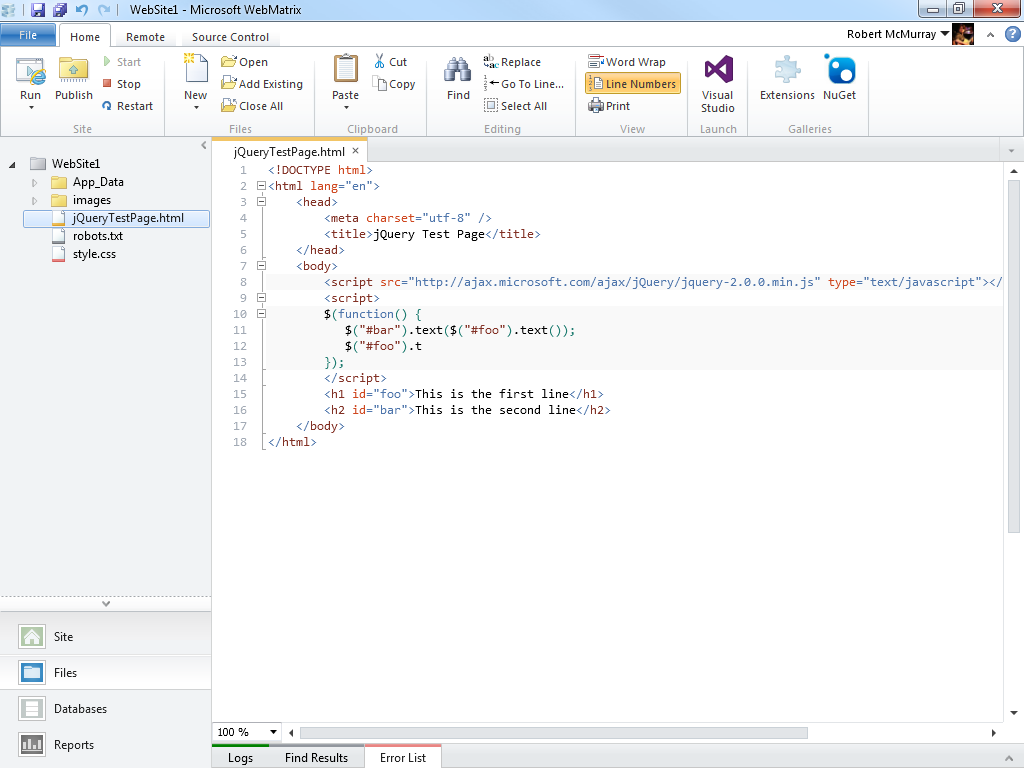
To start things off, let's take a look at a jQuery sample that is little more than a Hello World sample:
<!DOCTYPE html>
<html lang="en">
    <head>
        <meta charset="utf-8" />
        <title>jQuery Test Page</title>
    </head>
    <body>
        <script src="http://ajax.microsoft.com/ajax/jQuery/jquery-2.0.0.min.js" type="text/javascript"></script>
        <script>
        $(function() {
           $("#bar").text($("#foo").text());
           $("#foo").text("This is some custom text");
        });
        </script>
        <h1 id="foo">This is the first line</h1>
        <h2 id="bar">This is the second line</h2>
    </body>
</html>
This example does very little: it loads the jQuery library from Microsoft's AJAX Content Delivery Network (CDN), and it uses jQuery to replace the text in a couple of HTML tags. (The example isn't really important - getting IntelliSense to work is the topic du jour.) This sample would look like the following illustration if you opened it in WebMatrix 3:
When you are using a JavaScript library for which there is no built-in support, Microsoft's developer tools allow you to add IntelliSense support by adding Reference Directives to your page, and the files that you would use for your reference directives are available at the same Microsoft CDN where you can get the jQuery library:
http://www.asp.net/ajaxlibrary/cdn.ashx
In order to use IntelliSense for jQuery, you need to download the appropriate jquery-n.n.n-vsdoc.js file for the version of jQuery that you are using and store that in your website. For example, if you are using jQuery version 2.0.0, you would add a script reference to the CDN path for http://ajax.aspnetcdn.com/ajax/jQuery/jquery-2.0.0.min.js, and you would download the http://ajax.aspnetcdn.com/ajax/jQuery/jquery-2.0.0-vsdoc.js file for your website.
Like many developers, I usually add a folder named scripts in the root of my website, and this is where I will typically store the jquery-n.n.n-vsdoc.js file that I am using. Once you have added the appropriate jquery-n.n.n-vsdoc.js file to your website, all that you need to do is add the appropriate reference directive to your script, as I demonstrate in the highlighted section of the following code sample:
<!DOCTYPE html>
<html lang="en">
    <head>
        <meta charset="utf-8" />
        <title>jQuery Test Page</title>
    </head>
    <body>
        <script src="http://ajax.microsoft.com/ajax/jQuery/jquery-2.0.0.min.js" type="text/javascript"></script>
        <script>
        /// <reference path="scripts/jquery-2.0.0-vsdoc.js" />
        $(function() {
           $("#bar").text($("#foo").text());
           $("#foo").text("This is some custom text");
        });
        </script>
        <h1 id="foo">This is the first line</h1>
        <h2 id="bar">This is the second line</h2>
    </body>
</html>
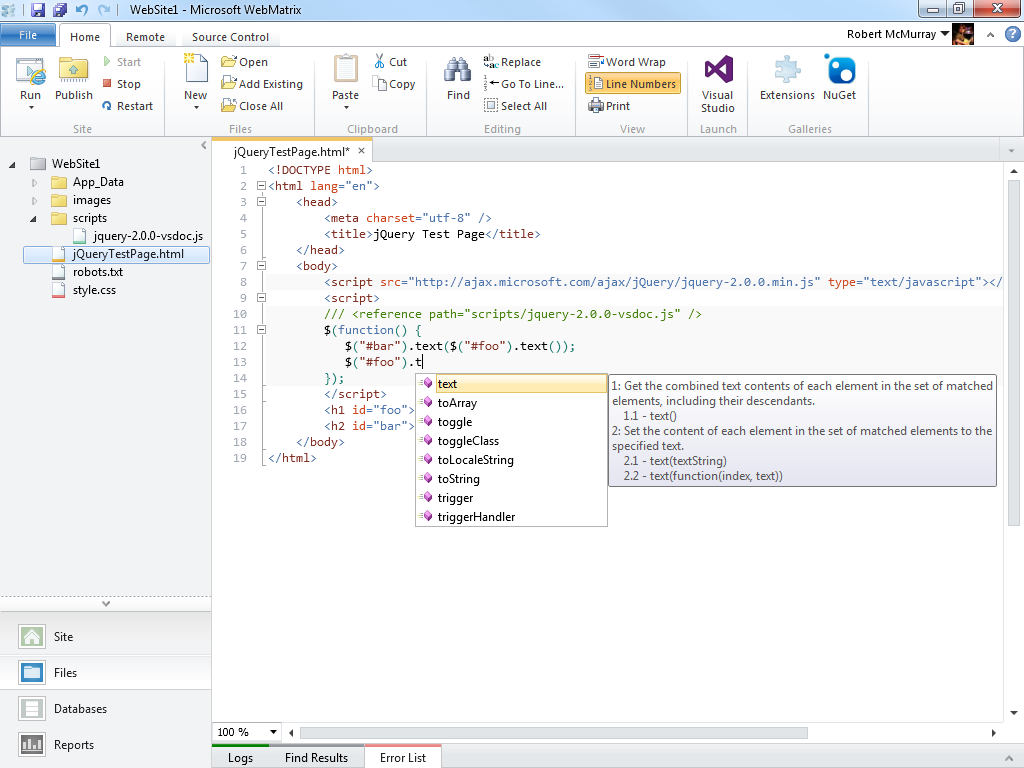
Once you have added the reference directive for your jquery-n.n.n-vsdoc.js file, IntelliSense will begin working for jQuery in WebMatrix, as shown in the following illustration:
In Closing...
One last thing that I would like to mention is that is always a good idea to load JavaScript libraries like jQuery from a CDN, and there are lots of CDNs to choose from. There are some additional steps that you can take to ensure that your website works with jQuery even if the CDN is down, but that subject is outside the scope of this blog. ;-]
Note: This blog was originally posted at http://blogs.msdn.com/robert_mcmurray/
Not that it will make any difference...
27 June 2013 • by Bob • Rants
I am a big fan of movies; and to be honest, I am mostly a fan of classic movies. I have slowly collected a large number of classic movies over the years from several of my favorite actors/actresses: Cary Grant, Ginger Rogers, Jimmy Stewart, Katharine Hepburn, Errol Flynn, etc., etc., etc.
That being said, I am generally not a big fan of recent movies; more often than not the creative team is too short-sighted, and they frequently fall short of creating a truly great movie. Sometimes the problem is writing, sometimes it's direction, and other times it's the acting. But to be fair, sometimes the problem isn't with any of those contributors - sometimes it's a problem with post-production, and this is why I love to buy "Director's Cuts" for many films. Quite often there is a level of depth that is missing from the movie that was part of the director's original vision, and it makes the movie so much better when you add that detail back.
Here's a case in point: I actually like the movie Far and Away with Tom Cruise and Nicole Kidman. Once you get past their bad Irish accents, the movie is a somewhat-acceptable dramedy.

But there are a few scenes that were cut from the film, and unfortunately the DVDs that have been released have never added those scenes to the media. Without theses scenes, parts of the plot have abnormal jumps in the storyline, and it's too bad that a Director's Cut has never been released.
Here are some examples of what I mean:
- Near the beginning of the movie was an extended sequence near the piano in the Christie's house where Stephen Chase has a private conversation with Shannon Christie. We see Stephen's character soften a little; we learn that he truly cares for Shannon, and that Stephen is not a complete jerk - he's just an arrogant by-product of elitist class.
- Likewise there was a hilltop scene in Ireland after Shannon and Joseph Donnelly have left for America where Stephen is emotionally destroyed, and he expresses his sentiments to Daniel Christie. Once again this softens Stephen's character a little, and this adds a great deal of conflict to the movie as a spectator - you want to hate Stephen, and you feel like you should hate Stephen, but now you can't. That was a great piece of filmmaking that should have stayed in the movie because it added so much depth.
- There was an extended scene later in the movie when Joseph was working for the railroad. The shortened scene that was kept simply shows Joseph in a job with no future, whereas the original scene showed Joseph as near-suicidal; Joseph believed not only that he had lost Shannon for good, but that Shannon might not have survived her gunshot wound. Because of this, Joseph was known as the "Crazy Mick" and sent on all of the dangerous missions - because Joseph no longer cared if he lived. This added a whole new dimension to the scene when Joseph discovers Shannon in Oklahoma, because it wasn't mere coincidence to him, he felt as if he was seeing a ghost.
- There was a brief scene when Joseph and Shannon first arrive in America where they pass under a bridge and they see scores of homeless Irish living in squalor. Later in the movie this comes full-circle when Joseph and Shannon are tossed out in the streets, because they find themselves living in that same squalor, and we get to see just how far they have fallen.
- There was another scene after Joseph and Shannon are tossed out in the streets where workers were needed for ditch-digging; Joseph volunteers so that he can earn money for the two of them, yet when he turns around at some point he sees Shannon working beside him digging in the ditch. This scene was extremely important to see how the two of them were truly becoming one unit in their struggles together, and it adds a great deal of depth to the scene later in the movie when Joseph and Shannon attempt to hide in the house they thought was unoccupied.
The last two deleted scenes that I described show the many months that Joseph and Shannon suffered together, instead of the awkward jump in the theatrical release between the scene when Joseph and Shannon were thrown out of their apartment (with Joseph beat to a pulp) and the scene when Joseph is begging to help someone load firewood (with Joseph now healed and exclaiming that they haven't eaten in days). Without that detail, the theatrical release is missing a great deal of its emotional impact.

Unfortunately, none of the scenes that I have described have ever been released on a DVD, so they are somewhat lost to the world. My descriptions of these additional details won't bring them back, and it's too bad that Imagine Films won't release these scenes in some format. If anyone knows Ron Howard, you might want to suggest that he release a 25th Anniversary Edition of Far and Away when that date eventually rolls around, but in the meantime - my lamentations won't make a bit of difference.
Using FrontPage 2003 to Bulk Rename Images Using VBA
21 June 2013 • by Bob • FrontPage, Macros, VBA
Despite the plethora of other tools and editors that I use to create websites, there are times when I simply have to dust off my copy of (gasp!) Microsoft FrontPage 2003. It may be a dinosaur, but there are some things that it does really well, and periodically I simply need to use it.
An often-mocked and yet critically essential feature that FrontPage 2003 provided was affectionately called "Link Fix Up," which was a feature that would replicate file renames across your entire website. In other words, if you had a file that was named "foo.html," you could rename it to "bar.html" and FrontPage 2003 would update every hyperlink in every file in your entire website which pointed to that file. Needless to say, this feature was often indispensable when I was working with extremely large websites.

Other applications may have similar features, but when you combine that feature with FrontPage 2003's built-in Visual Basic for Applications (VBA) functionality, you have a really powerful combination that can quickly seem indispensable.
With all of that being said, here's a scenario where using FrontPage 2003's "Link Fix Up" functionality with VBA really paid off, and I thought that it would make a great blog (in case anyone else runs into a similar issue and still has a copy of FrontPage 2003 lying around somewhere.)
Problem Description and Solution
I created a mixed-media website some years ago where I had thousands of images that were named like IMG5243.1024x768.png, IMG2745.1280x1024.png, IMG6354.800x600.png, etc. Some part of the file name obviously contained the image dimensions, which was useful at the time that I created the website, but that information was no longer necessary, and the filenames made the Obsessive Compulsive side of my behavior start to act up. (Too many characters.) With that in mind, I decided that I would rename all of those images back to simpler names like IMG5243.png, IMG2745.png, IMG6354.png, etc.
This is where FrontPage 2003's "Link Fix Up" functionality would come in handy; trying to crawl every webpage in my website to update the thousands of image links would have been incredibly painful, whereas FrontPage 2003 would take care of keeping the image links up-to-date for free, provided that I could come up with a way to automate the renaming process. (Enter VBA.)
Here is where I quickly ran into a problem - I hadn't standardized my file naming syntax. (Shame on me.) A lot of filenames had other parts or character strings that were going to cause problems, for example: IMG5243.1024x768_cropped.png, IMG2745.edited_1280x1024.png, IMG6354.new_800x600_small.png, etc. This meant that I was going to have to crawl through each filename character by character and look for image dimensions. This is not difficult through VBA, but it added a bit of complexity because I would have to locate any "x" character in a filename and then starting working my way to the right and left to see if it was surrounded by numbers. In other words, I would have to traverse every file name like "aaa_123x456_aaa.jpg" and "aaa.123x456.aaa.jpg" in order to remove "123x456," while leaving "aaa.wxy.jpg" untouched. Of course, there were also topics to be considered after I removed the numbers, like malformed image names like "aaa__aaa.jpg" and "aaa..aaa.jpg" that had unnecessary character duplications.
VBA Bulk File Renaming Macro
All that being said, here is the VBA macro that I created, which worked great; I was able to have this macro rename my thousands of images in a matter of seconds, and FrontPage 2003 made sure that every image URL in my HTML/ASP files were kept up-to-date.
Sub RemoveImageSizesFromFilenames()
  Dim intSectionCount As Integer
  Dim intXPosition As Integer
  Dim intCharPosition As Integer
  Dim intDictionaryCount As Integer
  Dim objWebFile As WebFile
  Dim strExt As String
  Dim strOldName As String
  Dim strNewName As String
  Dim strUrlStub As String
  Dim strSections() As String
  Dim strWidth As String
  Dim strHeight As String
  Dim objDictionary As Object
  Dim objItem As Object
  Dim varKeys As Variant
  Dim varItems As Variant

  ' Define the list of file extensions to process.
  Const strValidExt = "jpg|jpeg|gif|bmp|png"

  ' Create a dictionary object to hold the list of old/new filenames.
  Set objDictionary = CreateObject("Scripting.Dictionary")

  ' Verify that a website is open; exit if not.
  If Len(Application.ActiveWeb.Title) = 0 Then
    MsgBox "A website must be open." & vbCrLf & vbCrLf & "Aborting.", vbCritical
    Exit Sub
  End If

  ' Loop through the files colleciton for the website.
  For Each objWebFile In Application.ActiveWeb.AllFiles
    ' Retrieve the file extension for each file.
    strExt = LCase(objWebFile.Extension)
    ' Verify if the filename is part of the valid list.
    If InStr(strValidExt, strExt) Then
      ' Retrieve the current file name
      strOldName = LCase(Left(objWebFile.Name, Len(objWebFile.Name) - Len(strExt) - 1))
      ' Verify a multi-part filename.
      If InStr(strOldName, ".") Then
        ' Split the multi-part filename into sections.
        strSections = Split(strOldName, ".")
        ' Loop through the sections.
        For intSectionCount = 0 To UBound(strSections)
          ' Verify that each section actually has characters in it.
          If Len(strSections(intSectionCount)) > 1 Then
            ' Check for a lowercase X character.
            intXPosition = InStr(2, strSections(intSectionCount), "x")
            ' Make sure that the X character does not start or end the string.
            If intXPosition > 1 And intXPosition < Len(strSections(intSectionCount)) Then
              ' Make sure that the X character has numbers to the left and right of it.
              If IsNumeric(Mid(strSections(intSectionCount), intXPosition - 1, 1)) And IsNumeric(Mid(strSections(intSectionCount), intXPosition + 1, 1)) Then
                ' Initialize the width/height strings.
                strWidth = ""
                strHeight = ""
                ' Loop through the string to find the height.
                For intCharPosition = intXPosition + 1 To Len(strSections(intSectionCount))
                  If IsNumeric(Mid(strSections(intSectionCount), intCharPosition, 1)) Then
                    strHeight = strHeight & Mid(strSections(intSectionCount), intCharPosition, 1)
                  Else
                    Exit For
                  End If
                Next
                ' Loop through the string to find the width.
                For intCharPosition = intXPosition - 1 To 1 Step -1
                  If IsNumeric(Mid(strSections(intSectionCount), intCharPosition, 1)) Then
                    strWidth = Mid(strSections(intSectionCount), intCharPosition, 1) & strWidth
                  Else
                    Exit For
                  End If
                Next
                ' Remove the width/height string from the current filename section.
                strSections(intSectionCount) = Replace(strSections(intSectionCount), strWidth & "x" & strHeight, "")
              End If
            End If
          End If
        Next
        ' Reassemble the file sections.
        strNewName = Join(strSections, ".")
        If Right(strNewName, 1) = "." Then strNewName = Left(strNewName, Len(strNewName) - 1)
        ' Cleanup several unnecessary character sequences.
        If StrComp(strOldName, strNewName, vbTextCompare) <> 0 Then
          strOldName = strOldName & "." & strExt
          strNewName = strNewName & "." & strExt
          strNewName = Replace(strNewName, "_.", ".", 1, -1)
          strNewName = Replace(strNewName, "._", "_", 1, -1)
          strNewName = Replace(strNewName, "..", ".", 1, -1)
          strNewName = Replace(strNewName, "__", "_", 1, -1)
          strUrlStub = Left(objWebFile.Url, Len(objWebFile.Url) - Len(strOldName))
          ' Add the old/new file URLs to the dictionary.
          objDictionary.Add strUrlStub & strOldName, strUrlStub & strNewName
        End If
      End If
    End If
  Next

  varKeys = objDictionary.Keys
  varItems = objDictionary.Items

  ' Loop through the collection of URLs to rename.
  For intDictionaryCount = 0 To (objDictionary.Count - 1)
    ' Avoid collisions with existing URLs.
    If Application.ActiveWeb.LocateFile(varItems(intDictionaryCount)) Is Nothing Then
      ' Get current URL.
      Set objWebFile = Application.ActiveWeb.LocateFile(varKeys(intDictionaryCount))
      ' Rename the URL.
      objWebFile.Move varItems(intDictionaryCount), True, False
    End If
  Next

End Sub
In Closing...
There are a couple of additional details about this macro that you should consider:
First of all, this macro intentionally avoids overwriting the destination filename if it already exists. For example, if you have two files named IMG1234.100x100.jpg and IMG1234.200x200.jpg, simply removing the image size characters from each file name would result in a collision for the name IMG1234.jpg. What the macro currently does is to rename the first file, then it leaves any possible collisions unchanged. You could easily modify this script to prompt the user what to do, or you could configure it to rename each file with a syntax like IMG1234a.jpg / IMG1234b.jpg / IMG1234c.jpg, but I'll leave that up to you.
Second, I wrote this macro for a specific set of file types and filenames, but you could modify the macro for a variety of scenarios. For example, one developer that I knew liked to test his content on his production server by creating preview files with names like foo.preview.html and bar.preview.aspx. This allowed the production files to coexist on the same server with the preview files, although the production files would have the production-ready filenames like foo.html and bar.aspx. Once he was ready to push the preview files into production, he would simply rename the necessary files. This system worked for a small set of files, but it didn't scale very well, so the amount of labor on his part would increase as the website grew more complex. (Of course, he should have been using a development website for his preview testing, but that's another story.) In any event, this macro could easily be modified to remove the ".preview." string from every file name.
Note: This blog was originally posted at http://blogs.msdn.com/robert_mcmurray/
Your Tablet PC is Not a Camera
15 June 2013 • by Bob • Art, Photography, Rants
It never ceases to amaze me the number of people who walk around with a tablet PC and try to use it as a camera.

I don't care how many megapixels a tablet PC has - it's not a real camera, and people look pretty silly trying to hold up a tablet in order to use it as one. Not to mention the fact that people with tablet PCs are typically blocking everyone else's view.

Please do yourself and the rest of the world a favor - if you need to take a photo, buy a real camera.
A Quick Discussion of Active and Passive FTP Connections
24 May 2013 • by Bob • IIS, FTP
I get a lot of questions about Active versus Passive FTP Connections, specifically when people are configuring their FTP firewall settings as described in my articles like Configuring FTP Firewall Settings in IIS and FTP Firewall Support, and I get related questions when people are trying to figure out why they can't use the command-line FTP.EXE utility that ships with Windows over the Internet. With all of this in mind, I thought that I would put together a quick blog that explains Active and Passive FTP connections and why those matter when you are connecting to an FTP server over the Internet.
Here is the briefest description that I can think of to describe the different between Active and Passive FTP:
- When you are using Active FTP, your FTP client determines how your data connections will work.
- When you are using Passive FTP, your FTP server determines how your data connections will work.
That sums up the whole concept into two bullet points. Unfortunately, neither of those bullet points are the least bit significant to you if you don't understand what they actually mean, so I will describe them in detail below.
How Active FTP Works
The following output shows the communication between an FTP client and FTP server using Active FTP to retrieve a simple directory listing, and I manually color-coded the output so that the client and server's responses would be a little easier to see:
OPEN ftp.contoso.com
Resolving ftp.contoso.com...
Connect socket #1920 to 169.254.10.1, port 21...
220 Microsoft FTP Service
HOST ftp.contoso.com
220 Host accepted.
USER robert
331 Password required for robert.
PASS **********
230 User logged in.
PWD
257 "/" is current directory.
PORT 169,254,10,2,72,50
200 PORT command successful.
LIST
125 Data connection already open; Transfer starting.
drwxrwxrwx 1 owner group 0 Feb 15 19:26 aspnet_client
-rwxrwxrwx 1 owner group 689 Jan 31 22:27 default.htm
226 Transfer complete.
Transferred 106 bytes in 0.008 seconds
QUIT
221 Goodbye.
In the beginning of this exchange, the client connects to the server from one of its ephemeral data ports to the server's port for the FTP command channel. After negotiating the FTP host, username, and password, the client retrieves the name of the current directory. So far all of the client/server communication has taken place over the FTP command channel, and up to now the conversation is identical to Passive FTP, but that is about to change.
The client's next task is to request a directory listing, which is denoted by the LIST command. The server will return its response to the client over the data channel, so before FTP client can send the LIST command, the client has to specify whether to use Active or Passive. In this example, the client has specified Active FTP by sending a PORT command. The syntax for this command is PORT A1,A2,A3,A4,P1,P2, where A1 through A4 are octets of the client's IPv4 address, and P1/P2 are two bytes that make up a 16-bit (0-65535) port address on the client. (Note: if you are using IPv6, there is a similar EPRT command that works with IPv6 addresses.)
Here's what the information in the PORT command means: the FTP client is essentially telling the FTP server, "For the upcoming data transfer, you need to talk to me at this IP address on this port." This means that the FTP client is actively in control of how the subsequent data communication is going to take place.
If we analyze this information, you can easily see why Active FTP will often fail to work over the Internet. As a relevant example, if you were to use the FTP.EXE client that ships with Windows, it can only use Active FTP. So when a client computer requests something from the server that needs to use the data channel, the client computer sends its IP address via a PORT command. If the FTP client is behind a firewall or NAT server, then the client is going to send its internal, LAN-based address, to which the FTP server will more than likely fail to connect. For example, if you are on a LAN that uses a NAT server and you have a 192.168.0.nnn IPv4 address, that IP address is invalid over the Internet, so the server will never be able to establish a data connection to your client to send the data. (Note: This is the reason why many customers contact me with the following problem description: "I can use FTP.EXE to connect to my server, and everything works until I try to retrieve a directory listing, then it hangs until the connection times out." What is actually happening is the FTP server is trying to connect to the FTP client's IP address and port that were specified by the PORT command, but the connection does not succeed because the server cannot connect to the private IP address of the client.)
How Passive FTP Works
The following output shows the communication between an FTP client and FTP server using Passive FTP to retrieve the same directory listing as my previous example, and once again I manually color-coded the output so that the client and server's responses would be a little easier to see:
OPEN ftp.contoso.com
Resolving ftp.contoso.com...
Connect socket #2076 to 169.254.10.1, port 21...
220 Microsoft FTP Service
HOST ftp.contoso.com
220 Host accepted.
USER robert
331 Password required for robert.
PASS **********
230 User logged in.
PWD
257 "/" is current directory.
PASV
227 Entering Passive Mode (169,254,10,1,197,19).
LIST
Connect socket #2104 to 169.254.10.1, port 50451...
150 Opening ASCII mode data connection.
drwxrwxrwx 1 owner group 0 Feb 15 19:26 aspnet_client
-rwxrwxrwx 1 owner group 689 Jan 31 22:27 default.htm
226 Transfer complete.
Transferred 106 bytes in 0.008 seconds
QUIT
221 Goodbye.
As I mentioned in my earlier example, the beginning of this conversation is identical to Active FTP: the client connects from one of its ephemeral data ports to the server's port for the FTP command channel. After negotiating the FTP host, username, and password, the client retrieves the name of the current directory as in my earlier example - and here's where the difference begins.
Once again the client's next task is to request the directory listing, which is still denoted by the LIST command. But in this second example, the client has specified Passive FTP by sending a PASV command. The server responds to this command with a reply that is in the format of 227 Entering Passive Mode (A1,A2,A3,A4,P1,P2), where A1 through A4 are octets of the server's IPv4 address, and P1/P2 are two bytes that make up a 16-bit (0-65535) port address on the server. (Note: if you are using IPv6, there is a similar EPSV command that works with IPv6 addresses.)
Here's what the information in the response to the PASV command means: the FTP client is essentially telling the FTP server, "For the upcoming data transfer, you need to tell me which IP address and port I should use to talk to you." This means that the FTP client is passively allowing the server to control how the subsequent data communication is going to take place.
If we analyze this information, you can easily see why Passive FTP often works over the Internet; when the FTP server is in control of the communication parameters, it doesn't matter whether the FTP client is behind a NAT server, because the server is telling the client how it should communicate with the server.
All of this leads to an obvious question: what happens when both the server and the client are behind NAT servers or firewalls? This is where a little bit of configuration comes into play. If you read my Configuring FTP Firewall Settings in IIS and FTP Firewall Support articles, you would notice that you can configure the IIS FTP service to tell the FTP client which IP address to use; when your FTP server is located behind a firewall, you would configure your FTP server to send the external IP address of your firewall, and then you would configure your firewall to route FTP requests on that IP address to your FTP server. Since the FTP server is sending the external IP address of your firewall, the client knows how to communicate to the FTP server even though it is behind a firewall, even if your server is using a LAN-based internal IP address.
In Closing...
Having explained everything in my preceding examples, you should now understand what I meant earlier when I described the difference between Active and Passive FTP with these two simple points:
- When you are using Active FTP, your FTP client determines how your data connections will work.
- When you are using Passive FTP, your FTP server determines how your data connections will work.
I hope this clears up some questions you might have about Active versus Passive FTP, why you sometimes need to configure your firewall settings for your FTP service, and why the built-in FTP client for Windows seldom works over the Internet.
That wraps it up for today's blog post. ;-]
Note: This blog was originally posted at http://blogs.msdn.com/robert_mcmurray/
Adding Custom FTP Providers with the IIS Configuration Editor - Part 2
02 May 2013 • by Bob • IIS, FTP, Extensibility
In Part 1 of this blog series about adding custom FTP providers with the IIS Configuration Editor, I showed you how to add a custom FTP provider with a custom setting for the provider that is stored in your IIS configuration settings. For my examples, I showed how to do this by using both the AppCmd.exe application from a command line and by using the IIS Configuration Editor. In part 2 of this blog series, I will show you how to use the IIS Configuration Editor to add custom FTP providers to your FTP sites.
As a brief review from Part 1, the following XML excerpt illustrates what the provider's settings should resemble when added to your IIS settings:
<system.ftpServer>
   <providerDefinitions>
     <add name="FtpXmlAuthorization"
       type="FtpXmlAuthorization, FtpXmlAuthorization, version=1.0.0.0, Culture=neutral, PublicKeyToken=426f62526f636b73" />
     <activation>
       <providerData name="FtpXmlAuthorization">
         <add key="xmlFileName"
           value="C:\inetpub\FtpUsers\Users.xml" />
       </providerData>
     </activation>
   </providerDefinitions>
 </system.ftpServer>
The above example shows the settings that are added globally to register an FTP provider. Note that this example only contains the settings for my custom provider; you would normally see the settings for the IisManagerAuth and AspNetAuth providers that ship with the FTP service in the providerDefinitions collection.
To actually use a provider for an FTP site, you would need to add the provider to the settings for the FTP site in your IIS settings. So for part 2 of this blog series, we will focus on how to add a custom provider to an FTP site by using the IIS Configuration Editor.
Having said all of that, the rest of this blog is broken down into the following sections:
- Step 1 - Looking at the configuration settings for custom FTP providers
- Step 2 - Navigate to an FTP Site in the Configuration Editor
- Step 3 - Add custom FTP providers to an FTP site
- Summary and Parting Thoughts
Before continuing, I should reiterate that custom FTP providers fall into two categories: providers that are used for authentication and providers that are used for everything else. This distinction is important, because the settings are stored in different sections of your IIS settings. With that in mind, let's take a look at the settings for an example FTP site.
Step 1 - Looking at the configuration settings for custom FTP providers
The following example shows an FTP site with several custom FTP providers added:
<site name="ftp.contoso.com" id="2">
   <application path="/">
     <virtualDirectory path="/"
       physicalPath="c:\inetpub\www.contoso.com\wwwroot" />
   </application>
   <bindings>
     <binding protocol="ftp"
       bindingInformation="*:21:ftp.contoso.com" />
   </bindings>
   <ftpServer>
     <security>
       <ssl controlChannelPolicy="SslAllow"
         dataChannelPolicy="SslAllow" />
       <authentication>
         <customAuthentication>
           <providers>
             <add name="MyCustomFtpAuthenticationProvider" />
           </providers>
         </customAuthentication>
       </authentication>
     </security>
     <customFeatures>
       <providers>
         <add name="MyCustomFtpHomeDirectoryProvider" />
         <add name="MyCustomFtpLoggingProvider" />
       </providers>
     </customFeatures>
     <userIsolation mode="Custom" />
   </ftpServer>
 </site>
If you look at the above example, you will notice the following providers have been added:
- A custom FTP authentication provider named MyCustomFtpAuthenticationProvider has been added to the ftpServer/security/authentication/customAuthentication/providers collection; this provider will obviously be used by the FTP service to validate usernames and passwords.
- A custom FTP home directory provider named MyCustomFtpHomeDirectoryProvider has been added to the ftpServer/customFeatures/providers collection; this will be used by the FTP service for custom user isolation. Note the mode for the userIsolation element is set to custom.
- A custom FTP logging provider named MyCustomFtpLoggingProvider has been added to the ftpServer/customFeatures/providers collection; this will be used by the FTP service for creating custom log files.
As I mentioned earlier, you will notice that the settings for FTP custom providers are stored in different sections of the ftpServer collection depending on whether they are used for authentication or some other purpose.
Step 2 - Navigate to an FTP Site in the Configuration Editor
Open the IIS Manager and click on the Configuration Editor at feature the server level:

Click the Section drop-down menu, expand the the system.applicationHost collection, and then highlight the sites node:

If you click on the Collection row, an ellipsis [...] will appear:

When you click the ellipsis [...], IIS will display the Collection Editor dialog box for your sites; both HTTP and FTP sites will be displayed:

Expand the ftpServer node, which is where all of the site-level settings for an FTP site are kept.
Step 3 - Add custom FTP providers to an FTP site
As I mentioned earlier, custom FTP providers fall into two categories: providers that are used for authentication and everything else. Because of this distinction, the following steps show you how to add a provider to the correct section of your settings depending on the provider's purpose.
Add a custom FTP provider to an FTP site that is not used for authentication
Expand the customFeatures node, which is located under the ftpServer node for an FTP site; this collection defines the custom providers for an FTP site that are not used for authentication, for example: home directory providers, logging providers, etc. When you highlight the providers row, an ellipsis [...] will appear:

When you click the ellipsis [...], IIS will display the Collection Editor dialog box for your custom features (providers). When you click Add in the Actions pane, you need to enter the name of an FTP provider that you entered by following the instructions in Part 1 of this blog series:

Once you enter the name of your FTP provider in the Collection Editor dialog box for your custom features, you can close that dialog box. The Collection Editor for your sites will reflect the updated provider count for your FTP site:

Important Note: If you are adding a custom FTP Home Directory Provider, you have to configure the mode for FTP's User Isolation features. To do so, you need to expand the userIsolation node, which is located under the ftpServer node for an FTP site. Once you have done so, click the mode drop-down menu and choose Custom from the list of choices:

When you close the Collection Editor dialog box for your sites, you need to click Apply in the Actions pane to commit the changes to your IIS settings:

Add a custom FTP authentication provider to an FTP site
First and foremost - there is built-in support for adding custom authentication providers in IIS Manager; to see the steps to do so, see the FTP Custom Authentication <customAuthentication> article on the IIS.NET website. However, if you want to add a custom FTP authentication provider to an FTP site by using the IIS Configuration Editor, you can do so by using the following steps.
Expand the security node under the ftpServer node for an FTP site, then expand the authentication node, and then expand the customAuthentication node; this collection defines the custom authentication providers for an FTP site. When you highlight the providers row, an ellipsis [...] will appear:

When you click the ellipsis [...], IIS will display the Collection Editor dialog box for your custom authentication providers. When you click Add in the Actions pane, you need to enter the name of an FTP authentication provider that you entered by following the instructions in Part 1 of this blog series:

Once you enter the name of your FTP authentication provider in the Collection Editor dialog box for your custom authentication providers, you can close that dialog box. The Collection Editor for your sites will reflect the updated authentication provider count for your FTP site:

When you close the Collection Editor dialog box for your sites, you need to click Apply in the Actions pane to commit the changes to your IIS settings:
Summary and Parting Thoughts
As I mentioned in part 1 of this series, I admit that this might seem like a lot of steps to go through, but it's not that difficult once you understand how the configuration settings are organized and you get the hang of using the IIS Configuration Editor to add or modify these settings.
Disabling Custom User Isolation
In the Add a custom FTP provider to an FTP site that is not used for authentication section of this blog, I added a step to specify Custom as the User Isolation mode. Since this is something of an advanced feature, there is no user interface for enabling custom user isolation; this was a design decision to keep people from breaking their FTP sites. Here's why: if you enable custom user isolation and you don't install a custom Home Directory provider for FTP, all users will be denied access to your FTP site.
That being said, once you have enabled custom user isolation, the option to disable custom user isolation will "magically" appear in the FTP User Isolation feature in the IIS Manager. To see this for yourself, you would first need to follow the steps to custom user isolation in the Add a custom FTP provider to an FTP site that is not used for authentication section of this blog.
Once you have enabled custom user isolation, highlight your FTP site in the list of Sites pane of IIS Manager, then open the FTP User Isolation feature:

When you open the FTP User Isolation feature, you will see that an option for Custom now appears in the list of user isolation modes:

This option will appear as long as custom user isolation is enabled. If you change the user isolation mode to something other than Custom, this option will continue appear in the list of user isolation modes until you navigate somewhere else in IIS Manager. Once you have changed the user isolation mode to one of the built-in modes and you navigate somewhere else, the Custom option will not show up in the FTP User Isolation feature until you follow the steps to re-enable custom user isolation.
Additional Information
If you want additional information about configuring the settings for FTP providers, you can find detailed reference documentation at the following URLs:
- FTP Custom Features <customFeatures>
http://www.iis.net/configreference/system.applicationhost/sites/site/ftpserver/customfeatures - FTP Custom Authentication <customAuthentication>
http://www.iis.net/configreference/system.applicationhost/sites/site/ftpserver/security/authentication/customauthentication
Each of these articles contain "How-To" steps, detailed information about each of the configuration settings, and code samples for AppCmd.exe, C#/VB.NET, and JavaScript/VBScript.
As always, let me know if you have any questions. ;-]
Note: This blog was originally posted at http://blogs.msdn.com/robert_mcmurray/