Every Gene Pool has a Shallow End
17 February 2014 • by Bob • Humor
So I watched this video...
And that inspired me to create this image...

Enough said. ![]()
Using ASX Files with Windows Media Center
16 February 2014 • by Bob • Windows Media Center
Like a lot of Windows geeks and fanboys, I use Windows Media Center on a Windows 7 system as my Digital Video Recorder (DVR) and media library. My system consists of a Dell GX270 computer with a ZOTAC NVIDIA GeForce GT610 video card, and it uses an InfiniTV 6 ETH tuner to receive cable signals. This setup has served us faithfully for years, and it is the center piece of our home entertainment system. If you're not familiar with Windows Media Center, that's because it's a rather hideously under-advertised feature of Windows. Just the same, here is an official Microsoft teaser for it:
But I've done a few extra things with my Windows Media Center that are a little beyond the norm, and one of the biggest items that I spent a considerable amount of time and effort digitizing my entire collection of DVD and Blu-ray discs as MP4 files, and I store them on a Thecus NAS that's on my home network which I use for media libraries on my Windows Media Center. This allows me to have all of my movies available at all times, and I can categorize them into folders which show up under the "Videos" link on the Windows Media Center menu.
That being said, there's a cool trick that I've been using to help customize some of my movies. Some of the movies that I have encoded have some material that I'd like to cut out, (like excessive opening credits and lengthy intermissions), but I don't want to edit and re-encode each MP4 file. Fortunately, Windows Media Center supports Advanced Stream Redirector (ASX) files, which allows me to customize what parts of a video are seen without having to edit the actual video.
Here's a perfect example: I recently purchased the 50th Anniversary Collector's Edition of Lawrence of Arabia on Blu-ray. The film is one of my favorites, and this reissue on Blu-ray is phenomenal. That being said, the movie begins with a little over four minutes of a blank screen while the musical overture plays. In addition, there is an additional eight minutes of a blank screen while the music for intermission is played. This is obviously less than desirable, so I created an ASX file which skips the opening overture and intermission.
By way of explanation, ASX files are XML files which define a playlist for media types, which can be any supported audio or video media. The individual entries can define various metadata about each media file, and thankfully can be used to specify which parts of a media file will be played.
With that in mind, here's what the ASX file that I created for Lawrence of Arabia looks like:
<ASX VERSION="3.0">
  <!-- Define the title for the movie. -->
  <TITLE>Lawrence Of Arabia</TITLE>
  <!-- Specify the movie's author. -->
  <AUTHOR>Columbia Pictures</AUTHOR>
  <!-- List the copyright for the movie. -->
  <COPYRIGHT>1962 Horizon Pictures (GB)</COPYRIGHT>
  <ENTRY>
    <!-- Define the video file for this entry. -->
    <REF HREF="Lawrence Of Arabia.mp4" />
    <!-- Define the start time for this entry. -->
    <STARTTIME VALUE="00:04:17.0"/>
    <!-- Define the duration for this entry. -->
    <DURATION VALUE="02:15:07.0"/>
  </ENTRY>
  <ENTRY>
    <!-- Define the video file for this entry. -->
    <REF HREF="Lawrence Of Arabia.mp4" />
    <!-- Define the start time for this entry. -->
    <STARTTIME VALUE="02:23:38.0"/>
  </ENTRY>
</ASX>
The XML comments explain what each of the lines in the file is configuring, and it should be straight-forward. But I would like to describe a few additional details:
- Individual media entries are obviously defined in a collection of <ENTRY> elements, and in this example I have defined two entries:
- The first entry defines a <STARTTIME> and <DURATION> which skip over the overture and play up to the intermission.
- The second entry defines a <STARTTIME> which starts after the intermission and plays through the end of the movie.
- The other metadata in the file - like the <AUTHOR> and <COPYRIGHT> - is just for me. That information is optional, but I like to include it.
There are several other pieces of metadata which can be configured, and a list of those are defined in the Windows Media Metafile Elements Reference and ASX Elements Reference.
Error 0x80070005 When Calling the FTP FlushLog Method
31 January 2014 • by Bob • FTP, Extensibility
I had an interesting question earlier today which I thought was worth sharing. One of my coworkers was trying to use the code sample from my Programmatically Flushing FTP Logs blog, and he was getting the following error:
Unhandled Exception: System.UnauthorizedAccessException: Access is denied. (Exception from HRESULT: 0x80070005 (E_ACCESSDENIED))
at Microsoft.Web.Administration.Interop.IAppHostMethodInstance.Execute()
at Sample.Main() in c:\Projects\FtpTests\Program.cs:line 25
I knew that the code sample in my blog worked perfectly when I originally wrote it, so I figured that my coworker must be doing something wrong. (And every developer has said "It works on my computer..." at one time or other.) But I decided to give him the benefit of the doubt, so I copied the source code from my blog into a new Visual Studio project and I ran it.
Much to my surprise, I saw the same error that my coworker was seeing if I didn't step the code through with a debugger.
When I stepped through the code in a debugger, I saw the following error message:
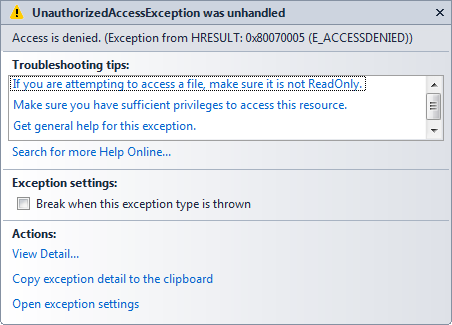
At this point I was thinking, "What the heck? I know this code was working before..." I started to wonder if we had released a breaking change to the FTP service sometime during the past two years, but then it suddenly dawned on me: I hadn't started the FTP service on my computer.
[Duh.]
That was the source of the problem: I usually have the FTP service configured for manual startup on my development computers, but the FTP methods to start and stop FTP sites and flush the FTP logs do not work when the FTP service is not running. Once both of us started the FTP service on each of our systems the problem went away.
I hope this helps. ;-]
Note: This blog was originally posted at http://blogs.msdn.com/robert_mcmurray/
Rapid PHP Deployment for IIS using a Batch File
30 January 2014 • by Bob • IIS, Scripting, IIS Express, PHP
Whenever I am delivering a presentation where I need to use PHP, I typically use a batch file that I wrote in order to rapidly deploy PHP on the system that I am using for my demos. The batch file usually takes less than a second to run, which always seems to amaze people in the audience. As a result, I usually have several people ask me for my batch file after each presentation, so I thought that it would make a good subject for today's blog.
I should mention that I have used this batch file in order to demonstrate PHP with IIS in a variety of scenarios, and one of my favorite demos is when I would borrow someone's laptop and plug in a flash drive where I had IIS Express pre-installed, and then I would run the batch file in this blog to deploy PHP. Next I would launch IIS Express, open a web browser on their system, and then browse to http://localhost/ in order to show that IIS Express was working correctly. Lastly I would write a simple PHP "Hello World" page to show that PHP was up-and-running on their system in a matter of seconds.
That being said, I have to point out that there is a very important prerequisite that you must have in order to follow the steps in the blog: you need to start with a known-good installation of PHP from one of your systems, and I'll explain what I mean by that.
My batch file expects to find a folder containing ready-to-run files for PHP in order to deploy PHP on a new system. I originally obtained my PHP files by using the Web Platform Installer (WebPI) to install PHP, and then I copied the files to my flash drive or some other repository. (Note that WebPI usually installs PHP in the "%ProgramFiles(x86)%\PHP" folder.) If you don't want to use WebPI, you can also download PHP from http://windows.php.net/, but you're on your own for configuration.
Once I have the files from a known-good installation of PHP, I create the following folder structure in the location where I will be storing the files that I use to deploy PHP on other systems:
- <root folder>
- SETUP_PHP.cmd (the batch file from this blog)
- PHP (the folder containing the PHP files)
- PHP.INI
- PHP-CGI.EXE
- etc. (all of the remaining PHP files and folders)
One thing to note is that the PHP.INI file you use may contain paths which refer to specific directories on the system from which you are copying your PHP files, so you need to make sure that those paths will exist on the system where you deploy PHP.
Here is an example: when I used WebPI to install PHP 5.5 on a system with IIS, it installed PHP into my "%ProgramFiles(x86)%\PHP\v5.5" folder. During the installation process, WebPI updated the PHP file to reflect any paths that need to be defined. At the time that I put together my notes for this blog, those updates mainly applied to the path where PHP expects to find it's extensions:
extension_dir="C:\Program Files (x86)\PHP\v5.5\ext\"
What this means is - if you want to deploy PHP to some other path on subsequent systems, you will need to update at least that line in the PHP.INI file that you are using to deploy PHP. In my particular case, I prefer to deploy PHP to the "%SystemDrive%\PHP" path, but it can be anywhere as long as you update everything accordingly.
The following batch file will deploy the PHP files in the "%SystemDrive%\PHP" folder on your system, and then it will update IIS with the necessary settings for this PHP deployment to work:
@echo off

REM Change to the installation folder
pushd "%~dp0"

REM Cheap test to see if IIS is installed
if exist "%SystemRoot%\System32\inetsrv" (
  REM Check for the PHP installation files in a subfolder
  if exist "%~dp0PHP" (
    REM Check for an existing installation of PHP
    if not exist "%SystemDrive%\PHP" (
      REM Create the folder for PHP
      md "%SystemDrive%\PHP"
      REM Deploy the PHP files
      xcopy /erhky "%~dp0PHP\*" "%SystemDrive%\PHP"
    )
    pushd "%SystemRoot%\System32\inetsrv"
    REM Configure the IIS settings for PHP
    appcmd.exe set config -section:system.webServer/fastCgi /+"[fullPath='%SystemDrive%\PHP\php-cgi.exe',monitorChangesTo='php.ini',activityTimeout='600',requestTimeout='600',instanceMaxRequests='10000']" /commit:apphost
    appcmd.exe set config -section:system.webServer/fastCgi /+"[fullPath='%SystemDrive%\PHP\php-cgi.exe',monitorChangesTo='php.ini',activityTimeout='600',requestTimeout='600',instanceMaxRequests='10000'].environmentVariables.[name='PHP_FCGI_MAX_REQUESTS',value='10000']" /commit:apphost
    appcmd.exe set config -section:system.webServer/fastCgi /+"[fullPath='%SystemDrive%\PHP\php-cgi.exe',monitorChangesTo='php.ini',activityTimeout='600',requestTimeout='600',instanceMaxRequests='10000'].environmentVariables.[name='PHPRC',value='%SystemDrive%\PHP']" /commit:apphost
    appcmd.exe set config -section:system.webServer/handlers /+"[name='PHP_via_FastCGI',path='*.php',verb='GET,HEAD,POST',modules='FastCgiModule',scriptProcessor='%SystemDrive%\PHP\php-cgi.exe',resourceType='Either']" /commit:apphost
    popd
  )
)
popd
Once you have all of that in place, it usually takes less than a second to deploy PHP, which is why so many people seem interested during my presentations.
Note that you can deploy PHP for IIS Express just as easily by updating the "%SystemRoot%\System32\inetsrv" paths in the batch file to "%ProgramFiles%\IIS Express" or "%ProgramFiles(x86)%\IIS Express" paths. You can also use this batch file as part of a deployment process for PHP within a web farm; in which case, you will need to pay attention to the paths inside your PHP.INI file which I mentioned earlier.
Note: This blog was originally posted at http://blogs.msdn.com/robert_mcmurray/
How Hippies Destroyed America
30 January 2014 • by Bob • Politics, Rants
Someone recently posted the following image on Facebook, and even though I know they were simply trying to be amusing, I found it highly offensive... (for reasons which I will explain in a moment).

Unfortunately, posting an image such as this reveals how little someone actually knows about how much damage "Flower Power" and the so-called "Love Movement" did to America. While hippies may have been right about some things, (like environmental responsibility and ecological activism), they were dead wrong about most others. Here is a brief summary of a few of the lasting effects that the single generation of 1960s-era youth had on society: an out-of-control drug culture, the unchecked rise in numerous sexually-transmitted diseases, hundreds of thousands of PTSD cases of veterans traumatized by counter-culture attacks, and the embarrassment of our nation in the eyes of the rest of the world.
When you follow the emergence of the hippie movement, it is one that outwardly preached living in harmony with all of society, and yet inwardly its actualization was one of extreme selfishness and unbridled, destructive power. Timothy Leary's invitation to "Turn On, Tune In, Drop Out" encouraged a generation of youth to abstain from any semblance of civil and moral responsibility in favor of seeking personal, self-centered desires. In the span of a few short years, the hippies managed to negate nearly all of the hard-won victories of our country's "Greatest Generation," (those who banded together to survive the Great Depression and win the Second World War). Our country descended from an industrious world leader populated by hard-working, family-oriented citizens to a vicious brood of misguided, distrustful, lazy, addicted, self-worshippers.
Like much of the hippie movement, the so-called "Summer of Love" is something of an oxymoron, because it achieved the opposite of its intended goals. When thousands of lost youths descended on the Haight-Ashbury district of San Francisco, they did so with bold proclamations of free love, uninhibited creativity, and peace-for-all. Yet the size of this group collapsed the infrastructure of the local area, which was unprepared to deal with the sudden arrival of thousands of drugged-out, socially irresponsible vagrants. This should have been one of society's first warnings about the pure selfishness of the hippy mindset, but this event was largely ignored by anyone except other teenagers and twenty-somethings who were tired of listening to their parents telling them to grow up, get a job, and contribute something to society other than folk songs and clouds of pot smoke.
One of the rallying cries for the hippie movement was a general objection to the Vietnam War, and while I agree that anyone in their right mind should oppose war as best as possible, the hippies reacted in the worst possible way. Instead of gathering peacefully across the country, hippies engaged in numerous cases of what would now be referred to as "Domestic Terrorism." In their naïveté, thousands of youths openly proclaimed their support for Marxism/Leninism/Communism to overthrow the government of the United States, even though none of these impressionable youths had ever lived under such oppressive regimes, and many of these same degenerates would not have lasted a year if they had emigrated to the USSR.
Please do not misunderstand me - I fully support the right to peaceful assembly and vociferously objecting to war, both then and now, but there are proper ways to do so - and conversely, there are improper ways to be avoided. For example: hippies used to call my mom in the late 1960s while my dad was stationed in Vietnam, and they would pretend to be the Department of the Air Force calling to inform my mom that my dad had been killed in combat. This happened many, many times - and she would hug my brothers and me as she wept inconsolably for hours; my mom's life was probably shortened by several years due to insufferable grief caused by the heinously evil and unnecessary actions of these particular vermin who called themselves hippies.

There are two things that can be learned from the hippies' response to the Vietnam War:
- War is a terrible thing which motivates some people to do terrible things.
- The way some people choose to protest war is far worse.
Tragically, my experiences were not isolated incidents; the history of the Vietnam War on the home front is rife with examples of the complete failure on the part of the hippy movement to make their protests known while still treating veterans returning from battle like fellow human beings. (Many of these veterans were draftees instead of volunteers, and therefore they had no say in their years of military service.)
Some of the most-damaging aspects of hippie culture were the concepts of "Open Marriages," "Free Love," etc. In their efforts to rid themselves of any vestige of what they believed were their parents' outdated sensibilities, hippies managed to convince themselves that committed, monogamous relationships were a thing of the past, and they substituted "Do What Feels Good For You" casual relationships in their place. There is an age-old axiom which states, "Why buy the cow when the milk is free," and in keeping with that notion, the men of the hippy generation managed to convince the women of that era to abandon their morality in what was probably the most-condescending deception of women in the history of the United States. To quote Steve Martin, "Free Love ... was the single greatest concept a young man has ever heard. This was a time when intercourse, or some version of it, was a way of saying hello. About three years later, women got wise and my frustration returned to normal levels (Martin 2007, 100)." Despite the ill-guided assertions that the hippy movement gave birth to the Women's Liberation movement of the following decade, male hippies treated their female counterparts little better than objects for their own, self-desires. As a direct result, a conflagration of sexually-transmitted diseases spread across the country like a raging inferno, divorce rates skyrocketed, and millions of children were forced to grow up in single-parent homes due to the hippy-based philosophy that marriages need not be permanent.
Ultimately the hippy movement was a complete failure of society on both sides of equation: the hippies failed to behave in any fashion which reflects the better ideals of humanity, and the United States' government failed to effectively respond to the subculture which infested much of the Baby Boomer generation. Our nation still bears numerous scars from societal wounds inflicted by the selfish and amoral youth of the 1960s, and history will eventually reveal that their actions irrevocably damaged the fabric of our culture and hastened the demise of our once-great country.
On a personal note - forty-five years have passed since the time when my family was individually targeted and tormented by faceless cowards who publicly preached love for their fellow man while privately living for their own selfish gains. I have neither forgiven nor forgotten the traumatic pain that these so-called "Peace Loving Hippies" caused my family and our nation to suffer.
Martin, Steve. Born Standing Up: A Comic's Life. New York, NY: Simon & Shuster, Inc., 2007.
SkyDrive is an Abysmal Failure in Windows 8.1
30 January 2014 • by Bob • SkyDrive
OK - I have to admit, I have used SkyDrive for several years now, and I have learned to become dependent on it because I like having several of my files easily accessible everywhere I go and on every device.
Apparently that was a big mistake on my part, because the SkyDrive team at Microsoft has slowly made SkyDrive a piece of crap. Having just set up my laptop with a brand-new installation of Windows 8.1 (which I installed from scratch), I can honestly say that SkyDrive in Windows 8.1 is now a complete failure as far as I am concerned. So unfortunately I'm probably going to have to switch to a third-party cloud storage application - and that sucks.
Before I discuss what's screwed up with SkyDrive in Windows 8.1, I should first mention that Microsoft used to make Windows Live Mesh, which was much better than SkyDrive. Mesh allowed you to choose any folder on your system and synchronize it across any machine that you specified. (In contrast, SkyDrive only synchronizes folders which are directly beneath the parent SkyDrive folder.) What's more, Mesh had a built-in remote desktop feature that was much like the built-in Windows Remote Desktop functionality - except that it actually worked. (If you've ever tried to manage a firewall and get the built-in Windows Remote Desktop functionality working over the Internet through your firewall and across a NAT, you know what I mean.) Unfortunately Microsoft's long-standing policy appears to be the following: if Microsoft has two competing technologies, choose the lesser of the two and ship that, and then deprecate the better technology. (At least that's what happened with SkyDrive and Mesh.)
Anyway - here are just a few of things things that are screwed up about SkyDrive in Windows 8.1:
In Windows 7, you had to manually choose to install the SkyDrive desktop functionality, so this was an opt-in feature. Of course, I installed SkyDrive, and I used it often. Unlike Windows Live Mesh, you had to drop files in the SkyDrive folder, which was really inconvenient. But that's also the way that DropBox works, so I'm sure that's what the engineers who were designing SkyDrive were trying to emulate.
In any event, after I installed SkyDrive on several of my systems, all of my SkyDrive-based files were physically stored on each of my local systems, and they were adequately synchronized across all machines where I installed SkyDrive. If I wanted to temporarily disable SkyDrive on any system, I could right-click on the SkyDrive System Tray icon and choose to close it.
However, once I installed Windows 8.1, everything changed. First of all SkyDrive is not optional - it's just there, and it appears to be always on. What's worse, my files weren't actually on my laptop anymore; they looked like they were locally stored, but they were more like ghost files which would actually download from the Internet whenever I tried to access a file. This was a pain in the butt for the system utilities which I was storing in my SkyDrive - most of them ceased to function because the EXE would download, but none of the supplemental DLL files would. As a direct result, all of my system utilities failed to run.
After some poking around I discovered that I could right-click on the SkyDrive folder and choose to make it available offline, which worked - albeit with hours of waiting for 25GB of files to download over Wi-Fi. But I need to point out that I had to go out of my way to make SkyDrive work the way that it used to; and more importantly, I had to discover on my own how to make something work the way that it always did in the past. This is known as a "Breaking Change," although I prefer to call that "Bad Design."
But today is when everything went from bad to worse. I needed to go to an appointment, so I brought my laptop with me because I thought that I would be able to do some work while I waited for my scheduled appointment time. I had a folder in my SkyDrive with some work-related files in it, so this seemed like something that should just work.
But it didn't work. In fact, it failed miserably.
What happened is this: I arrived at my appointment and booted my laptop, but when I opened my SkyDrive folder, everything was missing. Needless to say, I was more than a little alarmed. I opened Windows Explorer and navigated to the folder for my user profile, where I saw two folders that were both named "SkyDrive." Since Windows does not allow two folders with the same name in the same directory, I knew that this was a display anomaly which was probably caused by identical desktop.ini files in the two SkyDrive directories. I opened a command prompt and changed directories to my user profile folder, and the directory listing showed two folders: "SkyDrive" and SkyDrive (2)".
So I was correct in my assumption, and I verbally expressed my exasperation on the idiocy of this situation. ("What the heck...? Those stupid sons-of-biscuits...") I could immediately tell that Windows 8.1 had screwed something up, and my life was going to suck until I sorted it out.
I will spare you the details for everything that I tried to do, but it involved a lot of copying & renaming of files & folders - and after several hours of troubleshooting I still didn't have it resolved. But just to make things worse, while I was doing my troubleshooting I discovered that I suddenly had three folders under my user profile: "SkyDrive" and SkyDrive (2)," and "SkyDrive.old". I searched the Internet, and I found out that a lot of users have seen this problem.
A... lot... of... users...
There seemed to be two common consensuses: 1) this was clearly a bug in SkyDrive on Windows 8.1, and 2) SkyDrive now sucks for this reason.
One thing became clear to me: SkyDrive was going to continue to make my life miserable until I got it out of the way long enough for me to fix things. If you do some searching on the Internet, you can find ways to disable SkyDrive through Windows group policy, but I didn't want it permanently disabled - I just wanted it out of the way long enough to sort out the problem with multiple folders. Incidentally, logging out as my user account and logging in as the local administrator account did not make this easier since SkyDrive.exe runs at the system level.
Eventually I had to resort to backing up all of my multiple SkyDrive folders to an alternate location, and then running the following batch file while I manually cleaned up the multiple folders:
@echo off
:here
for %%a in (explorer.exe skydrive.exe) do (
   wmic process where name='%%a' call terminate
)
goto :here
Note that I had to put these process termination statements in a loop because Windows would keep restarting both executables, thereby thwarting any repairs that I had managed to start.
Yes, this is a lame and prosaic approach to solving this problem, but releasing a major breaking change to a service upon which you hope everyone will depend is pretty darn lame, too. And making the new service so heinously awful that it's barely usable is unforgivably lame.
Eventually I got everything sorted out, and I would love to be able to write something definitive like, "You need to do X and Y and your system will be better." But truth-be-told, I spent so many hours trying so many things that I cannot be certain which specific steps resolved the issue. And I'm not about to attempt setting up a repro environment to test which steps to take. Sorry about that - but I simply don't want to mess with things now that I have SkyDrive working again.
Meryl Streep and the Most-Vilified Segments of Society
09 January 2014 • by Bob • Rants
At last night's 74th Golden Globes Awards, Meryl Streep had the audacity to compare the occasional inconveniences of Hollywood elites to the suffering of immigrants when she was delivering an acceptance speech for yet another unnecessary award. However, my sarcasm and rhetoric cannot do justice to just how out-of-touch Ms. Streep is with reality; here are the ridiculous thoughts she actually uttered out loud before a crowded auditorium:
"All of us in this room, really, belong to the most-vilified segments in American society right now. Think about it: Hollywood, Foreigners, and the Press."
First of all, it simply amazes me that Ms. Streep cannot comprehend the irony of equating whatever fake oppression she believes she is experiencing with the real-life suffering of others while standing onstage at another over-the-top example of Hollywood's infatuation with itself. Awards shows like the Golden Globes are - of course - nothing more than another opportunity for self-indulged entertainers to fall in love with themselves all over again. Judging by the number of times per year that Hollywood entertainers need to pat themselves on the back for doing their jobs, you quickly get the impression that they are anything but a vilified segment of American society. (Hollywood types are, however, incredibly insecure cry-babies with delusions of grandeur, but I digress.)
Think about it, no other career field - not even professional sports - has anywhere near the number of awards shows that Hollywood film, television, and music entertainers have for themselves every year. Here is only a partial list:
AACTA Awards, Academy Awards (The Oscars), Academy of Country Music Awards, ACTRA Awards, Alternative Press Music Awards, Amanda Awards, American Academy of Arts and Letters Gold Medal in Music, American Country Awards, American Country Countdown Awards, American Music Award, ARIA Music Awards, ASCAP awards , Atlanta International Film Festival, Awit Awards, Back Stage Garland Awards, BAFTA Anthony Asquith Award, BET Awards, Billboard Awards, Billboard Music Awards, Brit Awards, British Academy Film Awards, British Academy Television Awards, British Composer Awards, Canadian Cinema Editors Awards, Canadian Screen Awards, Cannes Lions International Advertising Festival awards, CMT Music Awards, Comet, Country Music Association Awards, Country Music Awards of Australia, Critics' Choice Movie Awards, Critics' Choice Television Awards, Directors Guild of Canada Awards, Distinguished Service to Music Medal, Donaldson Awards, Drama-Logue Awards, Drama Desk Awards, Drama League Awards, Edward R. Murrow Awards, Emmy Awards (Creative Arts), Emmy Awards (Daytime), Emmy Awards (Primetime), Emmy Awards (Sports), European Film Awards, Evening Standard Awards, Filipino Academy of Movie Arts and Sciences Awards, Filmfare Awards, FIPA awards, Game Show Awards, George Peabody Medal, GLAAD Media Awards, GLAAD Media Awards, Gold Badge Awards, Golden Bear, Golden Globe Awards, Golden Leopard, Golden Lion, Golden Melody Awards, Golden Nymph Awards, Golden Orange, Goldene Kamera, Governors Awards, Goya Awards, Gracie Allen Awards, Grammy Awards, Grand Prix du Disque, Grawemeyer Award for Music Composition, Grimme Preis, Handel Music Prize, Herbert von Karajan Music Prize, Hollywood Walk of Fame, Humanitas Prize, Independent Spirit Awards, Indonesian Film Festival, International Indian Film Academy Awards, Iris Awards, Ivor Novello Awards, Juno Awards, LA Weekly Theatre Awards, Latin Grammy Award, Laurence Olivier Awards, Leo Awards, Logie Awards, Lola Awards, Los Angeles Drama Critics Circle Award, Los Premios MTV Latinoamérica, Lucille Lortel Awards, Léonie Sonning Music Prize, MOBO Awards, MTV Africa Music Awards, MTV Asia Awards, MTV Australia Awards, MTV Europe Music Awards, MTV Movie & TV Awards, MTV Video Music Awards, National Dance Awards, National Film Awards, National Television Awards, New York Drama Critics' Circle Awards, New York Film Festival, Obie Awards, Otaka Prize, Outer Critics Circle Awards, Ovation Awards, Palme d'Or (Cannes Film Festival), Peabody Awards, Polar Music Prize, Praemium Imperiale, Prix de Rome, Pulitzer Prize for Drama, Pulitzer Prize for Music, Royal Television Society Awards, San Diego Film Awards, Sanremo Music Festival, Sarah Siddons Award, Screen Actors Guild Awards, Shooting Stars Award, Sibelius Prize, Stellar Awards, Suntory Music Award, Theatre World Award, Tony Awards, Young Artist Awards, YouTube Music Awards, etc., etc., etc.
And these awards are simply for doing their jobs. While I recognize the fact that such awards are ostensibly being given to those who did the best job for the year, it's still an award for doing something that often does not require that much skill. Seriously. It takes very little talent to pretend to be someone else for a few days per year. The guy who recently fixed the air conditioner in my house has arguably more skills than many of the Hollywood A-Listers. But then again, the guy who fixed my air conditioner doesn't get any awards for doing his job; he gets paid. Of course, he probably only made a few hundred dollars while working for me, whereas Ms. Streep makes millions of dollars every time she steps in front of the cameras to do something that any number of struggling actors could undoubtedly do better.
And yet Ms. Streep is oblivious to just how ridiculous she sounds when she compares her life of awards shows, exorbitant salaries, first class jet-setting around the globe, designer gowns, luxury hotels, and palatial mansions to the sufferings of refugees and immigrants. I find it difficult to believe how someone - how anyone - could be that self-absorbed.
Contrary to her feelings on the matter, Ms. Streep is not a member of a vilified segment of American society; but she should be.
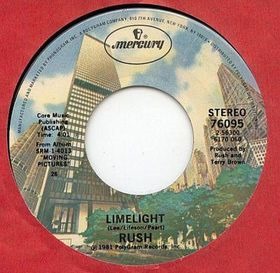
Rush - The Greatest Band Ever
31 December 2013 • by Bob • Music
I was watching the Rush Clockwork Angels Tour on DVD earlier today, and the video reminded me of a story that illustrates why I have always liked Rush, and why they have always been an atypical band.

Back in the early 1980s I saw Rush in concert several times; with each new Rush album would come a new Rush tour, and I caught every Rush show that I could. On one occasion, (I believe it was the Power Windows tour), I was at the front of the crowd directly in front of Alex Lifeson and hugging the barricade that separated audience from entertainers. In something that must be a performance rarity within the music business, the girl beside me and I actually carried on a conversation with Alex throughout the show.

Here's one such example - after Alex played a guitar solo, the girl next to me held up one hand with the international "you're number one" symbol and yelled, "You're the greatest!" Alex looked surprised, stepped back, shook his head, pointed to himself between chords, and mouthed the words, "Me? No - I don't think so..."

The next song was Limelight, which contains one of my favorite guitar solos. As Alex nailed the final notes of the solo, he looked to me and shrugged his shoulders as if to ask, "How was that?" I held up a hand with the international "OK" symbol, and I yelled, "That was pretty good!" Alex smiled and nodded, and then he replied, "Okay, I can accept that."
And that was how the rest of the show went - the anonymous girl and I commented on every song or solo, and Alex kept us entertained by his reactions. But the over-arching thing that I realized during that concert was: Alex was just a normal guy.
Despite being one of the central figures in one of the most-talented rock groups in history; Alex wasn't putting on airs, and he wasn't acting like a big rock star. Instead, he was down-playing our compliments, and playfully joking with audience members. I think that's one of the things that has endeared the members of Rush to their fans over the years: despite having earned a host of accolades, they seem indifferent and almost embarrassed by praise.

Humility in greatness - that's such a rare thing in today's self-absorbed entertainment industry, and one more reason why Rush is one of the greatest rock bands in history.
Building a Faux Fireplace for the Christmas Season
22 December 2013 • by Bob • Projects
My wife and I moved back to Arizona this past summer, and fireplaces are pretty scare here because it's generally warm for most of the winter. For example, this is the week of Christmas, and the temperatures are still in the high-60s Fahrenheit. Even though we're well into December and the rest of the country is contending with winter snow, I'm walking around in shorts and a Hawaiian shirt. So it's pretty easy to see why a fireplace isn't a selling feature for most homes in Arizona; in fact, it's often more of a nuisance.
But that being said, a lack of a fireplace has a few drawbacks during the Christmas season - and a primary downside was voiced by my wife when she recently asked, "Where are we going to hang our Christmas stockings this year?"
I have to admit - I hadn't given much thought to that question before, and I certainly wouldn't have bought a house with a fireplace just to have a place to hang stockings for a few weeks each year. Just the same, I started thinking about a way to rectify our miniscule first-world problem. My wife had travel plans that would have her out of the house for the first weekend in December, and that provided me with ample opportunity to hatch a scheme where I could do something about our stocking situation and surprise my spouse.
In case you were wondering, you read that correctly - my wife left me alone for the weekend and I spent it building a faux fireplace for her. Some guys would relish the opportunity to watch non-stop sports or action movies without having to fight for the remote, while other guys would head off to the mountains for some quality fishing or hunting. But as for me - I chose to spend my weekend wandering the aisles of my local Home Depot, Lowes, and Ace Hardware stores while picking out various parts to build something that was kind of geeky. Yup, that's just the kind of guy I am - deal with it.
Why Build a Fireplace?
First of all - why not? It's fun to build something every once in a while. ;-]
That being said, there are many different kinds of artificial fireplaces that are available on the market, but none of those met the requirements that I wanted to address:
- I didn't want the fireplace to generate any actual heat. Sure, most heat-producing artificial fireplaces will allow you to turn off the heat and simply enjoy the fake fire, but that would have denied me the opportunity to build something - and where's the fun in buying something when you can give up your weekend to build it? (Okay, I'll admit it - perhaps buying something occasionally works into your schedule a little better.)
- I wanted a fireplace that would be four-feet wide by four-feet tall, yet shallow enough to easily allow pedestrian traffic to walk past it. Several store-bought artificial fireplaces were close to those dimensions, but I usually didn't like something or other about them.
- I wanted a fireplace that could be disassembled at the end of the Christmas season so I could store it easily until next year. This was the clincher - none of the fireplaces that I looked at seemed to have a way to do this; all of the models that I looked at were designed to stay assembled forever. If a fake fireplace was on wheels, (and some were), I could push it into the garage for the next 11 months, but that would take up too much room.
In the end, building my own fireplace seemed to make the most sense to me. And if I ever decide that I'm done with it, I'm sure that I can donate to some high school's Drama Department. ;-]
Designing and Building the Fireplace
Once I had decided to build my own fireplace, the first thing that I had to do was get some fake fireplace logs. There are dozens of variations available, so that step was pretty easy - I just had to pick a set that seemed reasonable. Once I had purchased the fake logs for the fireplace, that gave me the dimensions that I would need to build the fireplace.
The next thing that I needed to do was to come up with a construction plan - which I didn't actually do. I had a general idea of what I wanted the end result to be, but it certainly wasn't a fully-formed proposal. I figured that I would wander into my local Home Depot or Lowes and wander aimlessly through the aisles until something a little more solid popped into my head, and that's pretty much what I did - with one exception: I called my dad and asked if he wanted to come along for what was undoubtedly going to be a weird construction project, and he agreed. ;-]
When we arrived at the hardware store, we headed to the lumber section, where I proceeded to explain the general concept that I had been pondering for the past few days. Between the two of us, we looked at all of our options based on the wood that was available, and we came up with a design that somewhat resembled what I had been thinking - albeit with some cool revisions.
The general design that we came up with was to create four rectangular boxes that stacked to create a square frame:
- One horizontal base box: 48-inch wide x 16-inch deep x 5-inch tall
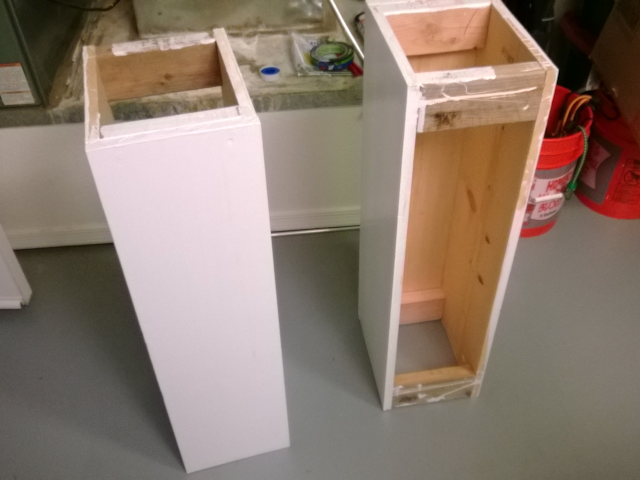
- Two vertical left and right boxes: 9.25-inch wide x 12-inch deep x 34-inch tall
- One horizontal crown box: 48-inch wide x 12-inch deep x 9-inch tall
Since we were basically making this up as we went along, there were a few "aha" moments where we realized that our plan wasn't going to work for some reason or other, so we changed the design several times during construction. One of the great ideas that my dad came up with was to use a single 48-inch x 48-inch x 0.5-inch board as the backing for the entire project, and that worked out great; it gave support to the whole structure, and it allowed me to use textured paint it so that it looked the inside of a fireplace.
The construction was pretty straightforward - my dad and I hauled all of the raw materials to his house, where we measured the wood and we used his table saw to cut everything to size. We started by creating the base, and once we had that built, we created the left and right sides, and we followed that by creating the crown. After we put the boxes together to see what the general idea would look like, we came up with the idea of adding the facade around the crown to give it a more finished look, and we decided to add a single piece of horizontal wood as mantle, which would extend beyond the edges of the crown. Once we had all of the boxes created, I took all of the parts home where I painted everything before the final construction.
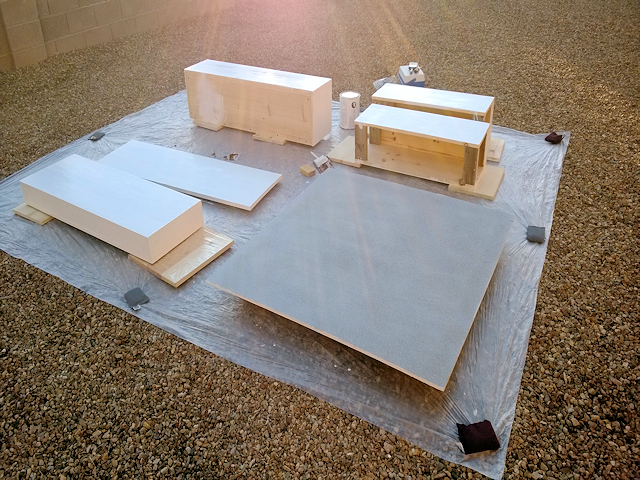
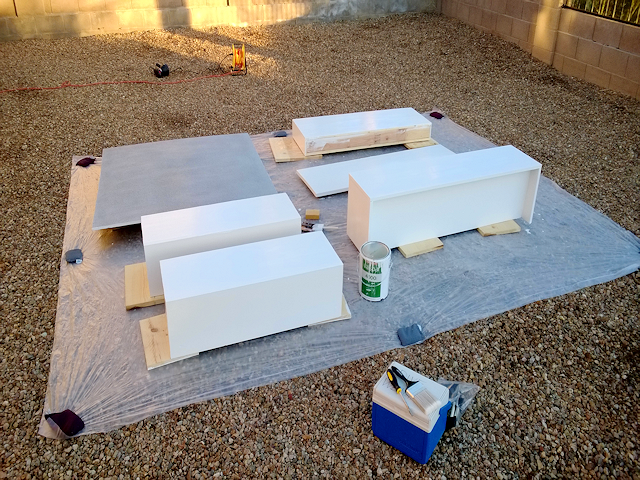
With that in mind, here are a few photographs from the latter part of the construction process:
These first few images are obviously from the painting process, and if you look closely you'll notice my ingenious use of my lead-pellet scuba diving weights to hold down the tarp. (I have no other use for those scuba diving weights since I can no longer bring those on dive trips due to TSA-induced weight restrictions, but that's another story for another day.)
This next photo is a close-up of the front and back views for the left and right vertical boxes.
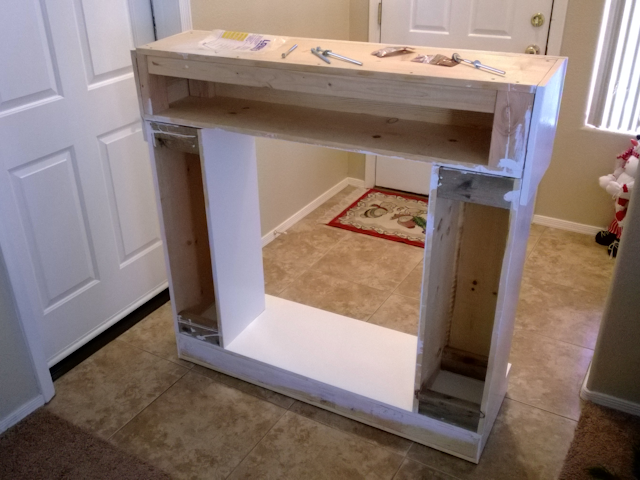
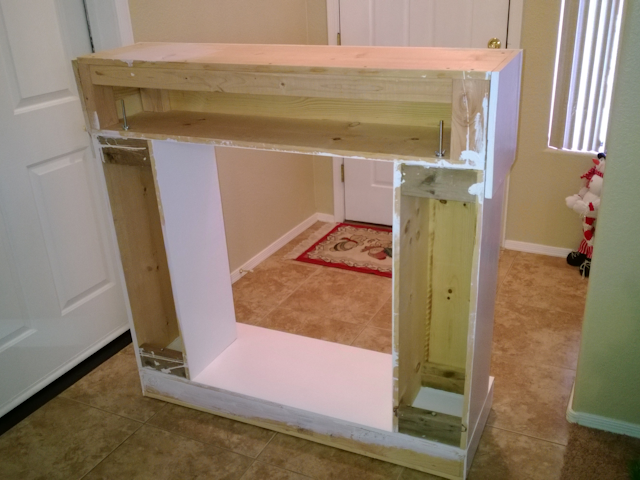
These next two photos are before-and-after shots of the partially-constructed fireplace, as seen from the back. After I had the pieces stacked correctly, I drilled holes between the different parts and secured them together with lag bolts and wing nuts.
Parts List for the Fireplace
I used several two-by-fours in this construction because the wood for the siding was fairly thin, so using two-by-fours inside the pieces allowed me to drill deeper holes and use 1.5-inch wood screws to bolt together the pieces. That being said, remember that a two-by-four is actually a 3.5-inch by 1.5-inch piece of wood, so you need to take that into account when you are measuring for wood projects. ;-]
- Backing Board:
- One 48-inch x 48-inch x 0.5-inch board (plywood is fine)
- Base Box:
- Two 48-inch x 16-inch x 0.75-inch boards (Top & Bottom)
- One 48-inch x 3.5-inch x 0.75-inch board (Front Facade)
- Two 15.25-inch x 3.5-inch x 0.75-inch boards (Left & Right Sides)
- Two 46.25-inch x 3.5-inch x 1.5-inch boards (Front Inside [behind Facade] and Back Inside); these are "two-by-fours" that are used for support
- Left-Side Box:
- One 34-inch x 9.25-inch x 0.75-inch board (Front Facade)
- Two 34-inch x 11.25-inch x 0.75-inch boards (Left & Right Sides)
- Four 7.75-inch x 3.5-inch x 1.5-inch boards (Top & Bottom Inside Front [behind Facade] and Top & Bottom Inside Back); these are "two-by-fours" that are used for support
- Right-Side Box:
- One 34-inch x 9.25-inch x 0.75-inch board (Front Facade)
- Two 34-inch x 11.25-inch x 0.75-inch boards (Left & Right Sides)
- Four 7.75-inch x 3.5-inch x 1.5-inch boards (Top & Bottom Inside Front [behind Facade] and Top & Bottom Inside Back); these are "two-by-fours" that are used for support
- Crown Box:
- Two 48-inch x 12-inch x 0.75-inch boards (Top & Bottom)
- Four 7.5-inch x 3.5-inch x 1.5-inch boards (Top & Bottom Inside Front [behind Facade] and Top & Bottom Inside Back); these are "two-by-fours" that are used for support
- One 43.5-inch x 3.5-inch x 1.5-inch board (Top Inside Back); this is a "two-by-four" that is used for additional support
- Crown Box Facade:
- One 48-inch x 12-inch x 0.75-inch board (Front)
- Two 12-inch x 12.5-inch x 0.75-inch boards (Left & Right Sides)
- Mantle:
- One 55-inch x 16-inch x 0.75-inch board (secured to the top of the Crown Box)
- Miscellaneous:
- 8 x plastic feet (for the bottom of the base box)
- 1 gallon of white semi-gloss paint (for the boxes and mantel)
- 1 can of flat gray spray primer (for the backing board)
- 1 can of rough-textured gray spray paint (for the backing board)
Creating the Grate
I could have bought an actual fireplace grate upon which to rest the fake fireplace logs, but those are usually made from wrought iron because they need to stand up to the heat of an actual fire. Using a real grate would also add a bunch of unnecessary weight to the overall project, and storing the grate would be a pain. With that in mind, I decided to create my own out of PVC pipe because it would be considerably lighter, and it afforded me the option to disassemble grate for storage later.
I chose to use 1.5-inch PVC pipe to construct the grate, and here is the list of parts for that part of the project:
- Lots of measured PVC cuts:
- 36 x 1.5-inch (for joining crosses/elbows and caps)
- 7 x 4.5-inch (between the front and back halves)
- 8 x 4-inch (for the legs)
- PVC connectors:
- 18 x 90-degree elbows
- 14 x crosses
- 10 x caps (three on the front and back, two on the right and left sides)
- Miscellaneous:
- PVC cement
- 8 x 1.5-inch rubber feet (for the bottom of the legs)
- I can of flat black spray paint
It took me a long time to cut all of the PVC pipe, and I had enough materials for me to cut a few different lengths for the legs in order to see what the grate looked like at a few different heights. In the end I decided on a 4-inch height for the legs - this seemed to look the best to me. Once I had everything cut, I assembled it just to make sure that everything was going to fit together, then I disassembled it and used the PVC cement to secure the parts of the construction that I didn't want slipping over time (like the legs). Once I reassembled the grate and painted it, I could still disassemble several parts of the grate if I wanted to do so, but I'll probably store the grate intact just to keep the parts together.

Official Unveiling
Despite having worked the entire construction weekend, I still wasn't quite done when Kathleen was due home, so I assembled what I had without bolting everything together. (I still had some final painting to do, and I had some decorative trim that I was still considering for the project.) Just the same, it was far enough along that I could put all of the pieces together and surprise Kathleen when she arrived. She unwittingly gave me a great compliment when asked where I had bought the fireplace. ;-]
Still, I had some work left to do and some changes that I wanted to make - so after leaving the fireplace set up for a week or so, I disassembled it, changed out some of the wood, repainted everything with several additional coats of paint, and I reassembled it.
Here's what the completed project looks like:

This was a great project to build, and it's always fun to work on a project with my dad. But the most important result was - of course - that Kathleen now has a place to hang her Christmas stockings. ;-]
Revisiting My Classic ASP and URL Rewrite for Dynamic SEO Functionality Examples
20 November 2013 • by Bob • Classic ASP, IIS, SEO, URL Rewrite
Last year I wrote a blog titled Using Classic ASP and URL Rewrite for Dynamic SEO Functionality, in which I described how you could combine Classic ASP and the URL Rewrite module for IIS to dynamically create Robots.txt and Sitemap.xml files for your website, thereby helping with your Search Engine Optimization (SEO) results. A few weeks ago I had a follow-up question that I thought was worth answering in a blog post.
Overview
Here is the question that I was asked:
"What if I don't want to include all dynamic pages in sitemap.xml but only a select few or some in certain directories because I don't want bots to crawl all of them. What can I do?"
That's a great question, and it wasn't tremendously difficult for me to update my original code samples to address this request. First of all, the majority of the code from my last blog will remain unchanged - here's the file by file breakdown for the changes that need made:
| Filename | Changes |
|---|---|
| Robots.asp | None |
| Sitemap.asp | See the sample later in this blog |
| Web.config | None |
So if you are already using the files from my original blog, no changes need to be made to your Robot.asp file or the URL Rewrite rules in your Web.config file because the question only concerns the files that are returned in the the output for Sitemap.xml.
Updating the Necessary Files
The good news it, I wrote most of the heavy duty code in my last blog - there were only a few changes that needed to made in order to accommodate the requested functionality. The main difference is that the original Sitemap.asp file used to have a section that recursively parsed the entire website and listed all of the files in the website, whereas this new version moves that section of code into a separate function to which you pass the unique folder name to parse recursively. This allows you to specify only those folders within your website that you want in the resultant sitemap output.
With that being said, here's the new code for the Sitemap.asp file:
<%
    Option Explicit
    On Error Resume Next

    Response.Clear
    Response.Buffer = True
    Response.AddHeader "Connection", "Keep-Alive"
    Response.CacheControl = "public"

    Dim strUrlRoot, strPhysicalRoot, strFormat
    Dim objFSO, objFolder, objFile

    strPhysicalRoot = Server.MapPath("/")
    Set objFSO = Server.CreateObject("Scripting.Filesystemobject")

    strUrlRoot = "http://" & Request.ServerVariables("HTTP_HOST")

    ' Check for XML or TXT format.
    If UCase(Trim(Request("format")))="XML" Then
        strFormat = "XML"
        Response.ContentType = "text/xml"
    Else
        strFormat = "TXT"
        Response.ContentType = "text/plain"
    End If

    ' Add the UTF-8 Byte Order Mark.
    Response.Write Chr(CByte("&hEF"))
    Response.Write Chr(CByte("&hBB"))
    Response.Write Chr(CByte("&hBF"))

    If strFormat = "XML" Then
        Response.Write "<?xml version=""1.0"" encoding=""UTF-8""?>" & vbCrLf
        Response.Write "<urlset xmlns=""http://www.sitemaps.org/schemas/sitemap/0.9"">" & vbCrLf
    End if

    ' Always output the root of the website.
    Call WriteUrl(strUrlRoot,Now,"weekly",strFormat)

    ' Output only specific folders.
    Call ParseFolder("/marketing")
    Call ParseFolder("/sales")
    Call ParseFolder("/hr/jobs")

    ' --------------------------------------------------
    ' End of file system loop.
    ' --------------------------------------------------
    If strFormat = "XML" Then
        Response.Write "</urlset>"
    End If

    Response.End

    ' ======================================================================
    '
    ' Recursively walks a folder path and return URLs based on the
    ' static *.html files that it locates.
    '
    ' strRootFolder = The base path for recursion
    '
    ' ======================================================================

    Sub ParseFolder(strParentFolder)
        On Error Resume Next

        Dim strChildFolders, lngChildFolders
        Dim strUrlRelative, strExt

        ' Get the list of child folders under a parent folder.
        strChildFolders = GetFolderTree(Server.MapPath(strParentFolder))

        ' Loop through the collection of folders.
        For lngChildFolders = 1 to UBound(strChildFolders)
            strUrlRelative = Replace(Mid(strChildFolders(lngChildFolders),Len(strPhysicalRoot)+1),"\","/")
            Set objFolder = objFSO.GetFolder(Server.MapPath("." & strUrlRelative))
            ' Loop through the collection of files.
            For Each objFile in objFolder.Files
                strExt = objFSO.GetExtensionName(objFile.Name)
                If StrComp(strExt,"html",vbTextCompare)=0 Then
                    If StrComp(Left(objFile.Name,6),"google",vbTextCompare)<>0 Then
                        Call WriteUrl(strUrlRoot & strUrlRelative & "/" & objFile.Name, objFile.DateLastModified, "weekly", strFormat)
                    End If
                End If
            Next
        Next

    End Sub

    ' ======================================================================
    '
    ' Outputs a sitemap URL to the client in XML or TXT format.
    '
    ' tmpStrFreq = always|hourly|daily|weekly|monthly|yearly|never
    ' tmpStrFormat = TXT|XML
    '
    ' ======================================================================

    Sub WriteUrl(tmpStrUrl,tmpLastModified,tmpStrFreq,tmpStrFormat)
        On Error Resume Next
        Dim tmpDate : tmpDate = CDate(tmpLastModified)
        ' Check if the request is for XML or TXT and return the appropriate syntax.
        If tmpStrFormat = "XML" Then
            Response.Write " <url>" & vbCrLf
            Response.Write " <loc>" & Server.HtmlEncode(tmpStrUrl) & "</loc>" & vbCrLf
            Response.Write " <lastmod>" & Year(tmpLastModified) & "-" & Right("0" & Month(tmpLastModified),2) & "-" & Right("0" & Day(tmpLastModified),2) & "</lastmod>" & vbCrLf
            Response.Write " <changefreq>" & tmpStrFreq & "</changefreq>" & vbCrLf
            Response.Write " </url>" & vbCrLf
        Else
            Response.Write tmpStrUrl & vbCrLf
        End If
    End Sub

    ' ======================================================================
    '
    ' Returns a string array of folders under a root path
    '
    ' ======================================================================

    Function GetFolderTree(strBaseFolder)
        Dim tmpFolderCount,tmpBaseCount
        Dim tmpFolders()
        Dim tmpFSO,tmpFolder,tmpSubFolder
        ' Define the initial values for the folder counters.
        tmpFolderCount = 1
        tmpBaseCount = 0
        ' Dimension an array to hold the folder names.
        ReDim tmpFolders(1)
        ' Store the root folder in the array.
        tmpFolders(tmpFolderCount) = strBaseFolder
        ' Create file system object.
        Set tmpFSO = Server.CreateObject("Scripting.Filesystemobject")
        ' Loop while we still have folders to process.
        While tmpFolderCount <> tmpBaseCount
            ' Set up a folder object to a base folder.
            Set tmpFolder = tmpFSO.GetFolder(tmpFolders(tmpBaseCount+1))
              ' Loop through the collection of subfolders for the base folder.
            For Each tmpSubFolder In tmpFolder.SubFolders
                ' Increment the folder count.
                tmpFolderCount = tmpFolderCount + 1
                ' Increase the array size
                ReDim Preserve tmpFolders(tmpFolderCount)
                ' Store the folder name in the array.
                tmpFolders(tmpFolderCount) = tmpSubFolder.Path
            Next
            ' Increment the base folder counter.
            tmpBaseCount = tmpBaseCount + 1
        Wend
        GetFolderTree = tmpFolders
    End Function
%>
It should be easily seen that the code is largely unchanged from my previous blog.
In Closing...
One last thing to consider, I didn't make any changes to the Robots.asp file in this blog. But that being said, when you do not want specific paths crawled, you should add rules to your Robots.txt file to disallow those paths. For example, here is a simple Robots.txt file that allows your entire website:
# Robots.txt
# For more information on this file see:
# http://www.robotstxt.org/

# Define the sitemap path
Sitemap: http://www.example.com/sitemap.xml

# Make changes for all web spiders
User-agent: *
Allow: /
Disallow:
If you were going to deny crawling on certain paths, you would need to add the specific paths that you do not want crawled to your Robots.txt file like the following example:
# Robots.txt
# For more information on this file see:
# http://www.robotstxt.org/

# Define the sitemap path
Sitemap: http://www.example.com/sitemap.xml

# Make changes for all web spiders
User-agent: *
Disallow: /foo
Disallow: /bar
With that being said, if you are using my Robots.asp file from my last blog, you would need to update the section of code that defines the paths like my previous example:
Response.Write "# Make changes for all web spiders" & vbCrLf
Response.Write "User-agent: *" & vbCrLf
Response.Write "Disallow: /foo" & vbCrLf
Response.Write "Disallow: /bar" & vbCrLf
I hope this helps. ;-]
Note: This blog was originally posted at http://blogs.msdn.com/robert_mcmurray/