Command-Line Utility to Create BlogEngine.NET Password Hashes
31 January 2015 • by Bob • BlogEngine.NET
I ran into an interesting predicament the other day, and I thought that both the situation and my solution were worth sharing. Here's the scenario: I host websites for several family members and friends, and one of my family member's uses BlogEngine.NET for her blog. (As you may have seen in my previous blogs, I'm a big fan of BlogEngine.NET.) In any event, she forgot her password, so I logged into the admin section of her website, only to discover that there was no way for me to reset her password – I could only reset my password. Since it's my webserver, I have access to the physical files, so I decided to write a simple utility that can create the requisite SHA256/BASE64 password hashes that BlogEngine.NET uses, and then I can manually update the Users.xml file with new password hashes as I create them.
With that in mind, here is the code for the command-line utility:
using System;
using System.Collections.Generic;
using System.Linq;
using System.Security.Cryptography;
using System.Text;
using System.Threading.Tasks;

namespace BlogEnginePasswordHash
{
  class Program
  {
    static void Main(string[] args)
    {
      // Verify that a single argument was passed to the application...
      if (args.Length != 1)
      {
        // ...if not, reply with generic help message.
        Console.WriteLine("\nUSAGE: BlogEnginePasswordHash <password>\n");
      }
      // ...otherwise...
      else
      {
        // Retrieve a sequence of bytes for the password argument.
        var passwordBytes = Encoding.UTF8.GetBytes(args[0]);
        // Retrieve a SHA256 object.
        using (HashAlgorithm sha256 = new SHA256Managed())
        {
          // Hash the password.
          sha256.TransformFinalBlock(passwordBytes, 0, passwordBytes.Length);
          // Convert the hashed password to a Base64 string.
          string passwordHash = Convert.ToBase64String(sha256.Hash);
          // Display the password and it's hash.
          Console.WriteLine("\nPassword: {0}\nHash: {1}\n", args[0], passwordHash);
        }
      }
    }
  }
}
That code snippet should be pretty self-explanatory; the application takes a single argument, which is the password to hash. Once you enter a password and hit enter, the password and it's respective hash will be displayed.
Here are a few examples:
C:\>BlogEnginePasswordHash.exe "This is my password"

Password: This is my password
Hash: 6tV+IGzvN4gaQ0vmCWNHSQ0UQ0WgW4+ThJuhpXR6Z3c=

C:\>BlogEnginePasswordHash.exe Password1

Password: Password1
Hash: GVE/3J2k+3KkoF62aRdUjTyQ/5TVQZ4fI2PuqJ3+4d0=

C:\>BlogEnginePasswordHash.exe Password2

Password: Password2
Hash: G+AiJ1Cq84iauVtdWTuhLk/xBGR0cC1rR3n0tScwWyM=

C:\>
Once you have created password hashes, you can paste those into the Users.xml file for your website:
<Users>
  <User>
    <UserName>Alice</UserName>
    <Password>GVE/3J2k+3KkoF62aRdUjTyQ/5TVQZ4fI2PuqJ3+4d0=</Password>
    <Email>alice@fabrikam.com</Email>
    <LastLoginTime>2015-01-31 01:52:00</LastLoginTime>
  </User>
  <User>
    <UserName>Bob</UserName>
    <Password>G+AiJ1Cq84iauVtdWTuhLk/xBGR0cC1rR3n0tScwWyM=</Password>
    <Email>bob@fabrikam.com</Email>
    <LastLoginTime>2015-01-31 01:53:00</LastLoginTime>
  </User>
</Users>
That's all there is to do. Pretty simple stuff.
Note: This blog was originally posted at http://blogs.msdn.com/robert_mcmurray/
Using the WebDAV Redirector with OneDrive Part 2 - Two-Step Verification
30 September 2014 • by Bob • WebDAV, OneDrive, SkyDrive
This blog is Part 2 of a series about mapping a drive letter to your OneDrive account. In Part 1 of this series, I showed you how to map a drive letter to your OneDrive account when you are using standard security, and in this blog I will show you how to map a drive letter to your OneDrive account after you have enabled two-step verification for your account security. The process is largely similar, with the notable exception that you need to generate an application password which you will use when you are mapping the drive letter with the WebDAV Redirector.
A quick note about two-step verification: enabling this security feature adds an additional requirement so that you will need to use a secondary method to verify your identity when you are logging in. (For example, you can use a phone app, text message, or second email account.) However, you cannot use a secondary login method when you are using the WebDAV Redirector, so you will need to create an application password. (Note: More information about two-step verification for your Microsoft is available in the Two-step verification: FAQ.)
Step 1 - Log Into Your OneDrive Account
The first thing that you need to do is to browse to 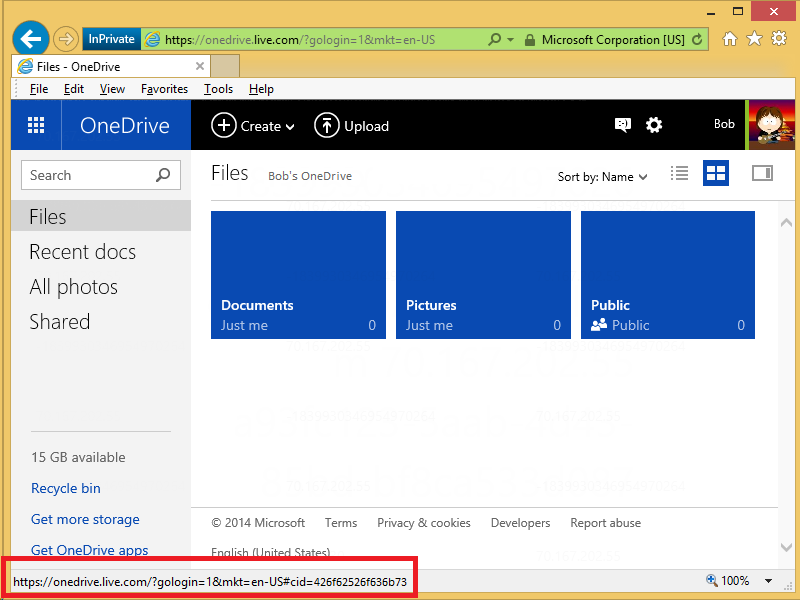
Your Customer ID is the value that is specified after the "cid=" in the URL; for example: "https://onedrive.live.com/?cid=426f62526f636b73". You will need this value when you map a drive letter.
Step 3 - Generate an Application Password
To map a WebDAV drive to your OneDrive account after you have enabled two-step account verification, you will need to generate an application password which you will use when you enter your credentials. (Note: More information about two-step verification can be found in the App passwords and two-step verification article.)
To generate an application password, you first need to log into your Microsoft account settings at 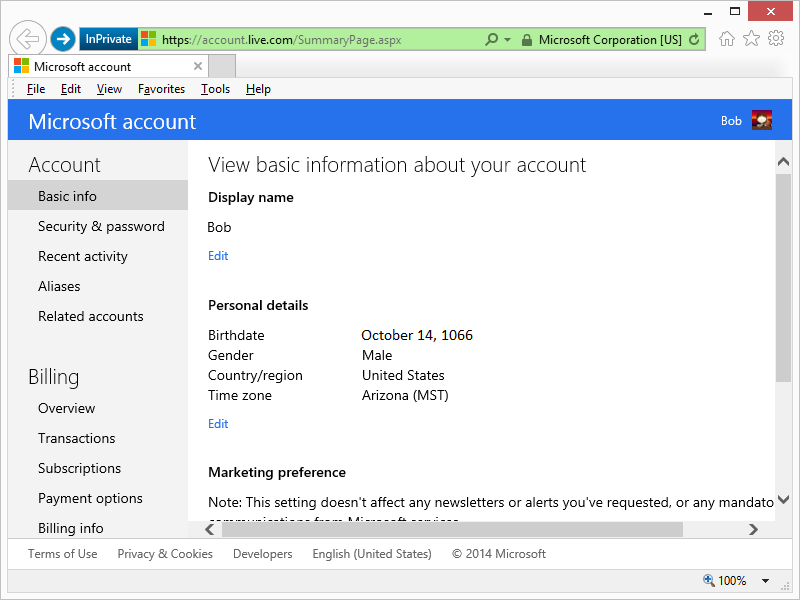
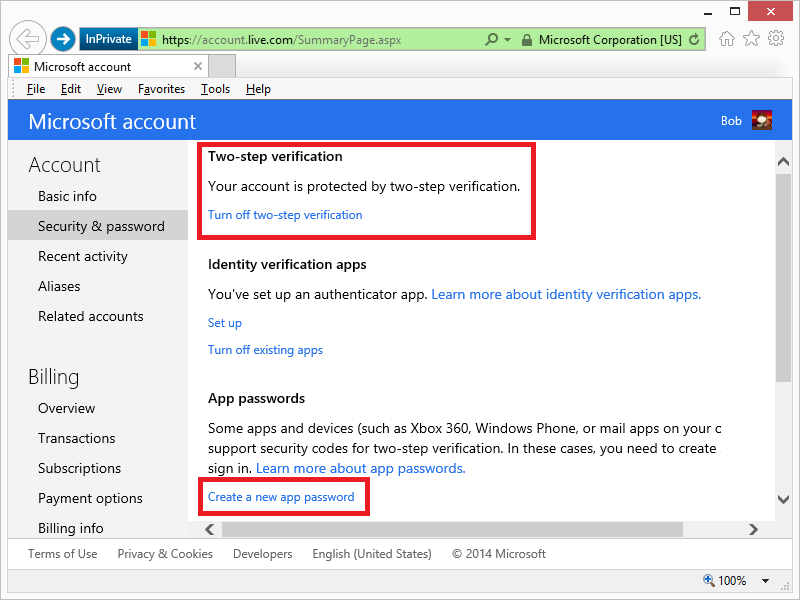
Once you have logged in, click on Security & password and then Create a new app password:
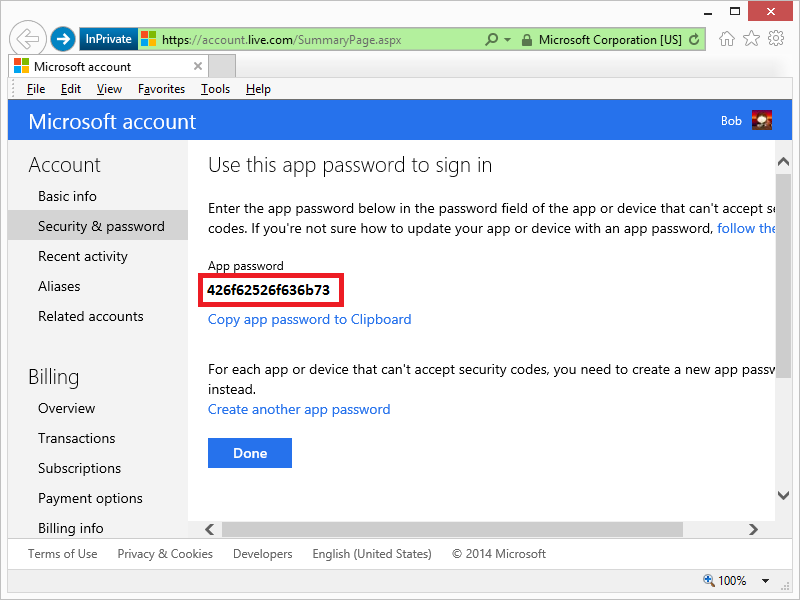
When the app password page is displayed, copy the password for later:
Step 4 - Map the Drive Letter
Your next step is to map the drive letter, and there are a few ways to do this. I have documented several methods in my Using the WebDAV Redirector article on the IIS.net website, but I will show a few ways in this blog.
Method #1 - Using the Windows User Interface and Wizards
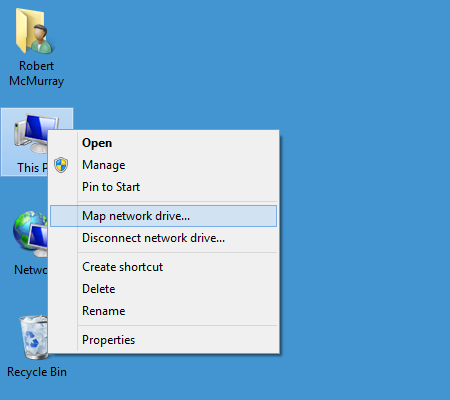
On most of my systems I have the Network and This PC or My Computer icons on my desktop, which makes it easy to simply right-click one of those icons and select Map network drive:
An alternate method on Windows 8 is to open This PC and Map network drive will be listed as an icon on the Windows Explorer ribbon:

Once the Map Network Drive Wizard appears, enter "https://d.docs.live.net/" followed by your Customer ID from Step 2. For example: "https://d.docs.live.net/426f62526f636b73/"

When the Windows Security dialog box appears, enter your email address that you used to log into your OneDrive account in Step 1 and the application password that you created in Step 3.

Once the mapping has been completed, you will be able to view your OneDrive files in Windows Explorer via the mapped drive:

Method #2 - Using the Windows Command Line
You can also map a WebDAV drive letter to your OneDrive account from a command line. The general syntax is listed below:
|
For example:
C:\>net use * https://d.docs.live.net/426f62526f636b73/ /user:"bob@contoso.com" "426f62526f636b73" C:\>dir Volume in drive Z has no label. Volume Serial Number is 0000-0000 Directory of Z:\ 09/02/2014 10:38 PM <DIR> Applications 09/27/2014 08:43 AM <DIR> Blog Photos 09/29/2014 10:50 PM <DIR> Documents 08/17/2014 03:44 AM <DIR> Pictures 09/22/2014 05:58 PM <DIR> Public 09/29/2014 10:43 AM <DIR> SkyDrive camera roll C:\> |
That wraps it up for Part 2 of this blog series - I hope this helps!
Note: This blog was originally posted at http://blogs.msdn.com/robert_mcmurray/
Using the WebDAV Redirector with OneDrive Part 1 - Standard Security
30 September 2014 • by Bob • WebDAV, OneDrive, SkyDrive
If you have read some of my previous blog posts and IIS.NET articles about WebDAV, you will see that I often use the WebDAV Redirector that is built-in to Windows in order to connect to various WebDAV websites. This allows me to access my files via a mapped drive letter, which also enables me to use WebDAV with applications that do not have native WebDAV support. (Like Visual Studio.) I'm also a big fan of OneDrive, but sometimes I'm on a legacy system where I don't have OneDrive installed. With that in mind, I thought that I would put together a quick blog series to show you how to map a drive letter to your OneDrive files.
In Part 1 of this series, I will show you how to map a drive letter to your OneDrive account by using standard security. In Part 2 of this series, I will show you how to map a drive letter to your OneDrive account after you have enabled two-step verification for your account security.
Step 1 - Log Into Your OneDrive Account
The first thing that you need to do is to browse to
Your Customer ID is the value that is specified after the "cid=" in the URL; for example: "https://onedrive.live.com/?cid=426f62526f636b73". You will need this value when you map a drive letter.
Step 3 - Map the Drive Letter
Your next step is to map the drive letter, and there are a few ways to do this. I have documented several methods in my Using the WebDAV Redirector article on the IIS.net website, but I will show a few ways in this blog.
Method #1 - Using the Windows User Interface and Wizards
On most of my systems I have the Network and This PC or My Computer icons on my desktop, which makes it easy to simply right-click one of those icons and select Map network drive:
An alternate method on Windows 8 is to open This PC and Map network drive will be listed as an icon on the Windows Explorer ribbon:
Once the Map Network Drive Wizard appears, enter "https://d.docs.live.net/" followed by your Customer ID from Step 2. For example: "https://d.docs.live.net/426f62526f636b73/"
When the Windows Security dialog box appears, enter the email address and password that you used to log into your OneDrive account in Step 1.
Once the mapping has been completed, you will be able to view your OneDrive files in Windows Explorer via the mapped drive:
Method #2 - Using the Windows Command Line
You can also map a WebDAV drive letter to your OneDrive account from a command line. The general syntax is listed below:
|
For example:
C:\>net use * https://d.docs.live.net/426f62526f636b73/ /user:"bob@contoso.com" "P@ssw0rd" C:\>dir Volume in drive Z has no label. Volume Serial Number is 0000-0000 Directory of Z:\ 09/02/2014 10:38 PM <DIR> Applications 09/27/2014 08:43 AM <DIR> Blog Photos 09/29/2014 10:50 PM <DIR> Documents 08/17/2014 03:44 AM <DIR> Pictures 09/22/2014 05:58 PM <DIR> Public 09/29/2014 10:43 AM <DIR> SkyDrive camera roll C:\> |
That wraps it up for Part 1 of this blog series. In Part 2, I will show how to map a WebDAV drive to your OneDrive account after you have enabled two-step verification for your account security.
Note: This blog was originally posted at http://blogs.msdn.com/robert_mcmurray/
Some Useful and Obscure FTP Configuration Settings
30 June 2014 • by Bob • Configuration, FTP, IIS
I get a lot of question about various configuration settings for the IIS FTP service, and most of the settings that I discuss with people can be configured through the FTP features in the IIS Manager. That being said, there are some useful configuration settings for the FTP service which I periodical send to people that have no user interface for setting them. With that in mind, I thought I would write a quick blog to point out a few of these obscure settings that I personally use the most-often or I send to other people.
Using Domain Name Syntax as an FTP Virtual Hostname
I use this setting on all of my FTP servers because it seems a little more natural to me. Here's the scenario: the IIS FTP service supports two kinds of hostnames:
- "Real" FTP hostnames - these are real FTP hostnames that are specified by using the FTP HOST command (as defined in RFC 7151)
- "Virtual" ftp hostnames - these are FTP hostnames that are specified as part of the FTP USER command
Real FTP hostnames are pretty straight-forward: an FTP client specifies the hostname with a HOST command when a user is connecting to the server. Once the IIS FTP service receives that command, the FTP service routes the FTP session to the correct FTP site.
That being said, the FTP HOST command is still rather new, so only a handful of FTP clients currently support it. Because of that, you can use FTP "virtual" hostnames with the IIS FTP service. By default that syntax uses the "vertical line" or "pipe" character to differentiate between the hostname and user name. For example:
- "
ftp.contoso.com|username" - "
ftp.fabrikam.com|username"
When you are specifying your FTP credentials in your FTP client, you would enter your username like the preceding examples. While this syntax is valid for both the IIS FTP service and the underlying FTP protocol, it seems a little odd to most users (including me). With that in mind, we added a configuration setting for the FTP service that will allow you to use the more-familiar domain\username syntax like the following examples:
- "
ftp.contoso.com\username" - "
ftp.fabrikam.com\username"
To enable this feature, use the following steps:
- Open a command prompt as an administrator.
- Type the following commands:
cd /d "%SystemRoot%\System32\Inetsrv"
appcmd.exe set config -section:system.ftpServer/serverRuntime /hostNameSupport.useDomainNameAsHostName:"True" /commit:apphost
net.exe stop FTPSVC
net.exe start FTPSVC - Close the command prompt.
More information about this feature is available in the IIS configuration reference at the following URL:
- FTP Host Name Support <hostNameSupport>
http://www.iis.net/ConfigReference/system.ftpServer/serverRuntime/hostNameSupport
FTP Credential Caching
The FTP service caches user credentials for successfully-authenticated user sessions in order to help improve login performance, and I wrote the following detailed blog about this a couple of years ago:
Credential Caching in FTP 7.0 and FTP 7.5
I don't want to re-post an old blog, but I have sent several people to that blog over the years, so I thought that it was worth mentioning here since it seems to be referenced quite often. The problem that people seem to run into the most is that their old password is still valid for FTP after they have changed it, and this is caused by the FTP service caching their user credentials.
This is especially annoying for me personally when I am working on a development computer where I am creating an authentication provider. Unless I disable credential caching on my development computer, I can never seem to get any work done. To resolve this issue, I disable credential caching for the FTP service by using the following steps:
- Open a command prompt as an administrator.
- Type the following commands:
cd /d "%SystemRoot%\System32\Inetsrv"
appcmd.exe set config -section:system.ftpServer/caching /credentialsCache.enabled:"False" /commit:apphost
net.exe stop FTPSVC
net.exe start FTPSVC - Close the command prompt.
The blog which I mentioned earlier goes into more detail about setting a custom timeout interval for credential caching instead of disabling the feature entirely, and all of the settings for FTP credential caching are in the IIS configuration reference at the following URLs:
- FTP Caching <caching>
http://www.iis.net/ConfigReference/system.ftpServer/caching - FTP Credentials Cache <credentialsCache>
http://www.iis.net/ConfigReference/system.ftpServer/caching/credentialsCache
FTP Client Certificate Authentication
FTP Client Certificate Authentication is an often-overlooked feature of the IIS FTP service, and I think that this is due to two reasons:
- There is no user interface to configure the required settings
- Configuring the required settings is very difficult
My second reason cannot be understated; I usually have to set up FTP Client Certificate Authentication once or twice a year in order to test various scenarios, and each time I do so I am reminded of just how difficult it can be to get everything right, and equally how easy it is to get something wrong.
Fortunately I took the time a couple of years ago to write a blog which documents everything that it takes to configure the FTP service, and I have used my notes in that blog several times. In complement to my blog on the subject, Vivek Kumbhar wrote an excellent blog series with additional steps to configure your Active Directory for certificate authentication. With that in mind, here are all of the requisite blog posts that you would need to set up this feature:
- Configuring FTP Client Certificate Authentication in FTP 7
Describes how to configure your FTP server for FTP Client Certificate Authentication. - Configure Client Certificate Mapping in FTP 7.5 - Part 1
Describes how to set up your Active Directory server, IIS server, and FTP client systems. - Configure Client Certificate Mapping in FTP 7.5 - Part 2
Walks you through obtaining and installing a server certificate, which you will use later for your FTP site. - Configure Client Certificate Mapping in FTP 7.5 - Part 3
Walks you through setting up an FTP site with SSL. - Configure Client Certificate Mapping in FTP 7.5 - Part 4
Describes how to configure Active Directory mapping for a user account.
As I have mentioned before, configuring this feature is not for the faint-of-heart, but it can be very beneficial from a security standpoint.
For more information about the settings that are required for FTP Client Certificate Authentication, see the following articles in the IIS configuration reference:
- FTP Client Certificate Authentication <clientCertAuthentication>
http://www.iis.net/ConfigReference/system.applicationHost/sites/site/ftpServer/security/authentication/clientCertAuthentication - FTP over SSL <ssl>
http://www.iis.net/ConfigReference/system.applicationHost/sites/site/ftpServer/security/ssl - FTP SSL Client Certificates <sslClientCertificates>
http://www.iis.net/ConfigReference/system.applicationHost/sites/site/ftpServer/security/sslClientCertificates
That wraps it up for today's post. ;-]
Note: This blog was originally posted at http://blogs.msdn.com/robert_mcmurray/
Custom Post-Build Events for Compiling FTP Providers
26 October 2013 • by Bob • Extensibility, FTP, Visual Studio
I've written a lot of walkthroughs and blog posts about creating custom FTP providers over the past several years, and I usually include instructions like the following example for adding a custom post-build event that will automatically register your extensibility provider in the Global Assembly Cache (GAC) on your development computer:
- Click Project, and then click the menu item your project's properties.
- Click the Build Events tab.
- Enter the following in the Post-build event command line dialog box:
net stop ftpsvc
call "%VS100COMNTOOLS%\vsvars32.bat">nul
gacutil.exe /if "$(TargetPath)"
net start ftpsvc
And I usually include instructions like the following example for determining the assembly information for your extensibility provider:
- In Windows Explorer, open your "C:\Windows\assembly" path, where C: is your operating system drive.
- Locate the FtpXmlAuthorization assembly.
- Right-click the assembly, and then click Properties.
- Copy the Culture value; for example: Neutral.
- Copy the Version number; for example: 1.0.0.0.
- Copy the Public Key Token value; for example: 426f62526f636b73.
- Click Cancel.
Over time I have changed the custom post-build event that I use when I am creating custom FTP providers, and my changes make it easier to register custom FTP providers. With that in mind, I thought that my changes would make a good blog subject.
First of all, if you take a look at my How to Use Managed Code (C#) to Create a Simple FTP Authentication Provider walkthrough, you will see that I include instructions like my earlier examples to create a custom post-build event and retrieve the assembly information for your extensibility provider.
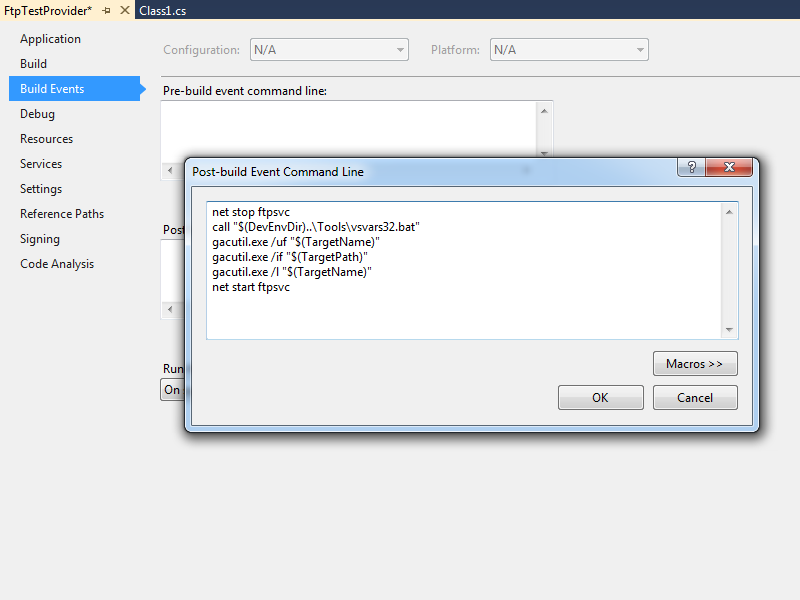
That being said, instead of using the custom post-build event in that walkthrough, I have started using the following custom post-build event:
net stop ftpsvc
call "$(DevEnvDir)..\Tools\vsvars32.bat"
gacutil.exe /uf "$(TargetName)"
gacutil.exe /if "$(TargetPath)"
gacutil.exe /l "$(TargetName)"
net start ftpsvc
This script should resemble the following example when entered into Visual Studio:
This updated script performs the following actions:
- Stops the FTP service (this will allow any copies of your DLL to unload)
- Loads the Visual Studio environment variables (this will add gacutil.exe to the path)
- Calls gacutil.exe to forcibly unregister any previous version of your FTP provider
- Calls gacutil.exe to forcibly register the newly-compiled version of your FTP provider
- Calls gacutil.exe to list the GAC information for your FTP provider (this will be used to register your DLL with IIS)
- Starts the FTP service
Let's say that you created a simple FTP authentication provider which contained code like the following example:
using System;
using System.Text;
using Microsoft.Web.FtpServer;

public class FtpTestProvider :
    BaseProvider,
    IFtpAuthenticationProvider
{
    private string _username = "test";
    private string _password = "password";

    public bool AuthenticateUser(
        string sessionId,
        string siteName,
        string userName,
        string userPassword,
        out string canonicalUserName)
    {
        canonicalUserName = userName;
        if (((userName.Equals(_username,
            StringComparison.OrdinalIgnoreCase)) == true) &&
            userPassword == _password)
        {
            return true;
        }
        else
        {
            return false;
        }
    }
}
When you compile your provider in Visual Studio, the output window should show the results of the custom post-build event:
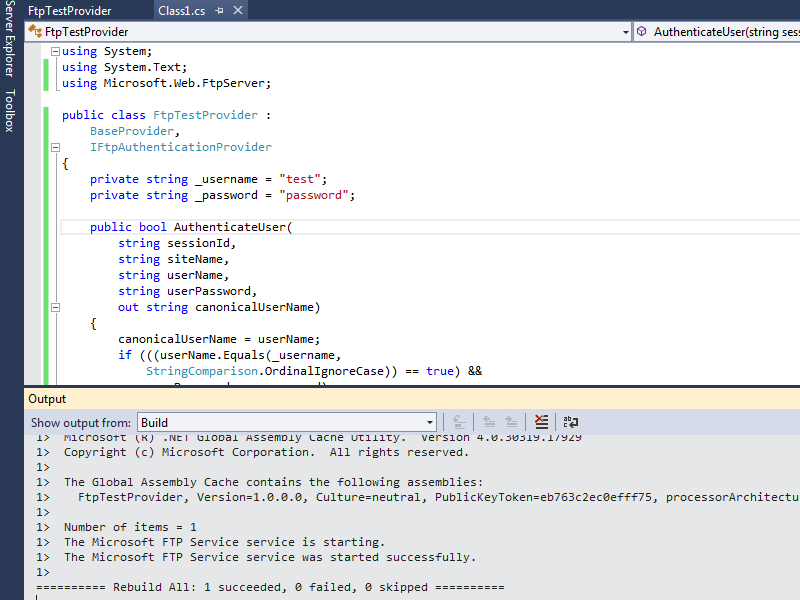
When you examine the output information in detail, the highlighted area in the example below should be of particular interest, because it contains the assembly information for your extensibility provider:
------ Rebuild All started: Project: FtpTestProvider, Configuration: Debug Any CPU ------
FtpTestProvider -> c:\users\foobar\documents\visual studio 2012\Projects\FtpTestProvider\bin\Debug\FtpTestProvider.dll
The Microsoft FTP Service service is stopping..
The Microsoft FTP Service service was stopped successfully.

Microsoft (R) .NET Global Assembly Cache Utility. Version 4.0.30319.17929
Copyright (c) Microsoft Corporation. All rights reserved.

Assembly successfully added to the cache
Microsoft (R) .NET Global Assembly Cache Utility. Version 4.0.30319.17929
Copyright (c) Microsoft Corporation. All rights reserved.

The Global Assembly Cache contains the following assemblies:
FtpTestProvider, Version=1.0.0.0, Culture=neutral, PublicKeyToken=eb763c2ec0efff75, processorArchitecture=MSIL

Number of items = 1
The Microsoft FTP Service service is starting.
The Microsoft FTP Service service was started successfully.

========== Rebuild All: 1 succeeded, 0 failed, 0 skipped ==========
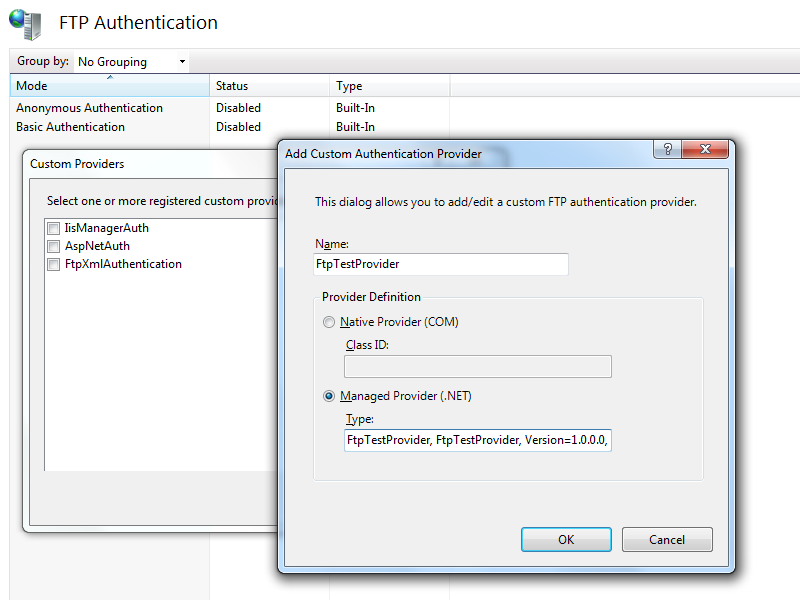
Once you have that information, you simply need to reformat it as "FtpTestProvider, FtpTestProvider, Version=1.0.0.0, Culture=neutral, PublicKeyToken=eb763c2ec0efff75" in order to enter it into the FTP Custom Authentication Providers dialog box in the IIS Manager, or by following the steps in my FTP Walkthroughs or my Adding Custom FTP Providers with the IIS Configuration Editor blogs.
That wraps it up for today's post. As always, let me know if you have any questions. ;-]
Note: This blog was originally posted at http://blogs.msdn.com/robert_mcmurray/
Configuring FTP Client Certificate Authentication in FTP 7
26 April 2012 • by Bob • FTP, Scripting
We had a customer question the other day about configuring FTP Client Certificate Authentication in FTP 7.0 and in FTP 7.5. It had been a while since the last time that I had configured those settings on an FTP server, so I thought that it would be great to re-familiarize myself with that feature. To my initial dismay, it was a little more difficult than I had remembered, because there are a lot of parts to be configured.
That being said, there are a few primary activities that you need to know about and configure correctly:
I will explain each of those in this blog, although I will defer some of the details for Active Directory mapping to an excellent blog series that I discovered by Vivek Kumbhar.
Configuring the FTP Service
There are several settings that you need to configure for the FTP server; unfortunately there is no user interface for those settings, so you might want to familiarize yourself with the following settings:
- FTP Client Certificate Authentication <clientCertAuthentication>
- FTP over SSL <ssl>
- FTP SSL Client Certificates <sslClientCertificates>
At first I had made a batch file that was configuring these settings by using AppCmd, but I eventually abandoned that script and wrote the following VBScript code to configure all of the settings at one time - the only parts that you need to change is your site name and the hash value your SSL certificate, which are highlighted in yellow:
Set adminManager = CreateObject("Microsoft.ApplicationHost.WritableAdminManager")
adminManager.CommitPath = "MACHINE/WEBROOT/APPHOST"
Set sitesSection = adminManager.GetAdminSection("system.applicationHost/sites", "MACHINE/WEBROOT/APPHOST")
Set sitesCollection = sitesSection.Collection

siteElementPos = FindElement(sitesCollection, "site", Array("name", "ftp.contoso.com"))
If (addElementPos = -1) Then
   WScript.Echo "Element not found!"
   WScript.Quit
End If
Set siteElement = sitesCollection.Item(siteElementPos)

Set ftpServerElement = siteElement.ChildElements.Item("ftpServer")
Set securityElement = ftpServerElement.ChildElements.Item("security")

Set sslClientCertificatesElement = securityElement.ChildElements.Item("sslClientCertificates")
sslClientCertificatesElement.Properties.Item("clientCertificatePolicy").Value = "CertRequire"
sslClientCertificatesElement.Properties.Item("useActiveDirectoryMapping").Value = True

Set authenticationElement = securityElement.ChildElements.Item("authentication")
Set clientCertAuthenticationElement = authenticationElement.ChildElements.Item("clientCertAuthentication")
clientCertAuthenticationElement.Properties.Item("enabled").Value = True

Set sslElement = securityElement.ChildElements.Item("ssl")
sslElement.Properties.Item("serverCertHash").Value = "57686f6120447564652c2049495320526f636b73"
sslElement.Properties.Item("controlChannelPolicy").Value = "SslRequire"
sslElement.Properties.Item("dataChannelPolicy").Value = "SslRequire"

adminManager.CommitChanges

Function FindElement(collection, elementTagName, valuesToMatch)
   For i = 0 To CInt(collection.Count) - 1
      Set element = collection.Item(i)
      If element.Name = elementTagName Then
         matches = True
         For iVal = 0 To UBound(valuesToMatch) Step 2
            Set property = element.GetPropertyByName(valuesToMatch(iVal))
            value = property.Value
            If Not IsNull(value) Then
               value = CStr(value)
            End If
            If Not value = CStr(valuesToMatch(iVal + 1)) Then
               matches = False
               Exit For
            End If
         Next
         If matches Then
            Exit For
         End If
      End If
   Next
   If matches Then
      FindElement = i
   Else
      FindElement = -1
   End If
End Function
Once you have configured your FTP settings, you should have an FTP site that resembles the following in your ApplicationHost.config file:
<site name="ftp.contoso.com" id="2">
   <application path="/">
      <virtualDirectory path="/" physicalPath="c:\inetpub\ftproot" />
   </application>
   <bindings>
      <binding protocol="ftp" bindingInformation="*:21:" />
   </bindings>
   <ftpServer>
      <security>
         <ssl serverCertHash="57686f6120447564652c2049495320526f636b73"  ssl128="false"  controlChannelPolicy="SslRequire"  dataChannelPolicy="SslRequire" />
         <authentication>
            <basicAuthentication enabled="false" />
            <anonymousAuthentication enabled="false" />
            <clientCertAuthentication enabled="true" />
         </authentication>
         <sslClientCertificates  clientCertificatePolicy="CertRequire"  useActiveDirectoryMapping="true" />
      </security>
   </ftpServer>
</site>
More details about these settings can be found in the configuration reference articles that I mentioned in the beginning of this blog post, and additional information about configuring FTP over SSL can be found in the following walkthrough:
Configuring Active Directory Mapping
The next part of this process is kind of tricky; you need to accomplish all of the following:
- Obtain and install a client certificate on the system where your FTP client is installed. Hare some additional notes to consider:
- This may involve setting up your client system to trust the CA that issued your client certificate.
- This may also involve setting up your FTP server to trust the CA that issued both your client certificate and the server certificate that you are using for your FTP site.
- Configure Active Directory to map the client certificate to an Active Directory account.
- Configure your FTP client to use a client certificate when connecting to your FTP server.
That makes it all sound so easy, but it can be very tricky. That being said, as I mentioned earlier, as I was putting together my notes to write this blog, I stumbled across a great blog series by Vivek Kumbhar, where he goes into great detail when describing all of the steps to set up the Active Directory mapping. With that in mind, instead of trying to rewrite what Vivek has already documented, I will include links to his blog series:
- Configure Client Certificate Mapping in FTP 7.5 - Part 1
Describes how to set up your Active Directory server, IIS server, and FTP client systems. - Configure Client Certificate Mapping in FTP 7.5 - Part 2
Walks you through obtaining and installing a server certificate, which you will use later for your FTP site. - Configure Client Certificate Mapping in FTP 7.5 - Part 3
Walks you through setting up an FTP site with SSL. - Configure Client Certificate Mapping in FTP 7.5 - Part 4
Describes how to configure Active Directory mapping for a user account.
I have to give Vivek full credit where it's due - he wrote a truly great blog series, and he included a lot more detail in his blog series than I had originally planned to include in this blog. (In my humble opinion, Vivek's blog series is the best documentation that I have seen for this feature.)
Configuring your FTP Client
To test out client certificates, I used both the SmartFTP GUI-based FTP client and the MOVEit-Freely command-line FTP client; both of which I discussed in my FTP Clients blog series some time ago.
Using the SmartFTP Client
To configure the SmartFTP client, I just needed to enable and specify the correct client certificate in the properties for my connection:

Using the MOVEit-Freely FTP Client
For the MOVEit-Freely FTP client, I just needed to specify the correct parameters on the command line:
ftps.exe -z -e:on -pfxfile:administrator.pfx -pfxpw:"P@ssw0rd" -user:anonymous -password:"someone@contoso.com"
The important settings are the pfxfile and pfxpw values, where pfxfile is the name of the PFX file that holds your client certificate, and pfxpw is the password for the PFX file. (The username and password values will be ignored for the most part, because you will actually be logged in through your client certificate, so you can leave those as anonymous.)
Client Recap
For more information about these two FTP clients, see the following blog posts:
- FTP Clients - Part 8: SmartFTP Client
- FTP Clients - Part 5: MOVEit Freely Command-Line Secure FTP Client
Summary
FTP client certificates are definitely a bit of a challenge to configure correctly, but it's not an impossible task to get this feature working.
Note: This blog was originally posted at http://blogs.msdn.com/robert_mcmurray/
How to use Managed Code (C#) to create an FTP Home Directory Provider that is based on the Remote Client IP Address
02 November 2011 • by Bob • FTP, IIS
I recently had an interesting scenario that was presented to me by a customer: they had a business requirement where they needed to give the same username and password to a group of people, but they didn't want any two people to be able to see anyone else's files. This seemed like an unusual business requirement to me; the whole point of keeping users separate is one of the reasons why we added user isolation to the FTP service.
With that in mind, my first suggestion was - of course - to rethink their business requirement, assign different usernames and passwords to everyone, and use FTP user isolation. But that wasn't going to work for them; their business requirement for giving out the same username and password could not be avoided. So I said that I would get back to them, and I spent the next few days experimenting with a few ideas.
One of my early ideas that seemed somewhat promising was to write a custom home directory provider that dynamically created unique home directories that were based on the session IDs for the individual FTP sessions, and the provider would use those directories to isolate the users. That seemed like a good idea, but when I analyzed the results I quickly saw that it wasn't going to work; as each user logged in, they would get a new session ID, and they wouldn't see their files from their last session. On top of that, the FTP server would rapidly start to collect a large number of session-based directories, with no garbage collection. So it was back to the drawing board for me.
After some discussions with the customer, we reasoned that the best suggestion for their particular environment was to leverage some of the code that I had written for my session-based home directory provider in order to create home directory provider that dynamically created home directories that are based on the remote IP of the FTP client.
I have to stress, however, that this solution will not work in all situations. For example:
- If multiple FTP clients are accessing your FTP server through the same firewall, their remote IP might appear to be the same.
- If an FTP client is moving between geographic locations, such as traveling with a laptop, then the remote IP address will change, and the client will not see their files from their previous session.
That being said, the customer felt that those limitations were acceptable for their environment, so I created a home directory provider that dynamically created home directories that were based on the remote IP address of their FTP clients. I agree that it's not a perfect solution, but their business requirement made this scenario considerably difficult to work around.
Note: I wrote and tested the steps in this blog using both
In This Blog
- Step 1: Set up the Project Environment
- Step 2: Create the Extensibility Class
- Step 3: Add the Demo Provider to FTP
- Summary
Prerequisites
The following items are required to complete the procedures in this blog:
- The following version of IIS must be installed on your Windows computer, and the Internet Information Services (IIS) Manager must also be installed:
- IIS 7.0 must be installed on Windows Server 2008
- IIS 7.5 must be installed on Windows Server 2008 R2 or Windows 7
- The new FTP 7.5 service must be installed. To install FTP 7.5, follow the instructions in the following topic:
- You must have FTP publishing enabled for a site. To create a new FTP site, follow the instructions in the following topic:
- Set the content permissions to allow access for the COM+ process identity that handles extensibility:
- Open a command prompt.
- Type the following command:
ICACLS "%SystemDrive%\inetpub\ftproot" /Grant "Network Service":M /T
Where "%SystemDrive%\inetpub\ftproot" is the home directory for your FTP site. - Close the command prompt.
Step 1: Set up the Project Environment
In this step, you will create a project in
- Open Visual Studio 2008 or Visual Studio 2010.
- Click the File menu, then New, then Project.
- In the New Projectdialog box:
- Choose Visual C# as the project type.
- Choose Class Library as the template.
- Type FtpRemoteIPHomeDirectory as the name of the project.
- Click OK.
- When the project opens, add a reference path to the FTP extensibility library:
- Click Project, and then click FtpRemoteIPHomeDirectory Properties.
- Click the Reference Paths tab.
- Enter the path to the FTP extensibility assembly for your version of Windows, where C: is your operating system drive.
- For Windows Server 2008 and Windows Vista:
- C:\Windows\assembly\GAC_MSIL\Microsoft.Web.FtpServer\7.5.0.0__31bf3856ad364e35
- For 32-bit Windows 7 and Windows Server 2008 R2:
- C:\Program Files\Reference Assemblies\Microsoft\IIS
- For 64-bit Windows 7 and Windows Server 2008 R2:
- C:\Program Files (x86)\Reference Assemblies\Microsoft\IIS
- For Windows Server 2008 and Windows Vista:
- Click Add Folder.
- Add a strong name key to the project:
- Click Project, and then click FtpRemoteIPHomeDirectory Properties.
- Click the Signing tab.
- Check the Sign the assembly check box.
- Choose <New...> from the strong key name drop-down box.
- Enter FtpRemoteIPHomeDirectoryKey for the key file name.
- If desired, enter a password for the key file; otherwise, clear the Protect my key file with a password check box.
- Click OK.
- Note: FTP 7.5 Extensibility does not support the .NET Framework 4.0; if you are using Visual Studio 2010, or you have changed your default framework version, you may need to change the framework version for this project. To do so, use the following steps:
- Click Project, and then click FtpRemoteIPHomeDirectory Properties.
- Click the Application tab.
- Choose .NET Framework 3.5 in the Target framework drop-down menu.
- Save, close, and re-open the project.
- Optional: You can add a custom build event to add the DLL automatically to the Global Assembly Cache (GAC) on your development computer:
- Click Project, and then click FtpRemoteIPHomeDirectory Properties.
- Click the Build Events tab.
- Enter the appropriate commands in the Post-build event command linedialog box, depending on your version of Visual Studio:
- If you are using Visual Studio 2010:
net stop ftpsvc
call "%VS100COMNTOOLS%\vsvars32.bat">null
gacutil.exe /if "$(TargetPath)"
net start ftpsvc - If you are using Visual Studio 2008:
net stop ftpsvc
call "%VS90COMNTOOLS%\vsvars32.bat">null
gacutil.exe /if "$(TargetPath)"
net start ftpsvc
- If you are using Visual Studio 2010:
- Save the project.
Step 2: Create the Extensibility Class
In this step, you will implement the extensibility interfaces for the demo provider.
- Add the necessary references to the project:
- Click Project, and then click Add Reference...
- On the .NET tab, click Microsoft.Web.FtpServer.
- Click OK.
- Add the code for the authentication class:
- In Solution Explorer, double-click the Class1.cs file.
- Remove the existing code.
- Paste the following code into the editor:
using System;
using System.Collections.Generic;
using System.Collections.Specialized;
using System.IO;
using Microsoft.Web.FtpServer;

public class FtpRemoteIPHomeDirectory :
    BaseProvider,
    IFtpHomeDirectoryProvider,
    IFtpLogProvider
{
    // Create a dictionary object that will contain
    // session IDs and remote IP addresses.
    private static Dictionary<string, string> _sessionList = null;

    // Store the path to the default FTP folder.
    private static string _defaultDirectory = string.Empty;

    // Override the default initialization method.
    protected override void Initialize(StringDictionary config)
    {
        // Test if the session dictionary has been created.
        if (_sessionList == null)
        {
            // Create the session dictionary.
            _sessionList = new Dictionary<string, string>();
        }
        // Retrieve the default directory path from configuration.
        _defaultDirectory = config["defaultDirectory"];
        // Test for the default home directory (Required).
        if (string.IsNullOrEmpty(_defaultDirectory))
        {
            throw new ArgumentException(
              "Missing default directory path in configuration.");
        }
    }

    // Define the home directory provider method.
    string IFtpHomeDirectoryProvider.GetUserHomeDirectoryData(
        string sessionId,
        string siteName,
        string userName)
    {
        // Create a string with the folder name.
        string _sessionDirectory = String.Format(
            @"{0}\{1}", _defaultDirectory,
            _sessionList[sessionId]);
        try
        {
            // Test if the folder already exists.
            if (!Directory.Exists(_sessionDirectory))
            {
                // Create the physical folder. Note: NETWORK SERVICE
                // needs write permissions to the default folder in
                // order to create each remote IP's home directory.
                Directory.CreateDirectory(_sessionDirectory);
            }
        }
        catch (Exception ex)
        {
            throw ex;
        }
        // Return the path to the session folder.
        return _sessionDirectory;
    }
    // Define the log provider method.
    public void Log(FtpLogEntry logEntry)
    {
        // Test if the USER command was entered.
        if (logEntry.Command.Equals(
            "USER",
            StringComparison.InvariantCultureIgnoreCase))
        {
            // Reformat the remote IP address.
            string _remoteIp = logEntry.RemoteIPAddress
                .Replace(':', '-')
                .Replace('.', '-');
            // Add the remote IP address to the session dictionary.
            _sessionList.Add(logEntry.SessionId, _remoteIp);
        }
        // Test if the command channel was closed (end of session).
        if (logEntry.Command.Equals(
            "CommandChannelClosed",
            StringComparison.InvariantCultureIgnoreCase))
        {
            // Remove the closed session from the dictionary.
            _sessionList.Remove(logEntry.SessionId);
        }
    }
}
- Save and compile the project.
Note: If you did not use the optional steps to register the assemblies in the GAC, you will need to manually copy the assemblies to your IIS 7 computer and add the assemblies to the GAC using the Gacutil.exe tool. For more information, see the following topic on the Microsoft MSDN Web site:
Step 3: Add the Demo Provider to FTP
In this step, you will add your provider to the global list of custom providers for your FTP service, configure your provider's settings, and enable your provider for an FTP site.
Adding your Provider to FTP
- Determine the assembly information for your extensibility provider:
- In Windows Explorer, open your "C:\Windows\assembly" path, where C: is your operating system drive.
- Locate the FtpRemoteIPHomeDirectory assembly.
- Right-click the assembly, and then click Properties.
- Copy the Culture value; for example: Neutral.
- Copy the Version number; for example: 1.0.0.0.
- Copy the Public Key Token value; for example: 426f62526f636b73.
- Click Cancel.
- Add the extensibility provider to the global list of FTP authentication providers:
- Open the Internet Information Services (IIS) Manager.
- Click your computer name in the Connections pane.
- Double-click FTP Authentication in the main window.
- Click Custom Providers... in the Actions pane.
- Click Register.
- Enter FtpRemoteIPHomeDirectory for the provider Name.
- Click Managed Provider (.NET).
- Enter the assembly information for the extensibility provider using the information that you copied earlier. For example:
FtpRemoteIPHomeDirectory,FtpRemoteIPHomeDirectory,version=1.0.0.0,Culture=neutral,PublicKeyToken=426f62526f636b73 - Click OK.
- Clear the FtpRemoteIPHomeDirectory check box in the providers list.
- Click OK.
Note: If you prefer, you could use the command line to add the provider to FTP by using syntax like the following example:
cd %SystemRoot%\System32\Inetsrv

 appcmd.exe set config -section:system.ftpServer/providerDefinitions /+"[name='FtpRemoteIPHomeDirectory',type='FtpRemoteIPHomeDirectory,FtpRemoteIPHomeDirectory,version=1.0.0.0,Culture=neutral,PublicKeyToken=426f62526f636b73']" /commit:apphost
Configuring your Provider's Settings
At the moment there is no user interface that allows you to configure properties for a custom home directory provider, so you will have to use the following command line:
cd %SystemRoot%\System32\Inetsrv

 appcmd.exe set config -section:system.ftpServer/providerDefinitions /+"activation.[name='FtpRemoteIPHomeDirectory']" /commit:apphost

 appcmd.exe set config -section:system.ftpServer/providerDefinitions /+"activation.[name='FtpRemoteIPHomeDirectory'].[key='defaultDirectory',value='C:\Inetpub\ftproot']" /commit:apphost
Note: The highlighted area contains the value that you need to update with the root directory of your FTP site.
Enabling your Provider for an FTP site
At the moment there is no user interface that allows you to enable a custom home directory provider for an FTP site, so you will have to use the following command line:
cd %SystemRoot%\System32\Inetsrv

 appcmd.exe set config -section:system.applicationHost/sites /+"[name='My FTP Site'].ftpServer.customFeatures.providers.[name='FtpRemoteIPHomeDirectory']" /commit:apphost

 appcmd.exe set config -section:system.applicationHost/sites /"[name='My FTP Site'].ftpServer.userIsolation.mode:Custom" /commit:apphost
Note: The highlighted areas contain the name of the FTP site where you want to enable the custom home directory provider.
Summary
In this blog I showed you how to:
- Create a project in Visual Studio 2010 or Visual Studio 2008 for a custom FTP home directory provider.
- Implement the extensibility interface for custom FTP home directories.
- Add a custom home directory provider to your FTP service.
When users connect to your FTP site, the FTP service will create a directory that is based on their remote IP address, and it will drop their session in the corresponding folder for their remote IP address. They will not be able to change to the root directory, or a directory for a different remote IP address.
For example, if the root directory for your FTP site is "C:\Inetpub\ftproot" and a client connects to your FTP site from 192.168.0.100, the FTP home directory provider will create a folder that is named "C:\Inetpub\ftproot\192-168-0-100", and the FTP client's sessions will be isolated in that directory; the FTP client will not be able to change directory to "C:\Inetpub\ftproot" or the home directory for another remote IP.
Once again, there are limitations to this approach, and I agree that it's not a perfect solution in all scenarios; but this provider works as expected when you have to use the same username and password for all of your FTP clients, and you know that your FTP clients will use unique remote IP addresses.
Note: This blog was originally posted at http://blogs.msdn.com/robert_mcmurray/
Credential Caching in FTP 7.0 and FTP 7.5
08 April 2011 • by Bob • FTP, IIS
I've seen a few situations where people that are using the FTP 7.0 and FTP 7.5 service have noticed that it takes a while for their password changes to be reflected by the FTP service. To put this another way, here are the typical symptoms that people describe to me:
- A user successfully logs into their FTP site using their username and password
- The user logs out of their FTP site
- The user changes their password
- The user attempts to log into their FTP site using their username and their new password, but this fails
- The user can successfully log into their FTP site using their username and their old password
- (Note: As a corollary, restarting the FTP service fixes the symptoms)
Here's why this happens: to help improve the performance for authentication requests, the FTP service caches the credentials for successful logins. (The cache duration is set to 15 minutes by default.) This means that if you change your password, your changes may not be reflected for the cache duration.
The good news is, the FTP credential cache settings can be changed easily, and I have documented all of the settings for FTP caching in the IIS configuration reference at the following URLs:
- FTP Caching <caching>
http://www.iis.net/ConfigReference/system.ftpServer/caching - FTP Credentials Cache <credentialsCache>
http://www.iis.net/ConfigReference/system.ftpServer/caching/credentialsCache
Quoting and paraphrasing the above documentation, there are the two settings that you can configure on the <credentialsCache> element:
| Attribute | Description |
|---|---|
enabled |
Optional Boolean attribute. true if credential caching is enabled; otherwise, false. The default value is true. |
flushInterval |
Optional uint attribute. Specifies the cache lifetime, in seconds, for credentials that are stored in the cache. Note: This value must be between 5 and 604,800 seconds. The default value is 900. |
What this means to you is - you can completely disable credential caching, or you can specify a different timeout. For example, on several of my development servers I often disable credential caching; this allows me to change passwords whenever I want, which is very useful when I am creating custom authentication providers. For my production servers I tend to stick with the default values, although I might change those values when I'm troubleshooting a problem.
I usually configure the settings from a command line or a batch file, although the articles that I listed earlier have steps for using the IIS Manager to change the settings for FTP credential caching. Just the same, here are some examples for setting the values by using appcmd.exe:
How to Disable FTP Credential Caching
cd /d "%SystemRoot%\System32\Inetsrv"
appcmd.exe set config -section:system.ftpServer/caching /credentialsCache.enabled:"False" /commit:apphost
net stop FTPSVC
net start FTPSVC
How to Specify a Custom Timeout for FTP Credential Caching
cd /d "%SystemRoot%\System32\Inetsrv"
appcmd.exe set config -section:system.ftpServer/caching /credentialsCache.enabled:"True" /commit:apphost
appcmd.exe set config -section:system.ftpServer/caching /credentialsCache.flushInterval:"300" /commit:apphost
net stop FTPSVC
net start FTPSVC
I hope this helps. ;-]
Note: This blog was originally posted at http://blogs.msdn.com/robert_mcmurray/