Bad Characters to Use in Web-based Filenames
27 April 2011 • by Bob • IIS
My good friend Wade Hilmo recently posted an excellent blog titled "How IIS blocks characters in URLs" that discusses some of the internal workings for how IIS deals with several characters in file names that do not work well in URLs. Wade’s blog does a great job explaining all of the internal IIS URL parsing logic in detail, and his post reminded me of some related notes that I had published on an internal website at Microsoft. As a complement to Wade’s outstanding blog post, I’m reposting my notes in this blog.
Recently a Microsoft Technical Account Manager (TAM) mentioned that he was working on an issue with a customer that was using SharePoint 2007 on IIS 7. The customer's problem was this: his company had several Word documents that were stored in SharePoint that had the plus sign (+) in the filenames, and HTTP requests for these documents were failing. The TAM configured IIS 7's request filtering feature to allow doubly-escaped characters by setting the allowDoubleEscaping attribute to true. This seemed to alleviate the problem, but I had to point out that this probably wasn't the right thing to do. As a general rule, I don't like changing many of the default configuration options for the IIS 7 request filtering feature, because they are designed to keep my servers safe. But in this specific scenario, modifying those settings is simply looking in the wrong place.
Let me explain:
There are several characters that are perfectly valid in a Windows filename that are really bad when you post those files on websites, and either the server or the client could wreak havoc with them. In most scenarios the HTTP requests will receive an HTTP 404 File Not Found error, but in some cases that might cause an HTTP 400 Bad Request error. As such, even though you might find a way to work around the problem, it's a really bad idea to use those characters when you are posting files to a website.
RFC 2396 is the governing document for "Uniform Resource Identifiers (URI): Generic Syntax." This RFC defines what can and can't be used in a URI, as well as what shouldn't be used.
First, section "2.2. Reserved Characters" contains the following list of reserved characters:
reserved = ";" | "/" | "?" | ":" | "@" |
           "&" | "=" | "+" | "$" | ","
Second, section "2.4.3. Excluded US-ASCII Characters" contains the following lists of delimiter and unwise characters:
delims = "<" | ">" | "#" | "%" | <">

unwise = "{" | "}" | "|" | "\" | "^" | "[" | "]" | "`"
Several of the characters in those lists cannot be used in Windows filenames, but the remaining characters should not be used for filenames if you intend to upload those files to a website.
Here are my explanations for why some of those characters will cause problems if you attempt to use them in filenames that you upload to a website:
- Plus Sign (+) - this character is often translated as a URI-encoded space, so the URI "http://localhost/foo+bar.doc" could be misinterpreted as the URI "http://localhost/foo bar.doc".
- Percent Sign (%) - this character is used for URI escaping, and I've seen this cause a lot of problems because the two characters that follow the percent sign are assumed to be hex digits for an escaped ASCII code, so the URI "http://localhost/foo%bar.doc" could be misinterpreted as the URI "http://localhost/fooºr.doc".
- Number/Pound Sign (#) - this character is used to delimit a URI from a fragment identifier (aka bookmarks), so the URI "http://localhost/foo#bar.doc" could be misinterpreted as the URI "http://localhost/foo" with a bookmark of "bar.doc".
So once again, just because you might be able to get this to work on your server doesn't mean that you should be using a character in a web-based filename that's reserved for something else. It's like building an atomic bomb - just because you can doesn't mean that you should. Your best answer in this scenario is to rename your files to something else.
;-]
Note: This blog was originally posted at http://blogs.msdn.com/robert_mcmurray/
Happy 40th Birthday FTP!
17 April 2011 • by Bob • FTP
Following on the heels of Clive Webster's article that FTP is 40 years old, let me be the next person to wish FTP a wonderful 40th birthday!
Happy Birthday FTP!
Yeah, that was kind of silly, wasn't it...? ;-]
Farewell to Zune? (Or not?)
12 April 2011 • by Bob • Zune
I'm a little slow on this bit of news, but I just stumbled across the Goodbye from Seattle: Microsoft ending Zune device article from a month ago on GeekWire. This was really bad news for me - I own several Zune devices, so I would be extremely sad to see them go; personally I think that Zunes are great media devices that have a lot of potential. Given the existence of a large body of anti-Apple users, which has led to the creation of websites like anythingbutipod.com, there are a lot of people that don't want to settle for an iPod.
As I was lamenting the untimely demise of my favorite media player, I came across the Zune Is Not Dead article on anythingbutipod.com, which was published the day after the GeekWire article was published. The anythingbutipod.com article contained a statement from Dave McLauchlan, who is the Senior Business Development Manager for Zune, and he stated rather emphatically that the Zune is not dead.
So this leaves me a bit confused, at least for the moment; I'm not sure what to think about the future for Zune devices.
FWIW - I have two Zunes, a Zune 120 (black) and a Zune 30 (red), both of which have been great devices for me. I use my Zune 30 every day during my commute to listen to audiobooks, and I use my Zune 120 when I'm traveling in order to listen to music and watch movies.
![]()
![]()
In addition to my Zunes, my wife, my son, and my daughter all use a Zune. (I also own an HTC HD7 that is running Zune on Windows Phone 7, but that's another story.)
All that being said, the Zune never reached a critical mass, and I could easily make a wish list of features that I think would help the Zune in the long run. Here are just a couple:
- Transferring files to and from a Zune should not require using the Zune software.
This is an annoying limitation, and I realize that it's the same model that is used by the iPod with iTunes. But Microsoft already makes Windows Media Player, and you can use that to transfer files to/from third-party players, so I find it somewhat limiting that you have to use the Zune software. - The Zune should show up as a removable device in Windows Explorer like most third-party media players.
This is somewhat related to the previous comment, but here's an example: my dad and my aunt both own media players from Creative, and it's great that their media players show up as removable devices in Windows Explorer when you plug them in. There's an old adage that says, "You can't teach an old dog new tricks," and it's great when you don't need to try. My dad is in his early 70's and my aunt is in her early 80's, so it's great that they can stick with the simple drag & drop or copy & paste functionality in Windows when they want to update the media on their players. (For that matter, I wrote a batch file that my dad uses when he adds MP3 files to his media player that automatically updates the metadata; all he has to do is run the batch file when he adds new files to his media player and everything is up-to-date. You can't do that on an iPod or a Zune.)
Anyway, that's my $.02 on the subject. I love my Zunes, and I hope that Microsoft decides to keep them around.
Credential Caching in FTP 7.0 and FTP 7.5
08 April 2011 • by Bob • FTP, IIS
I've seen a few situations where people that are using the FTP 7.0 and FTP 7.5 service have noticed that it takes a while for their password changes to be reflected by the FTP service. To put this another way, here are the typical symptoms that people describe to me:
- A user successfully logs into their FTP site using their username and password
- The user logs out of their FTP site
- The user changes their password
- The user attempts to log into their FTP site using their username and their new password, but this fails
- The user can successfully log into their FTP site using their username and their old password
- (Note: As a corollary, restarting the FTP service fixes the symptoms)
Here's why this happens: to help improve the performance for authentication requests, the FTP service caches the credentials for successful logins. (The cache duration is set to 15 minutes by default.) This means that if you change your password, your changes may not be reflected for the cache duration.
The good news is, the FTP credential cache settings can be changed easily, and I have documented all of the settings for FTP caching in the IIS configuration reference at the following URLs:
- FTP Caching <caching>
http://www.iis.net/ConfigReference/system.ftpServer/caching - FTP Credentials Cache <credentialsCache>
http://www.iis.net/ConfigReference/system.ftpServer/caching/credentialsCache
Quoting and paraphrasing the above documentation, there are the two settings that you can configure on the <credentialsCache> element:
| Attribute | Description |
|---|---|
enabled |
Optional Boolean attribute. true if credential caching is enabled; otherwise, false. The default value is true. |
flushInterval |
Optional uint attribute. Specifies the cache lifetime, in seconds, for credentials that are stored in the cache. Note: This value must be between 5 and 604,800 seconds. The default value is 900. |
What this means to you is - you can completely disable credential caching, or you can specify a different timeout. For example, on several of my development servers I often disable credential caching; this allows me to change passwords whenever I want, which is very useful when I am creating custom authentication providers. For my production servers I tend to stick with the default values, although I might change those values when I'm troubleshooting a problem.
I usually configure the settings from a command line or a batch file, although the articles that I listed earlier have steps for using the IIS Manager to change the settings for FTP credential caching. Just the same, here are some examples for setting the values by using appcmd.exe:
How to Disable FTP Credential Caching
cd /d "%SystemRoot%\System32\Inetsrv"
appcmd.exe set config -section:system.ftpServer/caching /credentialsCache.enabled:"False" /commit:apphost
net stop FTPSVC
net start FTPSVC
How to Specify a Custom Timeout for FTP Credential Caching
cd /d "%SystemRoot%\System32\Inetsrv"
appcmd.exe set config -section:system.ftpServer/caching /credentialsCache.enabled:"True" /commit:apphost
appcmd.exe set config -section:system.ftpServer/caching /credentialsCache.flushInterval:"300" /commit:apphost
net stop FTPSVC
net start FTPSVC
I hope this helps. ;-]
Note: This blog was originally posted at http://blogs.msdn.com/robert_mcmurray/
Why I Won't Buy Another HP Computer
23 March 2011 • by Bob • Hardware, Windows, Support
First of all, I have to point out that I have a few friends that work for Hewlett-Packard, so I have to apologize up front for what I'm about to write in this blog. But I just had such a horrible customer support experience with HP that I won't buy from them again.
Why I Bought an HP Computer
I have nothing against HP computers; for several years I used two beefy dual-CPU HP/Compaq ProLiant servers for my web hosting machines. (I loved those computers, and I only replaced those when Windows Server 2008 was released and I thought that it was time to upgrade my servers.)
Recently I decided to replace my aging Dell desktop computer with a newer model. I'm quite partial to Dell computers, because I've always had great experiences with their computers and their company. I had a chance to buy a refurbished HP P6510F computer for a great price, so I decided to take a chance with HP since that particular computer model had a lot of great reviews.
When the computer arrived I did what I always do - I reformatted the hard drive and I installed a brand new copy of Windows from scratch. (I have to do this because all computer companies - HP, Dell, Gateway, etc. - install a bunch of useless garbage software whenever you buy one of their new computers.) The computer ran fine for several weeks, but I'm a person that likes to keep their computer up-to-date, so this past weekend I browsed to HP's website to see if there were any updates.
Upgrading the BIOS
As it turns out, there was a new version of their BIOS that was supposed to resolve issues when waking the computer from sleep mode if you have more than 4GB of memory. I only had 4GB of RAM in the computer, but I was already shopping for another 4GB, so it seemed prudent to install the BIOS update. I downloaded the update and ran their installer. After a couple of minutes a dialog box popped up saying that the update had applied successfully and I needed to reboot my computer, which I did.
That's when everything started to go wrong.
All Heck Breaks Loose
When my computer restarted it immediately hit the infamous Blue Screen of Death (BSOD); something very much like the following illustration:
A problem has been detected and Windows has been shut down to prevent damage to your computer. If this is the first time you've seen this Stop error screen, restart your computer. If this screen appears again, follow these steps: Check for viruses on your computer. Remove any newly installed hard drives or hard drive controllers. Check your hard drive to make sure it is properly configured and terminated. Run CHKDSK /F to check for hard drive corruption, and then restart your computer. Technical information: *** STOP: 0x0000007B (0xFFFFF880009A9928,0xFFFFFFFFC0000034, 0x0000000000000000,0x0000000000000000) |
It didn't matter how many times I tried to reboot, I still got the BSOD. I knew that BIOS updates changed some of the settings, so my natural suspicion was to assume that something in the new BIOS settings was causing the problem. I tweaked a few settings like disabling hardware virtualization and such - but there was still no joy in Mudville. After this I started to assume that perhaps the BIOS updated hadn't actually applied successfully, so I started trying to see if I could get my computer to boot from one of my several WinPE-based utility CD-ROMs and reapply the patch, but all of those also fell victim to the vicious BSOD.
I'll spare you the details of everything else that I tried - both hardware and software - but I finally gave up and decided to call HP's 24x7 technical support number.
The Technical Support Nightmare Begins
For geeks like me, having to call technical support is humiliating enough, but it's made so much worse by having to deal with front-line technical support people. Having spent 10 years in technical support myself, I have a great deal of patience with technical support engineers, but it can still be an aggravating experience. I spent the next half-hour answering mundane questions and following every instruction from HP's Tier 1 technical support script - all of which I had tried before. (At least the parts that actually applied to my situation.) I'm sure that the engineer with whom I was working meant well, but it was clear that she was floundering.
After a while she began to tell me that I didn't need the BIOS patch and that this was all my fault, to which I replied that she was correct - I didn't actually need the BIOS patch right now, but I would need it in the future, but that didn't really matter - the BIOS patch should not cause the BSOD. Besides - I always updated the BIOS in my Dell computers with no problems. (There's a good jab at HP to try yourself sometime.) Then she started to tell me that since I had a different version of Windows than HP had installed on my computer, the BIOS patch was not compatible. I asked her incredulously, "Do you mean to tell me that HP expects their customers to never install a new version of Windows?" She hesitated before replying "No," and then I reiterated my earlier assertion that no matter what, the BIOS patch should not cause the BSOD.
Then she began to tell me that I needed to purchase a system restore DVD from HP to rebuild my system. I was quick to point out that doing so would reformat my hard drive - thereby erasing all of my files - and that I was willing to bet that the problem wouldn't go away since the system restore DVD was probably not going to reset the BIOS back to an earlier version. So in my estimation I would be wasting my money and my time on a suggestion that would ultimately achieve nothing. This is where I lost her - she had no idea what I meant; so after more than an hour of basic troubleshooting with Tier 1 support and lots of time spent on hold, my patience was finally gone, and I asked to speak with someone in HP's Tier 2 support.
The Technical Support Nightmare Continues
I was transferred to a guy in Tier 2 support who discussed my predicament with me, and he seemed to have a much better handle on things. One of the first things that he did was verify that there was no reason that the BIOS update shouldn't work with my version of Windows, to which I replied that I had been trying to tell the earlier engineer the same thing. We looked at several settings, but the problem persisted, and then he suggested that I needed to purchase a system restore DVD from HP to rebuild my system. I restated my earlier claim that I would be wasting my money and my time since I was 99.9% sure that the system restore DVD would not roll back the BIOS version, so he put me on hold while he checked on that.
When he came back he informed me that the system restore DVD would not roll back the BIOS version, so I needed to return the computer to HP in order for them to reset the computer's BIOS to the original factory version. He pointed out that this would be free since the computer was under warranty, and he took my address so HP could send me a box in order to send the computer back to HP for repairs. Once all that was taken care of, we hung up.
My total time on the phone was about two hours. Ugh.
Problem Resolved
The next day I went out to lunch with my good friend, Wade Hilmo, and I related my experience to him. Once I described the symptoms he said, "I'll bet the BIOS update changed the mode for your SATA controller. Switch it from IDE to AHCI or vice-versa and the problem should go away."
Darn. I should have thought of that. ;-]
Sure enough, when I got home that night and I pulled up my BIOS settings, the SATA mode was set to RAID; I switched it to IDE and the BSOD went away. Once I knew what the problem was I found the following Microsoft Knowledge Base article that allowed me to enable AHCI:
Error message when you start a Windows 7 or Windows Vista-based computer after you change the SATA mode of the boot drive: "STOP 0x0000007B INACCESSABLE_BOOT_DEVICE"
http://support.microsoft.com/kb/922976
My thanks to Wade for pointing that out, but Wade's follow-up comment was apropos, "I'm still a bit surprised that neither of the HP folks suggested it." So I decided that I should call HP and let them know what it took to fix the problem.
Back to Technical Support
The next day I called HP Customer Care to have them cancel my open work ticket, which was the polite thing to do since the problem was resolved. Having taken care of that, I thought that I'd give their technical support people the details of what caused the issue and how to fix it. Having worked in technical support, I always liked to know what it took to resolve an issue.
This seemed like such a good idea at the time, but it didn't turn out that way. When I called HP's Customer Care folks transferred the call to their technical support people, one of their idiots support engineers put me on hold for 20-30 minutes while he read the case notes.
Are you kidding me? It doesn't take 20-30 minutes to read the case notes, even if you're in your first year of Hooked on Phonics.
Once he took me off hold, I was pleading with him to listen to my explanation that the problem was already resolved and it was not caused by whatever stupid idea kept popping out of his wild imagination - I just wanted to share the details of how to resolve the issue if another customer calls in with the same problem, which is undoubtedly going to happen. I pointed out that I was trying to help HIM, for Pete's sake, and he just wouldn't listen. (I started hoping that HP was recording the call.)
After all that, I made it abundantly pretty clear that what he did was very unprofessional, and I asked to speak to a manager. He informed me that he'd see if a manager was available - then he put me back on hold. Fortunately I was calling from work where I have a headset for my telephone, this way I could keep working while I was on hold. (Otherwise this would have really aggravated me.)
After another 20-30 minutes I realized that this idiot engineer was not going to find a manager, he was waiting for me to hang up and go away. So I decided to put that call on hold and try to call back into technical support, but my @#$% LG-Nortel phone won't let me call a phone number if I already have that number on hold. Argh. While I was browsing HP's website to see if I could locate a different phone number for technical support I accidently hung up the original call.
Crap, crap, crap.
So I called HP again and I got another engineer - and I asked to speak to a manager right off the bat. I profusely apologized to the new engineer, and I stated emphatically that it was nothing that he did. He asked for my name and such, but I told him that I had a support ticket number and I gave him that instead. Then I started to explain what happened with the other idiot and how I resolved the issue, but this new engineer attempted to defend the earlier idiot engineer and started to change the subject. I politely cut him off and simply pointed out that the first guy took 30 minutes to read the case notes, whereas he took less than 30 seconds - even this guy had to admit that the first guy's behavior was uncalled for.
Cutting the rest of the story short, I did finally tell the new engineer what it took to fix the problem, which was simply resetting the SATA configuration back to the pre-update BIOS value. I also gave him the information about how to enable AHCI using Microsoft's KB 922976. He thanked me for the information, and after he tried unsuccessfully to upsell me on a new warranty for my computer we ended the call.
Closing Remarks
So there you have it - a thoroughly bad HP customer support experience. If either Hewlett or Packard somehow manage to read this blog, they should be ashamed on behalf of their employees. I'd give you the names of those employees, but no one that I talked to had a name that I could pronounce.
Of course, I never did get to speak to a manager at HP.
IIS 6: Setting up SSL - Part 3: Installing the Certificate
17 February 2011 • by Bob • IIS, SSL
In part three of my series on setting up SSL on IIS 6, I'll describe the steps that are necessary to install an SSL certificate. Simply out of convenience I broke this process into two sections:
- Installing Your Certificate (Required)
- Verifying Your Certificate (Optional)
Installing Your Certificate
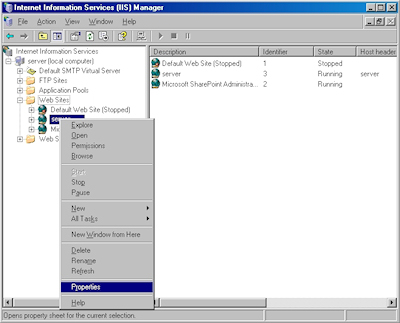
- Bring up the properties for a website:

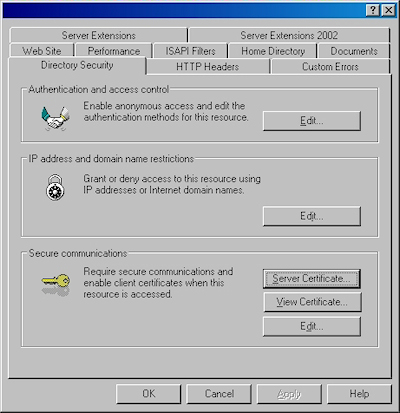
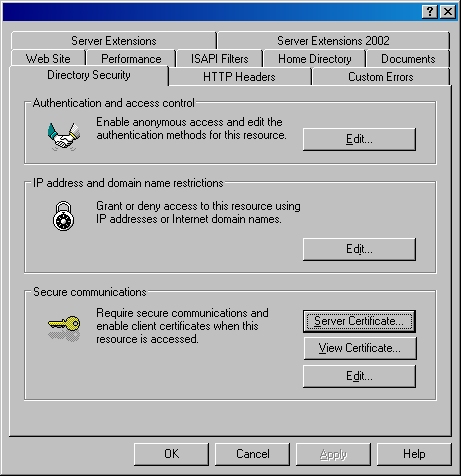
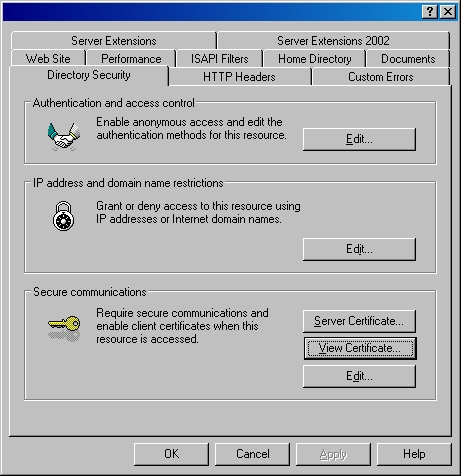
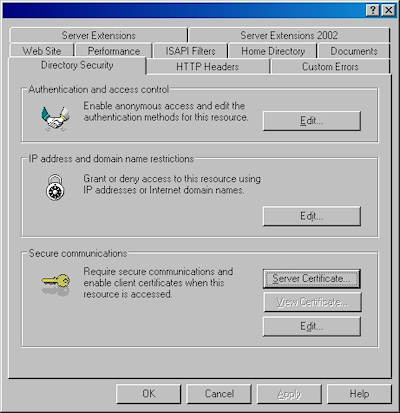
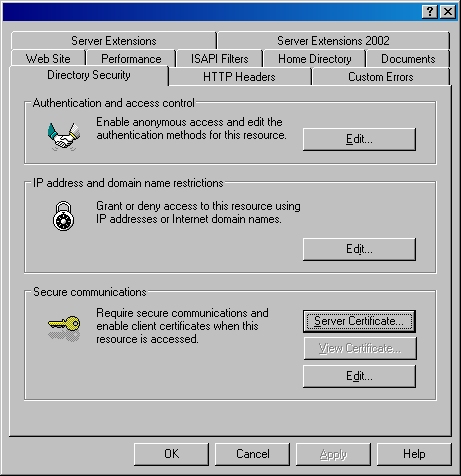
- Switch to the "Directory Security" tab and click "Server Certificate:"

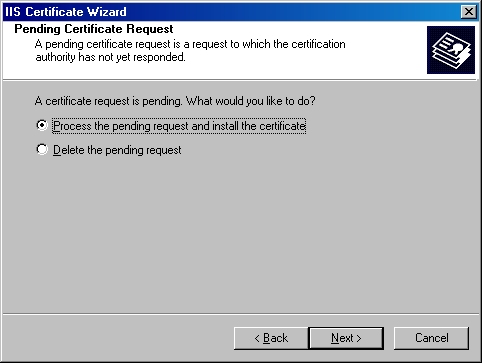
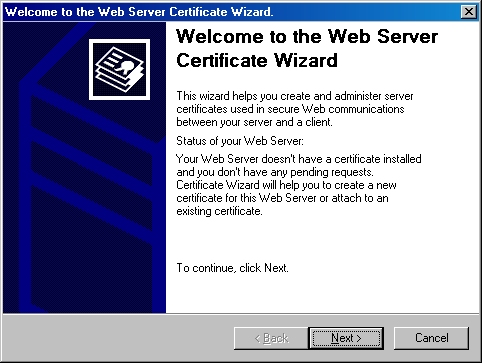
- Click "Next" to bypass the first page:

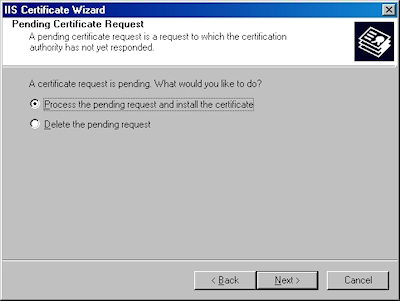
- Choose to process the request and click "Next":
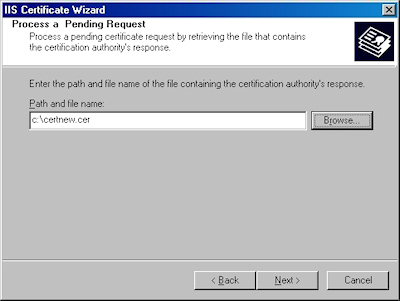
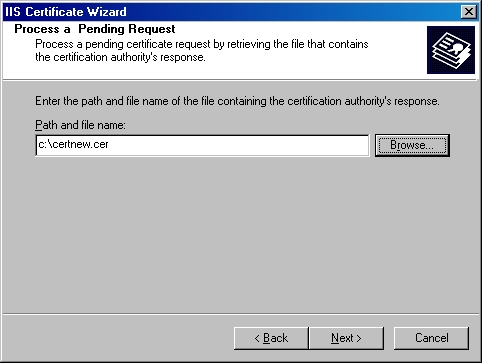
- Click "Browse" to the locate your certificate request:
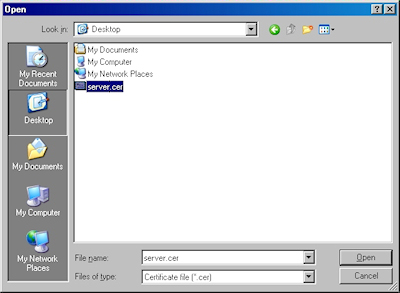
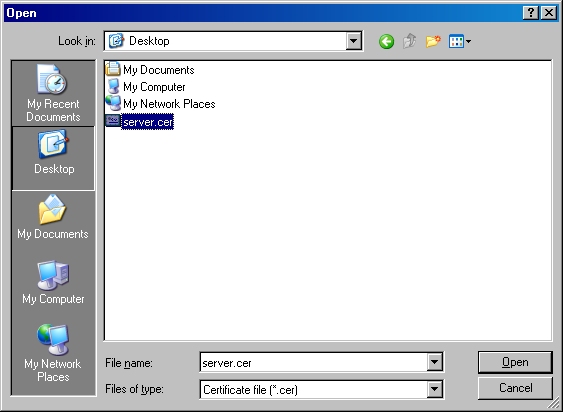
- Browse to the location of your certificate, highlight it, and click "Open":
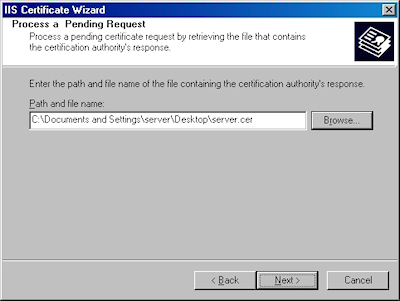
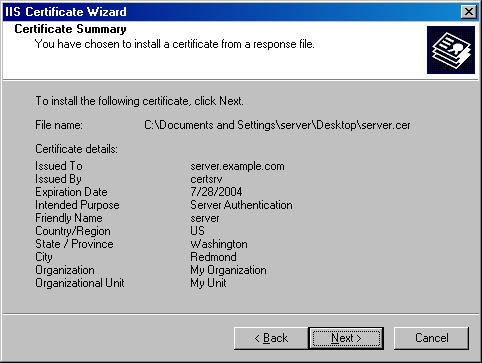
- Verify the location of your certificate and click "Next":
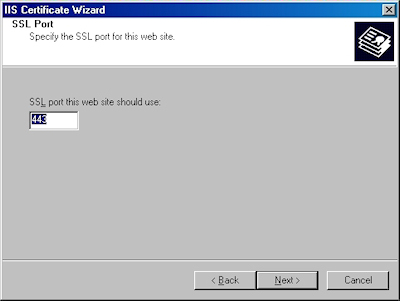
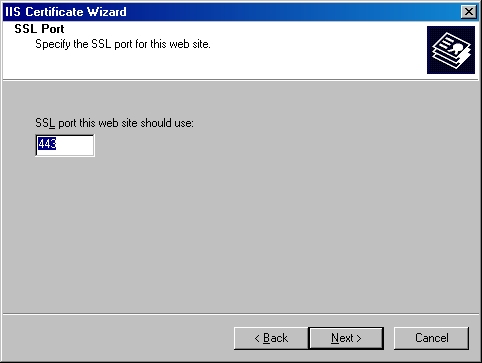
- Choose your SSL port and click "Next":
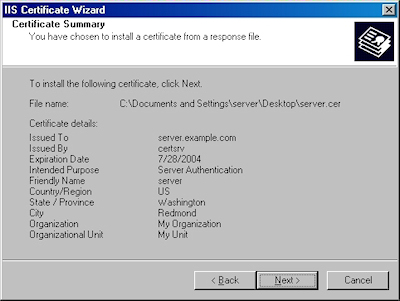
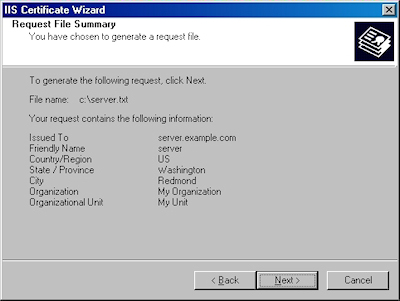
- Review the information to make sure it is correct and click "Next":
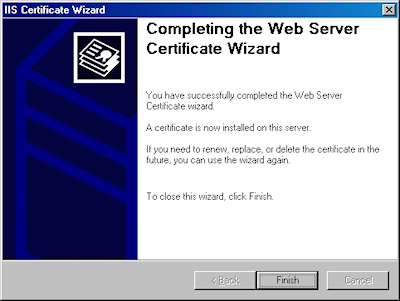
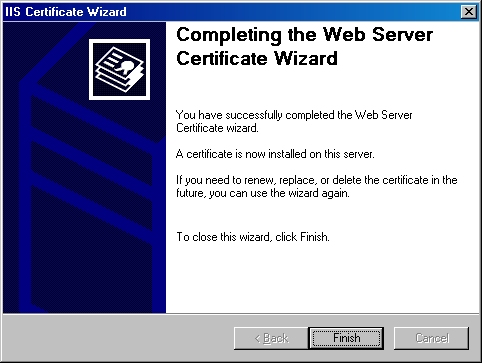
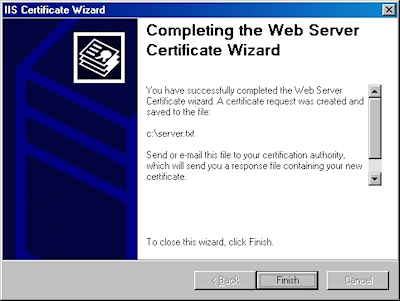
- Click "Finish" to close the wizard:
- Notice that you now have all the buttons available for SSL.


Verifying Your Certificate
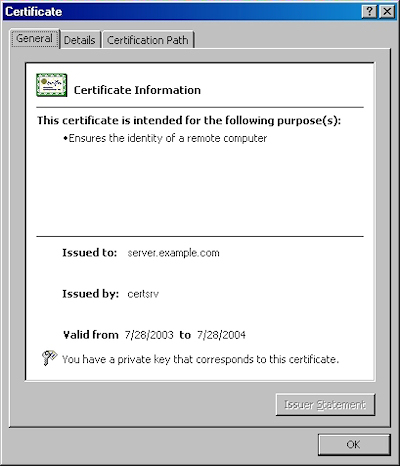
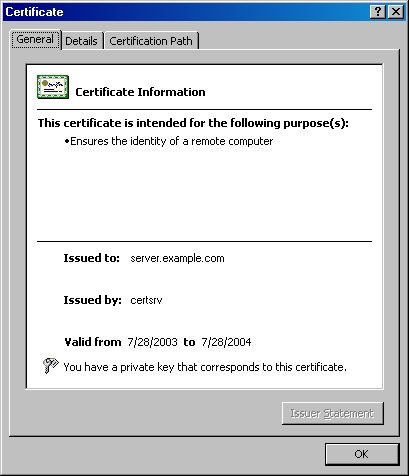
- Click the "View Certificate" button:

- On the "General" tab, if the certificate is good you will see a normal certificate icon. (If no, you will see a warning or error icon.)
- On the "Certification Path" tab you will see your certificate hierarchy:
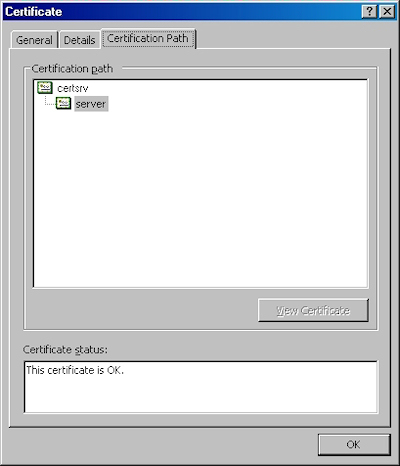
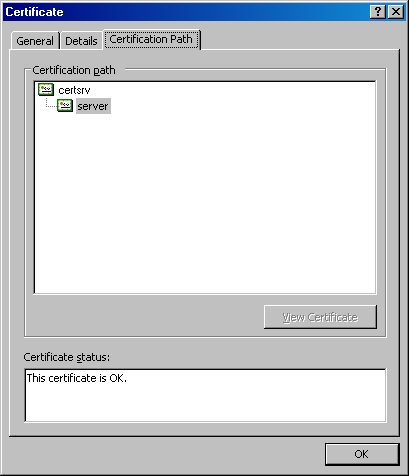
That wraps it up for creating, submitting, obtaining, and installing a certificate. In subsequent blogs I'll post some appendices with instructions about setting up Certificate Services on Windows Server 2003.
Note: This blog was originally posted at http://blogs.msdn.com/robert_mcmurray/
IIS 6: Setting up SSL - Part 2: Submitting a Certificate Request and Obtaining a Certificate
16 February 2011 • by Bob • IIS, SSL
In part two of my series on setting up SSL on IIS 6, I'll describe the steps that are necessary to obtain an SSL certificate. Typically you would submit your certificate request to any one of several Certificate Authorities (CA); and there are several that are available. Here are just a few:
- Thawte Digital Certificates
http://www.thawte.com/ - VeriSign Digital Certificates
http://www.verisign.com/
The steps to obtain a certificate differ for each CA, and it would be way outside the scope of my limited blogspace to include the steps for every CA on the Internet. So for my blog series I'm going to show how to use Certificate Services on Windows Server 2003 to obtain a certificate. This part of the process is broken into three steps:
Submit the Certificate Request
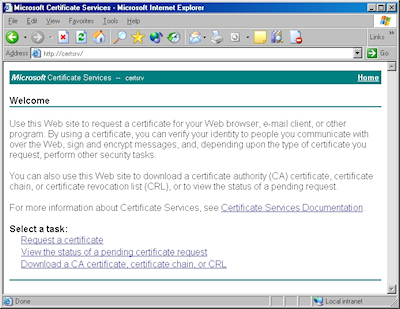
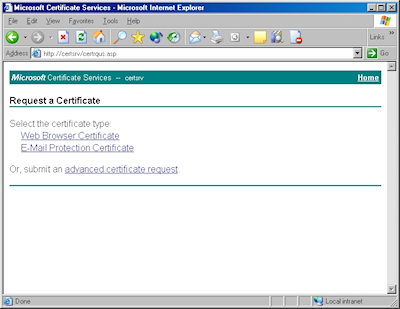
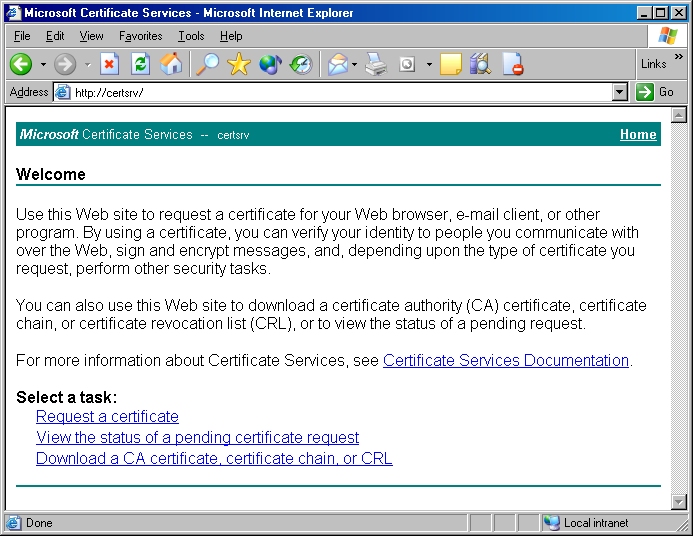
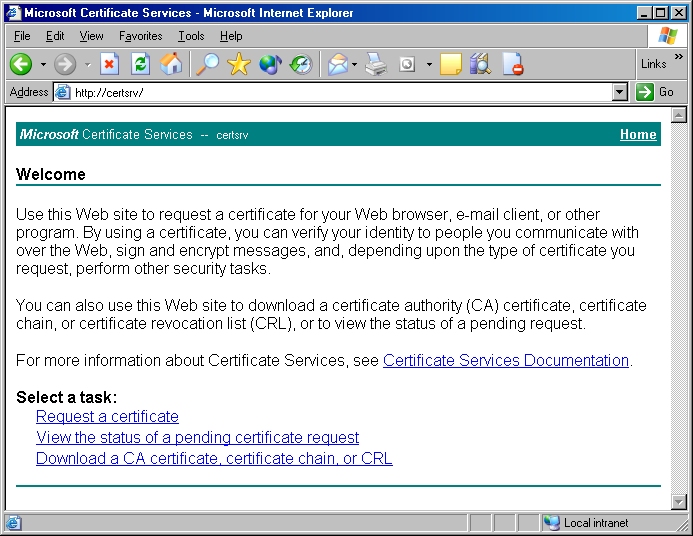
- Browse to the "Certificate Services" website, and then click the link to "Request a Certificate":
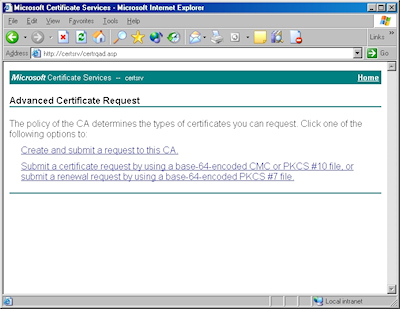
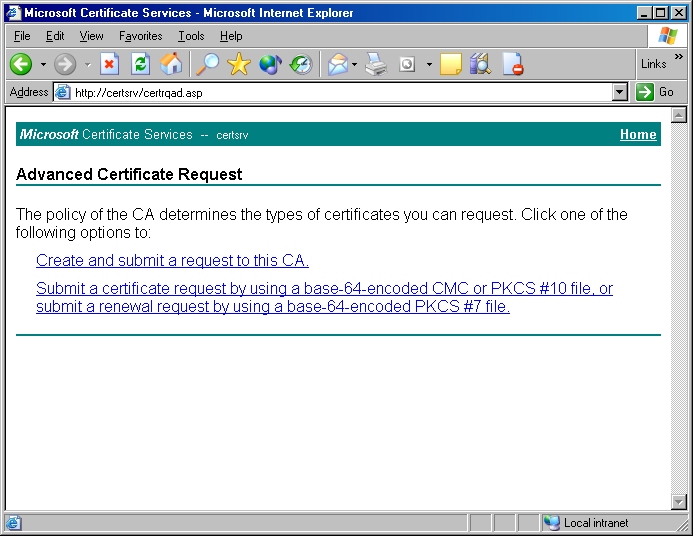
- Click the link to submit an "advanced certificate request":
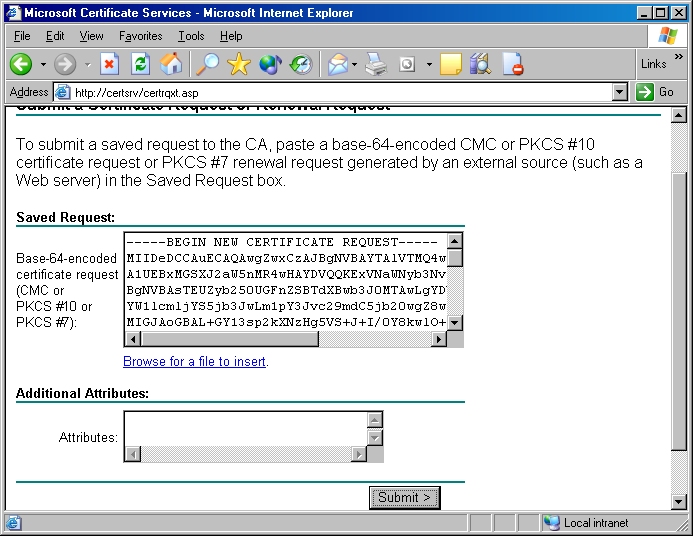
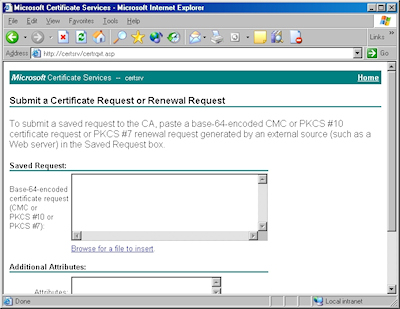
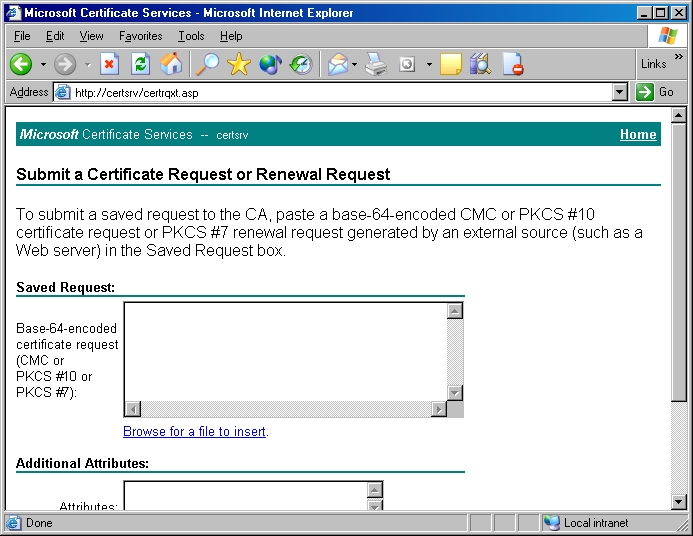
- Click the link to "Submit a certificate request by using a base-64 encoded file":
- Copy the text from your certificate request file and paste it into the "Base-64 Encoded Certificate Request" text box, then click "Submit":
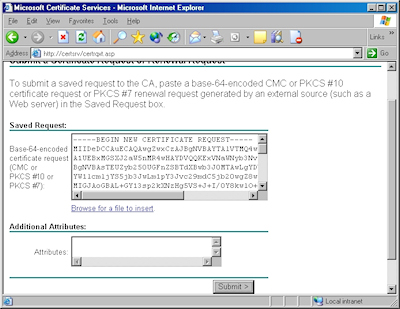
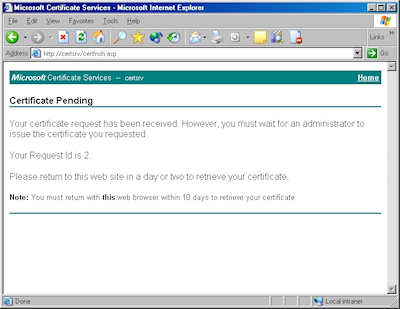
- By default, Certificate Services will return a message stating that your certificate is pending. You will need to notify your Certificate Services administrator that your certificate needs to be approved.


Note: As an alternative to copying the text from your certificate request file, when you are using Certificate Services on Windows Server 2003, you can use the application to read the file for you. To do so, you would need to change the step where you copy and paste the text to the following steps:
- Click the link to "Browse for a file to insert":
- You may be prompted whether to allow an ActiveX control to run; this warning may appear because the web application uses an ActiveX control to read the certificate request file. In order to continue, you need to click "Yes":

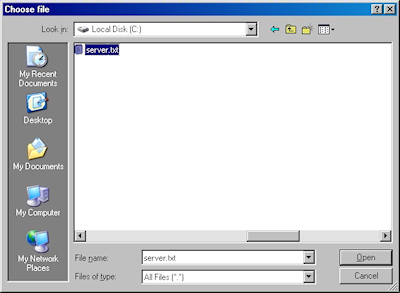
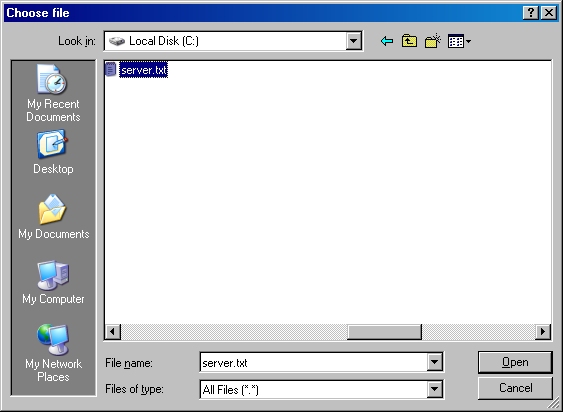
- When the subform appears, click the Browse button:

- Locate your certificate request file, and then click "Open":
- Click the "Read" button to load the text from your certificate request file, this will insert it into the form:
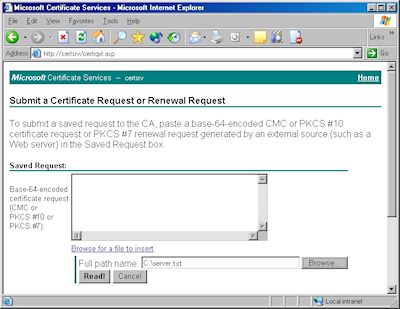
- Once the text from your certificate request file has been inserted, you can submit the form as you would have done if you had copied and pasted the text manually.


Certificate Processing
At this point the Certificate Authority (CA) will consider your request. I'll post a blog later with details about processing a request using Certificate Services on Windows Server 2003.
Obtain the Certificate
When your certificate request has been processed, you need to use the following steps to save your certificate to your system before you can process it.
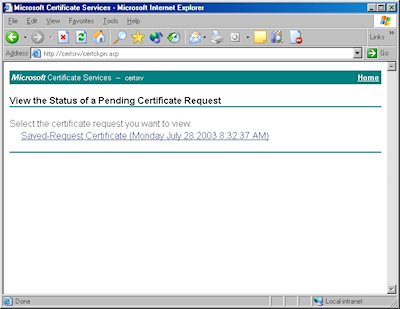
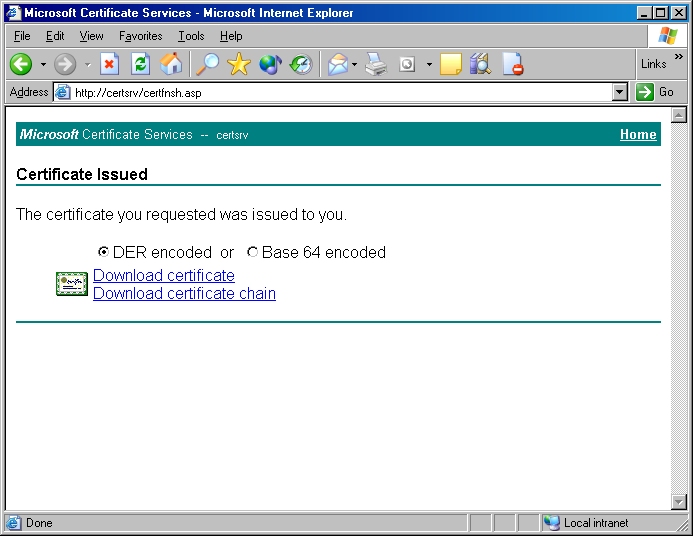
- Browse to the "Certificate Services" website, and then click the link to "View the status of a pending certificate request":

- Click the link for your approved request.
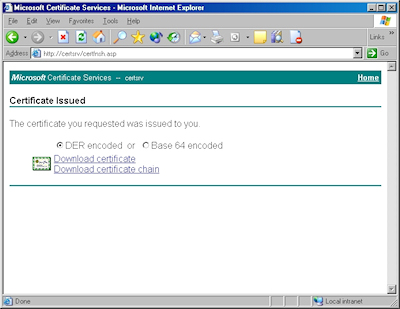
- Click the link to "Download CA certificate":
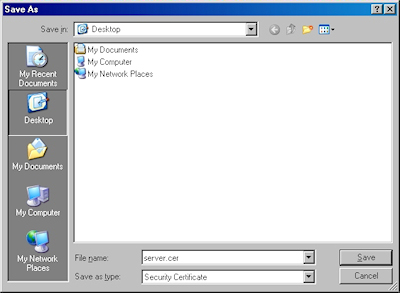
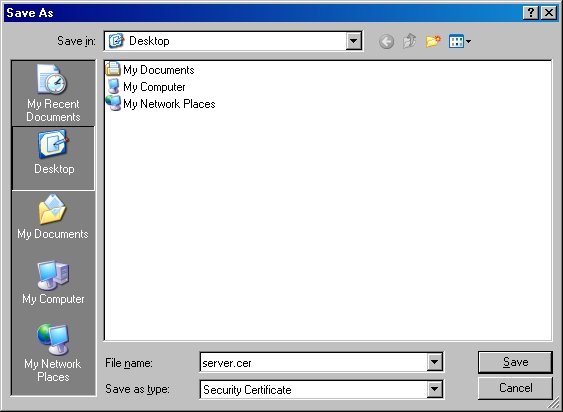
- When prompted, click "Save":
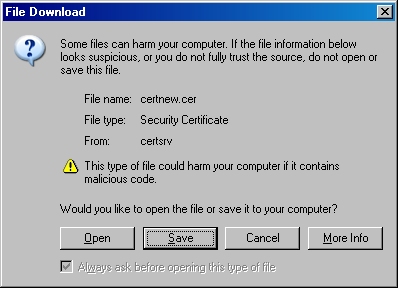
- Save the file to somewhere convenient, like your desktop:

In the next post of this blog series, I'll show you how to install your certificate on IIS 6.
Note: This blog was originally posted at http://blogs.msdn.com/robert_mcmurray/
IIS 6: Setting up SSL - Part 1: Making a Request
14 February 2011 • by Bob • IIS, SSL
In part one of my series on setting up SSL on IIS 6, I'll describe all of the steps that are necessary to request an SSL certificate for a website. Once you have completed your certificate request, you would send that to a Certificate Authority (CA) for approval. In subsequent blog posts I'll discuss submitting a certificate to a CA - specifically Certificate Services on Windows Server 2003 - and then I'll discuss obtaining a certificate and installing it on your IIS server. But for now, let's get started with a creating certificate request. To do so, use the following steps.
- Bring up the properties for a website:
- Switch to the "Directory Security" tab and click "Server Certificate:"
- Click "Next" to bypass the first page:

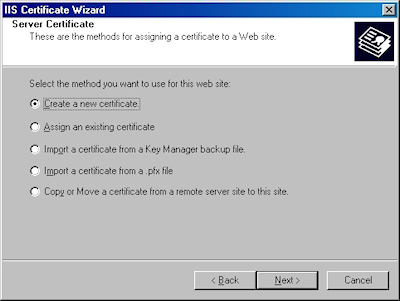
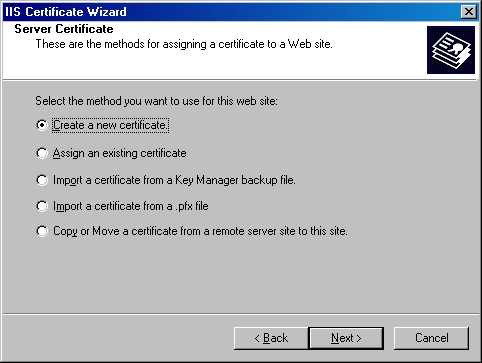
- Choose to "Create a new certificate" and click "Next":
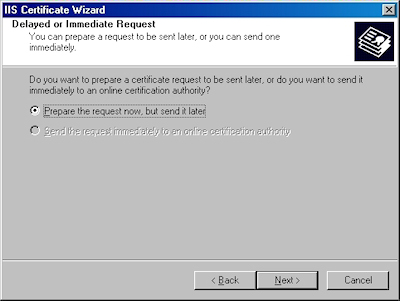
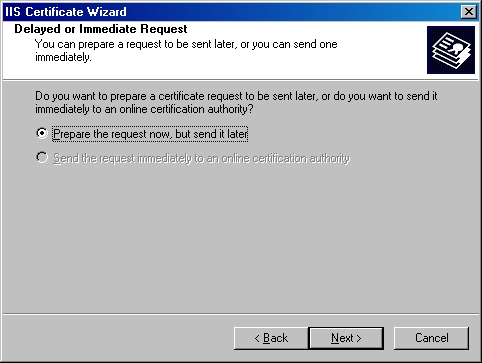
- Choose to "Prepare the request now, but send later" and click "Next":
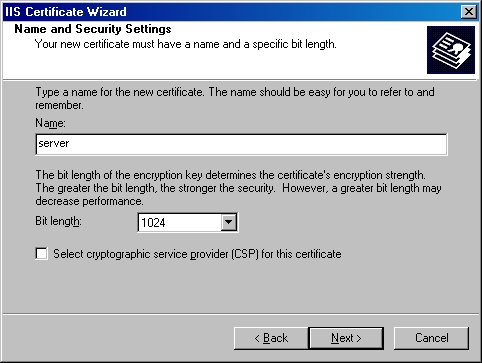
- Enter a friendly "Name" for the request, and your desired "Bit length". Click "Next":

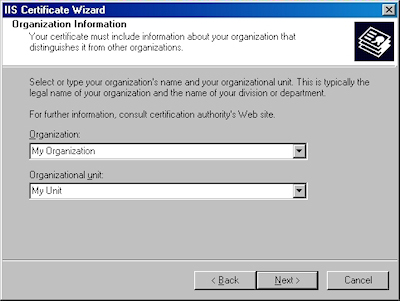
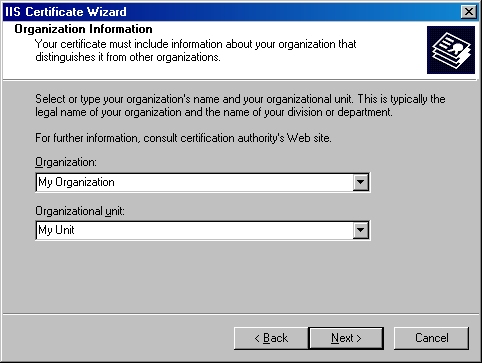
- Enter your "Organization" and "Organization unit", then click "Next":
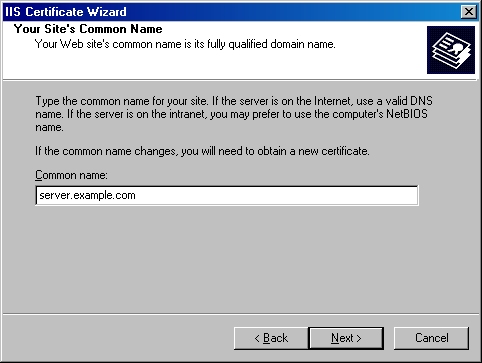
- Enter the "Common name" for your site then click "Next":
Note: This must be the actual web address that users will browse to when they hit your site.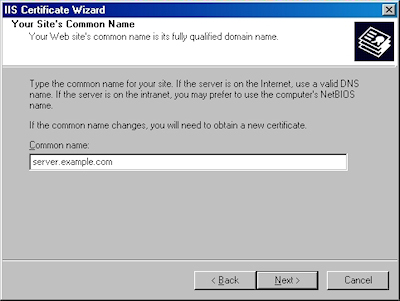
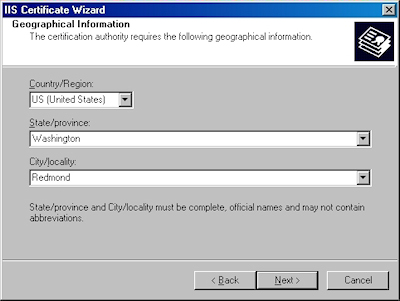
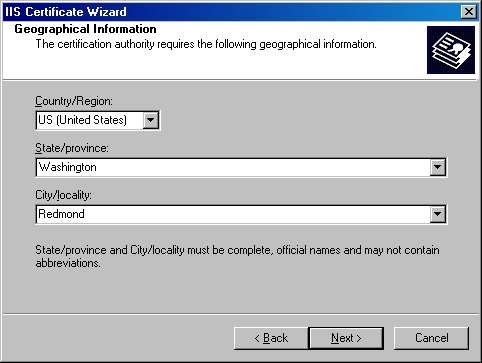
- Enter your "Country", "State", and "City", then click "Next":
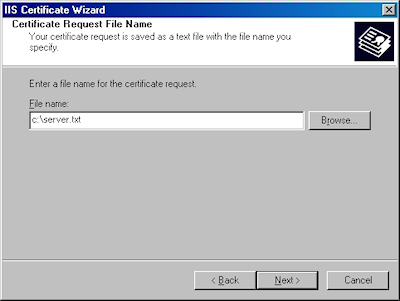
- Enter the "File name" for your request, then click Next:
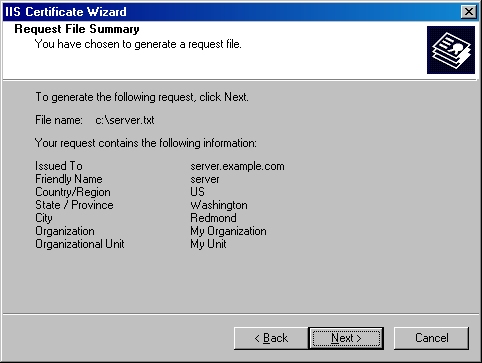
- Review the information for your request, then click Next:
- Click "Finish" to exit the wizard.


FYI: If you were to open your request file in Notepad, it will look something like the following:

In the next post of my blog series, I'll show you how to use Certificate Services on Windows Server 2003 to obtain a certificate.
Note: This blog was originally posted at http://blogs.msdn.com/robert_mcmurray/
More 511th Jokes and Humor
05 February 2011 • by Bob • Military
This 11th entry from the annals of 511th MI Company history is a continuation of the jokes that I introduced in my last post. As a quick reminder, these entries were all collected from the voluminous number of utterly useless messages that we sent back and forth between the EW platoons over the ASAS datalink system in the TRQ-32s.
The Official EW2 List of Things "Not to Do with Coffee"
- Don't make oatmeal with coffee
- Don't drink mess hall coffee after eating red lifesavers
- Don't drink mess hall coffee, period
- Don't let Paski near a full cup of coffee while on pos, unless you want to wear it
- Don't pour coffee on your Lt.
- Don't share coffee with your T&A team, unless you plan to resupply them forever
- Don't let Alex, Fred, or J.J. near a full pot of coffee and an ASAS Datalink
- Don't wash your field socks in coffee
- Don't use coffee as brake, hydraulic, or windshield wiper fluid (However, you can use it for rust removal)
- Don't yodel with your mouth full of coffee
- Don't puke, piss, or pop pimples in a pot of coffee
- Don't deploy to the field without lots of it
(J.J. Simmons and Bob McMurray, "Caravan Guard" 1989)
A Story
[Note: As if we hadn't picked on 1LT Stahl enough, I wrote the following story about him. (Of course, D.A.T. means "Dumb Ass Tanker".)]
Once upon a time, all was well in E.W. land. The birds were singing and the jammers were jamming. Happiness just seemed to flow from everything about the EWites. Their lives were simple yet full of good cheer. They truly loved the work that they did and fancied to themselves that maybe it was important for some reason.
But then one day, "IT" came to town. The dreaded D.A.T.-Beast that they had all heard rumors of. There was no way to stop it. No way to prepare. No time to run or hide. It fell upon the helpless EWites and viscously attacked them. It tore at their very hearts as if it derived joy from seeing others suffer. It held no concept of the work that they tried so hard to do. It scarred their precious COMSEC habits. It had no life of its own, and thus it began to feed on the lives of others like some inhuman vampire of man's very essence.
It possessed no concept of right or wrong. It sought only self-importance and personal gain - the incredible irony to the role in which it chose to masquerade itself; an Army officer. By design the title should reflect an attitude of responsibility, accompanied by a genuine sense of caring for the well-being of its subordinates. But the Beast held not one endearing trait as a leader of men. A thoughtless, soulless specter shaped like a man. An empty, hollow shell that somehow tried to crush the will of others to bring itself some sadistic form of pleasure.
In its arrogance and pride, it has the audacity to raise its head in a flare of self-righteous temper and cry, "How dare you question my judgment?" when its imperfections are exposed. But therein lies its tragic flaw; for no puffed up ego that rests upon one's shoulders can lay low enough to duck through every door. Sooner or later it comes crashing to the ground at the wrong time yet in the right place, and if all luck prevails the Beast will die in some strange way. The hope remains that this mass of flesh that torments man will indeed fall prey to the traps that it laid for others, and some as yet unseen force will attack and purge this cancerous ego infection from the Beast, leaving enough to mold into a shape more closely resembling a man.
(Bob "Fred" McMurray, "Bold Lancer" 1989)
The World: Man's Future Foretold...
Life as we know it, has ended.
The nations of the world have all been devastated by a massive nuclear war.
Civilization is no more.
The peoples of the world are massing together in an effort to reclaim their lives.
The leader of the masses has been designated Emperor of the World.
The Emperor has maintained order in America the ten years since WWIII.
Very few oppose the emperor; those who do wish for a quick death.
Damnation of the rebels is personally levied by the hand of the emperor:
J.J. Slayer.
Are you damned in this Hell???????
(J.J. Simmons, Caravan Guard, 1989)
Bad DF-Ville (Sung to the tune of Margaritaville)
Wasting away again in Bad DF-Ville,
Searching for my lost OPFOR freq.
Some people say that there's an LT to blame,
But I know, that it's all TCAE's fault.
DF's and fixes, we all know what we're missin'.
We don't have a clue where the enemy stays.
"Gimme a grid square...I don't care where,"
That's all we hear from the TCAE goons.
But it don't matter, ignore the radio chatter.
Don't even bother, you'll be jumping real soon.
Wasting away again in Bad DF-Ville,
Searching for my lost OPFOR freq.
Some people say that the Blue LT is to blame,
But I know, that it's all TCAE's fault.
(Bill McCollum, Hohenfels 1990)
That wraps it up for this post, but I have a few more jokes in my files to post in the future.
511th Jokes and Humor
03 February 2011 • by Bob • Military
This post marks the 10th installment in my series on the 511th MI Company. So far I have posted all of the lists that I had collected, and I've included some stories along the way. Today's post is a little different - I also collected a bunch of jokes that the ESM squads from the two EW platoons sent back and forth over the TRQ-32's ASAS system. I thought that it might be amusing to let everyone see what we thought was funny at the time. ;-]
In the text file that I had used to collect these jokes I had added the following dedication:
These works best represent the attitudes and feelings shared by most who have sat rack upon the "Pos of Sorrow" at one time or another. They are not always intended to offend, though they sometimes do, but rather to show a rare moment of humor in what might otherwise be a dull and boring life.
To all who wear the Blackhorse, I say with the utmost of heartfelt sincerity and emotion, "Get out of the Army while you still can!"
For each of the jokes that were sent, I managed to write down who sent them and what field problem we were deployed on when I collected them.
Selected Titles from the J. Irwin Rumplemeyer Memorial Book Club
There are many titles to chose from when you join the J. Irwin Rumplemeyer Memorial Book Club. Famous authors, quality works.
- Trotting across Zaire
- I suck, you suck (Speak for yourself, Spanky)
- The Spankmeister of Fulda Gap
- Thermonuclear Racquetball: Applied theories
- Opussum Huntin' with Billy Bob Redneck
- The Chairborne Rangers: Tales from the Orderly Room
- How to make two small hats from a brassiere
- John Carter, Warlord of Mars versus Andy Griffith
- Roadkill: It's not just for breakfast anymore
- Tremble your way to fitness
- Eat right, stay fit, and die anyway
- Getting the point across with Plastique
- The Donner Party Cookbook: Frontier recipes with a twist
- It's not easy being a complete Putz: Biography of an XO
- The Black and Decker home facial reconstruction kit
- The Petroleum Jelly Diet
- What every 98G should know, but doesn't ask. (Who cares!)
- Dude, get a clue.
- Coming of age, new NCO's speak out.
- Gandhi, story of an abused child.
- Does Fu Man Chu?
- Thatcher and Reagan: Portrait of a lust affair
- The life and times of 34 extremely short Saints
- True Confessions: I was a Democrat!!
- "Is safe sex in a car, intercourse with the seatbelts on?"
- How to net with a 32(V) and get a date at the same time
- Sex and the 98G, or Wahhh!!
- Spanking: An in-depth study of milk and ************
- Milk: It's not just for drinking!
- Field Duty: It's not just a job, it's boring!!!!!
- Toxic Dumps: A guide to vacationing in America
(By Dave Paski, "Bold Lancer" 1989)
Note: I believe that Paski's "Biography of an XO" book was in reference to 1LT Stahl, who was thrust on the 511th for several months as Company XO until our CO managed to find a way to push him off on some other unsuspecting Company.
The 10 Top Heavy Metal Albums of All Time
- Burl Ives - "Chainsaw Lust"
- Slim Whitman - "Satan and a Six Pack"
- Roger Whitaker - "Dance, Bitch, Dance"
- Boxcar Willy - "Hobo Hell"
- Mormon Tabernacle Choir - "Sacrifice Two out of Three Wives"
- Boston Pops - "Belial's Orchestra"
- Mitch Miller - "Backwards Singalongs"
- Roy Clark - "Even **** Rot"
- Engelbert Humperdink - "Vanity for my Soul"
- Buck Owens - "I hope that Roy Clark rots"
(J.J. Simmons, "Bold Lancer" 1989)
The F.B.I.'s Latest Wanted Dead List
- Lt. McNeil (Alias "Spanky") - Wanted for impersonating an Officer
- Sgt. Smith - Wanted for impersonating a mature person
- Sgt. Degrood - Wanted for impersonating Dumbo
- Spc. Paski - Wanted for impersonating Sgt. Smith
- Spc. Dodge - Wanted for impregnating sheep
(J.J. Simmons, "Bold Lancer" 1989)
Five Reasons Why Not to Yodel in the Woods
- The Boars only like country
- It causes diarrhea in rodents
- It causes spontaneous itching in embarrassing places
- Burl Ives would sue
- It turns Bill Magan on
(J.J. Simmons, "Caravan Guard" 1989)
That's it for now - I'll post more in future notes.