IIS 6: Setting up SSL - Part 1: Making a Request
14 February 2011 • by Bob • IIS, SSL
In part one of my series on setting up SSL on IIS 6, I'll describe all of the steps that are necessary to request an SSL certificate for a website. Once you have completed your certificate request, you would send that to a Certificate Authority (CA) for approval. In subsequent blog posts I'll discuss submitting a certificate to a CA - specifically Certificate Services on Windows Server 2003 - and then I'll discuss obtaining a certificate and installing it on your IIS server. But for now, let's get started with a creating certificate request. To do so, use the following steps.
- Bring up the properties for a website:
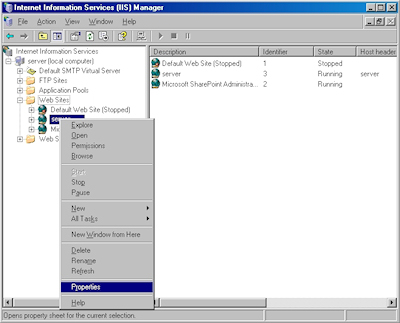
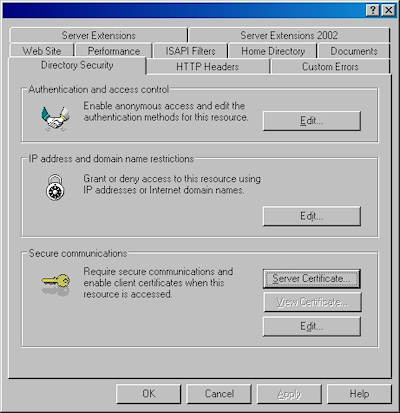
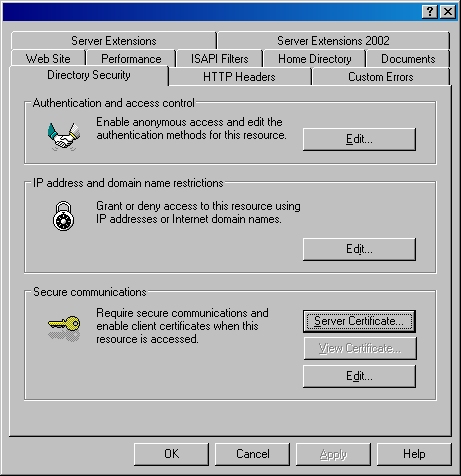
- Switch to the "Directory Security" tab and click "Server Certificate:"
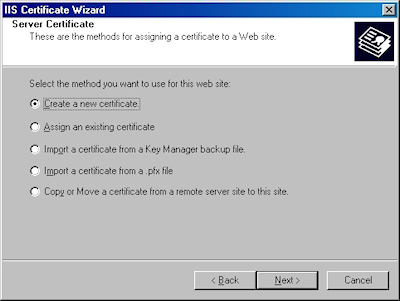
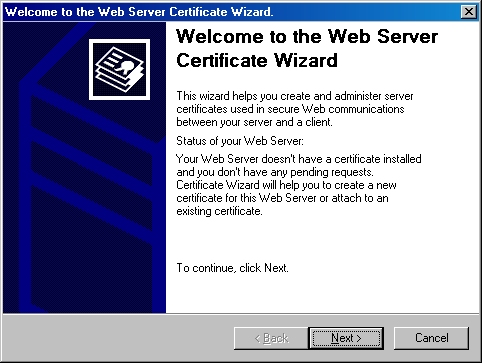
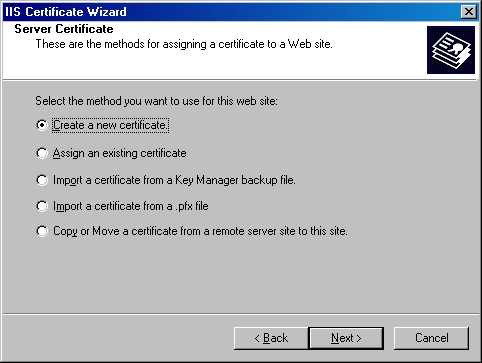
- Click "Next" to bypass the first page:

- Choose to "Create a new certificate" and click "Next":
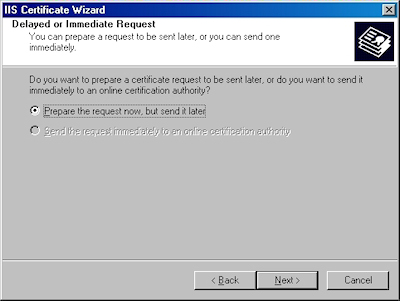
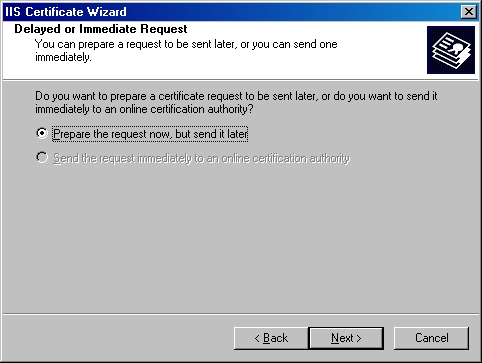
- Choose to "Prepare the request now, but send later" and click "Next":
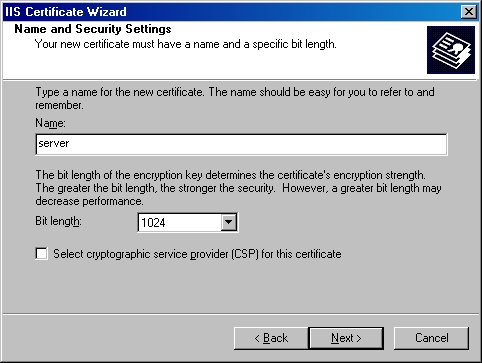
- Enter a friendly "Name" for the request, and your desired "Bit length". Click "Next":

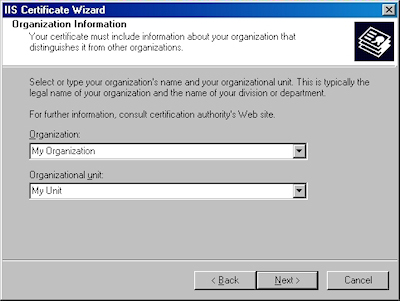
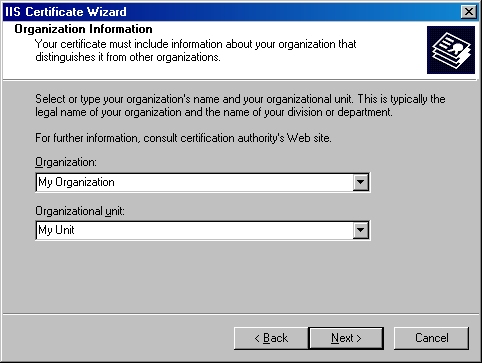
- Enter your "Organization" and "Organization unit", then click "Next":
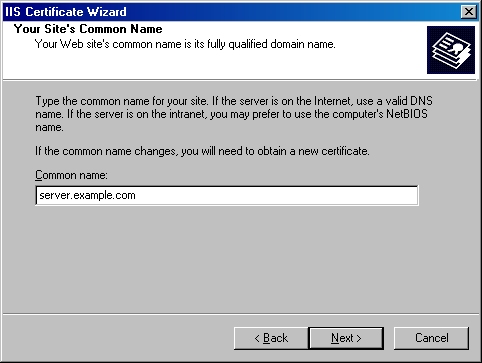
- Enter the "Common name" for your site then click "Next":
Note: This must be the actual web address that users will browse to when they hit your site.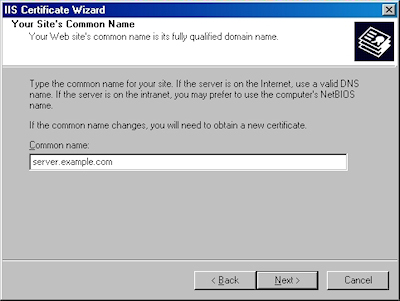
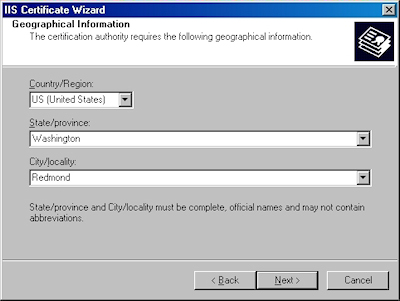
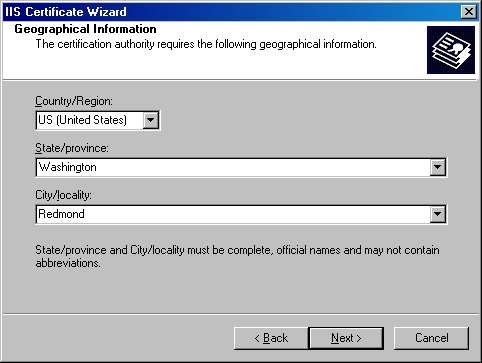
- Enter your "Country", "State", and "City", then click "Next":
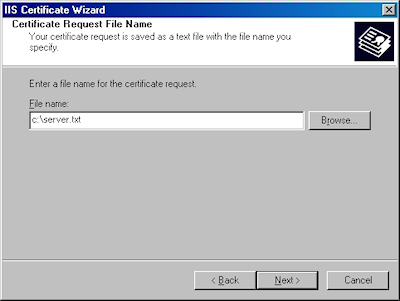
- Enter the "File name" for your request, then click Next:
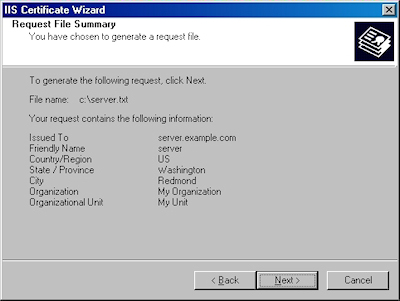
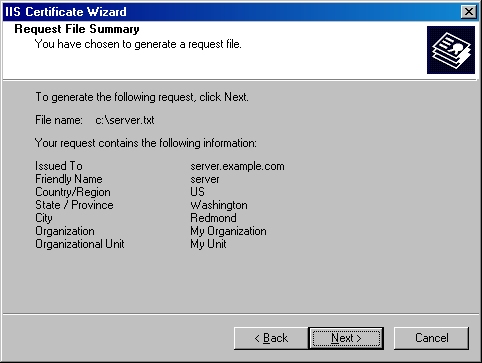
- Review the information for your request, then click Next:
- Click "Finish" to exit the wizard.
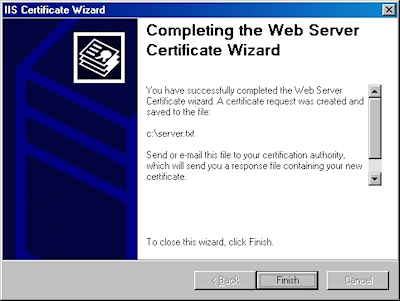


FYI: If you were to open your request file in Notepad, it will look something like the following:

In the next post of my blog series, I'll show you how to use Certificate Services on Windows Server 2003 to obtain a certificate.
Note: This blog was originally posted at http://blogs.msdn.com/robert_mcmurray/
Life after FPSE (Part 6)
31 January 2011 • by Bob • FrontPage, IIS, WebDAV
In this latest installment on my series about configuring your server for hosting without the FrontPage Server Extensions (FPSE), I'd like to discuss a couple of WebDAV best practices that I like to use.
Blocking FPSE-related Folders with Request Filtering
In my How to Migrate FPSE Sites to WebDAV walkthough, I discuss the following FPSE-related folders:
| Folder | Notes |
| _fpclass | Should contain publicly-available FrontPage code - but should be secured. |
| _private | The FrontPage Server Extensions often keep sensitive data files in this folder, so it should be secured to prevent browsing. |
| _vti_bin | This is the virtual directory for the FrontPage Server Extensions executables. This path is configured to allow executables to function, and since we are migrating sites to WebDAV it should be secured to prevent browsing. |
| _vti_cnf | The FrontPage Server Extensions keep sensitive metadata files in this folder, so it should be deleted or secured to prevent browsing. |
| _vti_log | The FrontPage Server Extensions keep author logs in this folder, so it should be deleted or secured to prevent browsing. |
| _vti_pvt | This folder holds several files that contain various metadata for your website, and should be secured. |
| _vti_txt | This folder contains the text indices and catalogs for the older FrontPage WAIS search. Since later versions of FrontPage only used Index Server, it is safe to delete this folder, but at the very least it should be secured to prevent browsing. |
| fpdb | FrontPage keeps databases in this folder, so it should be secured to prevent browsing. |
One of the actions that I usually take on my servers is to lock down all of these folders for my entire server using Request Filtering. To do so, open a command prompt and enter the following commands:
cd %WinDir%\System32\inetsrv
appcmd.exe set config -section:system.webServer/security/requestFiltering /+"hiddenSegments.[segment='_vti_cnf']" /commit:apphost
appcmd.exe set config -section:system.webServer/security/requestFiltering /+"hiddenSegments.[segment='_fpclass']" /commit:apphost
appcmd.exe set config -section:system.webServer/security/requestFiltering /+"hiddenSegments.[segment='_private']" /commit:apphost
appcmd.exe set config -section:system.webServer/security/requestFiltering /+"hiddenSegments.[segment='_vti_log']" /commit:apphost
appcmd.exe set config -section:system.webServer/security/requestFiltering /+"hiddenSegments.[segment='_vti_pvt']" /commit:apphost
appcmd.exe set config -section:system.webServer/security/requestFiltering /+"hiddenSegments.[segment='_vti_txt']" /commit:apphost
appcmd.exe set config -section:system.webServer/security/requestFiltering /+"hiddenSegments.[segment='fpdb']" /commit:apphost
Note: You should only enter the following commands if you are sure that you will not be using FPSE anywhere on your server!
cd %WinDir%\System32\inetsrv
appcmd.exe set config -section:system.webServer/security/requestFiltering /+"hiddenSegments.[segment='_vti_bin']" /commit:apphost
These settings will prevent any of the FPSE-related paths from being viewed over HTTP from a web browser; web clients will receive an HTTP Error 404.8 - Not Found message when they attempt to access those paths. But that being said - when you enable WebDAV for a website by using the Internet Information Services (IIS) Manager, it will configure the Request Filtering settings that enable WebDAV clients to access those paths through WebDAV requests, even though access from a web browser is still blocked. (All of this is made possible through the built-in integration between WebDAV and Request Filtering.
Two Sites are Better Than One
In part 4 of this blog series I discussed why I like to set up two websites when using WebDAV; as a quick review, here is the general idea for that environment:
- The first website (e.g. www.example.com) is used for normal HTTP web browsing
- The second website (e.g. authoring.example.com) is used for for WebDAV authoring
There is a list of several reasons in that blog post why using two sites that point to the same content can be beneficial, and I won't bother quoting that list in this blog post - you can view that information by looking at that post.
But that being said, one of the items that I mentioned in that list was using separate application pools for each website. For example:
- The first application pool (e.g. www.example.com) is configured to use delegated configuration
- The second application pool (e.g. authoring.example.com) is configured to ignore delegated configuration
This configuration helps alleviate problems from uploading invalid Web.config files that might otherwise prevent HTTP access to your website. By way of explanation, the WebDAV module attempts to validate Web.config files when they are uploaded over WebDAV - this is done to try and prevent crashing your HTTP functionality for a website and being unable to fix it. Here's what I mean by that: IIS 7 allows configuration settings to be delegated to Web.config files, but if there is a mistake in a Web.config file, IIS 7 will return an HTTP Error 500.19 - Internal Server Error message for all HTTP requests. Since WebDAV is HTTP-based, that means that you won't be able to fix the problem over WebDAV. (If the WebDAV module didn't perform any validation, that means that your website would become unusable and unrepairable if you had uploaded the bad Web.config file over WebDAV.) To help alleviate this, the WebDAV module performs a simple validation check to prevent uploading invalid Web.config files. But if you save an invalid Web.config file through some other means, like the local file system or over FTP, then you will have no way to repair the situation through WebDAV.
This leads us back to the idea that you can implement when you are using two websites - you can configure the application pool for the WebDAV-enabled website to ignore delegated configuration settings; so it doesn't matter if you have an invalid Web.config file - you will always be able to fix the problem over WebDAV. To configure an application pool to ignore delegated configuration settings, open a command prompt and enter the following commands:
cd %WinDir%\System32\inetsrv
appcmd.exe set config -section:system.applicationHost/applicationPools /[name='authoring.example.com'].enableConfigurationOverride:"False" /commit:apphost
Note: you need to update the highlighted section of that example with the name of your website, such as "Default Web Site," etc.
When you have two websites configured in this example and you have an invalid Web.config file that is causing the HTTP 500 error for the www.example.com website, you can still connect to authoring.example.com via WebDAV and fix the problem.
More Information
For additional information on the concepts that were discussing in this blog, see the following topics:
- Life after FPSE (Part 4) - This blog post discusses a couple of WebDAV-related topics, and includes my list of additional reasons why configuring two websites when you are using WebDAV can be advantageous.
- Adding Application Pools - This topic contains the detailed information about the enableConfigurationOverride setting for an application pool.
- Using the WebDAV Redirector - This walkthrough discusses mapping drives to WebDAV-enabled websites.
I hope this helps.
Note: This blog was originally posted at http://blogs.msdn.com/robert_mcmurray/
IIS 6: Setting up SSL - Overview
31 January 2011 • by Bob • IIS
Many years ago I wrote a series of instructions that used dozens of screenshots in order to show my coworkers how to set up and enable Secure Sockets Layer (SSL) communications in IIS 5, which I eventually turned into a blog series on one of my personal blog sites. A few years later I wrote a sequel to that series of instructions for my coworkers, and I wanted to turn that into a series of walkthroughs in the IIS.net website. Sometime ago I proposed the idea to Pete Harris, who was in charge of IIS.net at the time, but then I changed jobs and we scrapped the idea. We followed up on the idea a short time ago, but we just couldn't find a place where it made sense to host it on IIS.net, so Pete suggested that I turn it into another blog series. With that in mind, over a series of several blog entries I will show how to configure SSL on IIS 6.
Note: This first post will leverage a lot of the content from the overview that I wrote for my IIS 5 blog series, but subsequent posts will reflect the changes in IIS 6.
Much like IIS 5, setting up SSL on IIS 6 is pretty simple. SSL is a Public Key/Private Key technology, and setting up SSL is essentially obtaining a Public Key from a trusted organization. The basic process for working with SSL is reduced to the following actions:
- Creating a Certificate Request
- Obtaining a Certificate from a Certificate Authority
- Installing the Certificate
While not necessary, installing certificate services on your computer is helpful when troubleshooting SSL issues, and I'll discuss that later in this blog series.
Creating a Certificate Request
This is a series of steps that need to be performed on the web server, and they differ widely depending on the server and version. A web administrator is required to enter information about their organization, their locality, etc. This information will be used to validate the requester.
Obtaining a Certificate from a Certificate Authority
This is when a web administrator submits their request for a certificate to a Certificate Authority (CA), which is a trusted organization like VeriSign or Thawte. For a list of trusted organizations, see the following section in Internet Explorer.
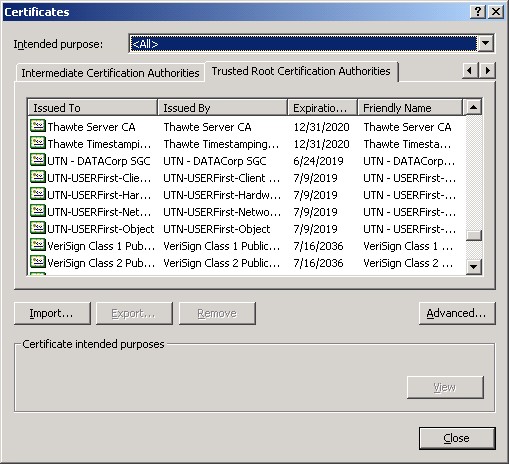
You can choose to trust a new CA by obtaining the Root Certificate from the CA. (I'll post an Obtaining a Root Certificate blog with more information later.)
Installing the Certificate
After a request has been processed by a CA, the web administrator needs to install the certificate on the web server. Once again, this series of steps needs to be performed on the web server, and the steps differ depending on the web server and version.
For the Future...
In future blogs I'll go through the steps for creating certificate requests, obtaining certificates from a CA, and installing certificates. Following that, I'll discuss setting up a CA for testing SSL in your environment.
Note: This blog was originally posted at http://blogs.msdn.com/robert_mcmurray/
IIS: Notes on Server-Side Includes (SSI) Syntax (KB 203064 Revisited)
28 December 2010 • by Bob • IIS
Many years ago I wrote Microsoft KB article 203064 about using Server-Side-Include (SSI) files with IIS 4 and IIS 5, but that KB has long since vanished from Microsoft's support website because it was never updated for IIS 6 or IIS 7. I eventually turned the information from that KB article into a blog post, but that being said, I still see questions about SSI showing up in the IIS forums every once in a while. There was a great deal of useful information in that KB article about general SSI syntax and several practical examples for SSI directives, so I thought that it would make a good blog post if I updated the information from that KB for later versions of IIS.
SUMMARY
This blog post details some features that are available in the Microsoft implementation of Server-Side Include (SSI) files for Internet Information Server (IIS) and provides general syntax and examples for SSI directives.
APPLIES TO
- Microsoft Internet Information Services 7.5
- Microsoft Internet Information Services 7.0
- Microsoft Internet Information Services 6.0
- Microsoft Internet Information Services 5.0
- Microsoft Internet Information Server 4.0
MORE INFORMATION
SSI files are most commonly used with IIS to allow content authors to include the contents of one file inside another file, allowing the easy creation of script libraries or page headers and footers to standardize the look and feel of your web content. SSI consists of very simple commands that are contained within HTML comment tokens, and are limited in functionality. Higher-level programming languages like ASP, ASP.NET, PHP, etc. make the need for SSI considerably less necessary than in previous years. In addition, programming features such as ASP.NET's Master Pages and Dynamic Web Template (DWT) files that are used by Dreamweaver, Expression Web, and FrontPage have replaced much of the need for SSI. Because of this, SSI is an outdated technology by today's standards. With that in mind, web developers are highly encouraged to migrate their SSI content to another technology, such as ASP.NET or PHP.
SSI Implementation Details
SSI files are mapped by file extension to a preprocessor or handler dynamic-link library (DLL), in the same way that file like ASP, ASP.NET, PHP, etc. are mapped to their requisite handlers. In the case of SSI, the specific handler is ssiinc.dll for IIS 4 through IIS 6 and iis_ssi.dll for IIS 7. SSI files on Windows are often named with .stm file extensions, although extensions of .shtm and .shtml are also supported.
Changes Between IIS Versions
- SSI is not enabled by default on IIS 6. To enable SSI on IIS 6, set the status for the Server Side Includes web service extension to Allowed in the Internet Information Services (IIS) Manager.
- SSI is not installed by default on IIS 7. To install SSI on IIS 7, see the Server Side Include <serverSideInclude> topic.
- The
cmddirective for#execis disabled by default in IIS 5 and IIS 6. To enable thecmddirective, see Microsoft KB article 233969. - The
cmddirective for#execis now disabled for SSI files in IIS 7; you can only use thecgidirective.
General SSI Syntax
SSI is employed by the use of special preprocessing directives in SSI documents that are contained within HTML comment tokens; these directives are parsed by the SSI DLL and processed into HTML that is returned to a web client. All SSI directives take the following general form:
<!--#<DIRECTIVE> [<PARAMETER> = <VALUE>]-->
IIS supports a small set of SSI directives, and each directive has different parameters that configure the output for the directive. Other web servers may support a different set of SSI directives and parameters, so SSI files are not 100% compatible across different technologies.
Supported Directives
The following directives are supported in the IIS implementation of SSI:
- #config - Configures how variables and commands are displayed.
- The general syntax for the #config directive is as follows:
<!-- #CONFIG <ERRMSG/TIMEFMT/SIZEFMT>="<format>" -->
- The following is an example of a simple page that uses the #config directive:
<html>
<body>
<!-- #CONFIG TIMEFMT="%m/%d/%y" -->
<p>Today's Date = <!--#ECHO VAR = "DATE_LOCAL" --></p>
<!-- #CONFIG TIMEFMT="%A, %B %d, %Y" -->
<p>Today's Date = <!--#ECHO VAR = "DATE_LOCAL" --></p>
</body>
</html>
- Note: See the Parameter Values for the #config Directive section later in this blog for more information about configuring dates with the #config directive.
- The general syntax for the #config directive is as follows:
- #echo - Inserts the value of various Common Gateway Interface (CGI) server variables.
- The general syntax for the #echo directive is as follows:
<!--#ECHO VAR = "<CGI_VARIABLE_NAME>"-->
- The following is an example of a simple page that uses the #echo directive:
<html>
<body>
<p>Server Name = <!--#ECHO VAR = "SERVER_NAME"--></p>
<p>Date = <!--#ECHO VAR = "DATE_LOCAL" --></p>
<p>Page URL = <!--#ECHO VAR = "URL" --></p>
</body>
</html>
- For a list of supported CGI server variables, see IIS Server Variables.
- The general syntax for the #echo directive is as follows:
- #exec - Executes CGI or Internet Server API (ISAPI) command scripts and inserts output into an HTML document.
- The general syntax for the #exec directive is as follows:
<!-- #EXEC <CGI/CMD>="<command>" -->
- The following is an example of a simple page that uses the #exec directive:
<html>
<body>
<p>Root Directory of C:</p>
<pre><!--#EXEC CGI = "/cgi-bin/HelloWorld.exe" --></pre>
</body>
</html>
- Notes:
- The CMD command for the #exec directive is disabled by default on IIS 5 and IIS 6. For more information, see the following Microsoft Knowledge Base article:
233969 SSIEnableCmdDirective is set to FALSE by default
- The CMD command for the #exec directive is was removed from IIS 7. For more information, see the following Microsoft Knowledge Base article:
- The CMD command for the #exec directive is disabled by default on IIS 5 and IIS 6. For more information, see the following Microsoft Knowledge Base article:
- The general syntax for the #exec directive is as follows:
- #flastmod - Retrieves the last modification time of a specified file.
- The general syntax for the #flastmod directive is as follows:
<!--#FLASTMOD <FILE/VIRTUAL> = "filename.ext"-->
- The following is an example of a simple page that uses the #flastmod and #config directives:
<html>
<body>
<!-- #CONFIG TIMEFMT="%m/%d/%y" -->
<p>Modified Date = <!--#FLASTMOD FILE="filename.ext"--></p>
<!-- #CONFIG TIMEFMT="%B %d, %Y" -->
<p>Modified Date = <!--#FLASTMOD FILE="filename.ext"--></p>
</body>
</html>
- The general syntax for the #flastmod directive is as follows:
- #fsize - Retrieves the size of a specified file.
- The general syntax for the #fsize directive is as follows:
<!--#FSIZE <FILE/VIRTUAL> = "filename.ext"-->
- The following is an example of a simple page that uses the #fsize and #config directives:
<html>
<body>
<!-- #CONFIG SIZEFMT="BYTES" -->
<p>File Size = <!--#FSIZE FILE="filename.ext"--> bytes</p>
<!-- #CONFIG SIZEFMT="ABBREV" -->
<p>File Size = <!--#FSIZE FILE="filename.ext"--> KB</p>
</body>
</html>
- The general syntax for the #fsize directive is as follows:
- #include - Includes the contents of one specified file inside another.
- The general syntax for the #include directive is as follows:
<!--#INCLUDE <FILE/VIRTUAL> = "filename.ext"-->
- The following is an example of a simple page that uses the #include directive:
<html>
<body>
<!--#INCLUDE FILE = "header.inc"-->
<p>Hello World!</p>
<!--#INCLUDE VIRTUAL = "/includes/footer.inc"-->
</body>
</html>
- Note: See the More Information on File and Virtual Syntax section later in this blog for more information about using file versus virtual values.
- The general syntax for the #include directive is as follows:
Parameter Values for the #config Directive
The #config directive supports a large array of possible parameter values, which are listed in the following table. Note: All of these values are case-sensitive.
| Value | Description | Example |
|---|---|---|
%A |
Full Weekday Name | Tuesday |
%a |
Short Weekday Name | Tue |
%B |
Full Month Name | December |
%b |
Short Month Name | Dec |
%c |
Full Date & Time | 12/28/10 19:52:19 |
%d |
Day of Month as a Number | 28 |
%H |
Hours as a Number on a 24-Hour Clock | 19 |
%I |
Hours as a Number on a 12-Hour Clock | 07 |
%j |
Julian Date (Offset from Start of Year) | 362 |
%M |
Minutes as a Number | 52 |
%m |
Month as a Number | 12 |
%p |
AM or PM Indicator | PM |
%S |
Seconds as a Number | 19 |
%U |
Week Number (Offset from Start of Year) | 52 |
%W |
Week Number (Offset from Start of Year) | 52 |
%w |
Day of the Week as a Number | 2 |
%X |
Short Time | 19:52:19 |
%x |
Short Date | 12/28/10 |
%Y |
Four-Digit Year as a Number | 2010 |
%y |
Two-Digit Year as a Number | 10 |
%Z |
Time Zone Name | Pacific Standard Time |
%z |
Time Zone Name | Pacific Standard Time |
Note: The following Windows Script Host (WSH) code will create a sample SSI page that you can use to test the parameter values for the #config directive:
Option Explicit
Dim objFSO, objFile, intCount
Set objFSO = WScript.CreateObject("Scripting.Filesystemobject")
Set objFile = objFSO.CreateTextFile("ssitest.stm")
objFile.WriteLine("<html>")
objFile.WriteLine("<body>")
For intCount = Asc("A") To Asc("Z")
    objFile.WriteLine("<!-- #CONFIG TIMEFMT=""%" & _
        UCase(Chr(intCount)) & """ --><p>%" & _
        UCase(Chr(intCount)) & _
        " = <!--#ECHO VAR = ""DATE_LOCAL"" --></p>")
    objFile.WriteLine("<!-- #CONFIG TIMEFMT=""%" & _
        LCase(Chr(intCount)) & """ --><p>%" & _
        LCase(Chr(intCount)) & _
        " = <!--#ECHO VAR = ""DATE_LOCAL"" --></p>")
Next
objFile.WriteLine("</body>")
objFile.WriteLine("</html>")
More Information on File and Virtual Syntax
SSI directives that use file paths can reference files by using a file or virtual path.
- The file element is used with files that are relative to the folder of the current document. The following example includes a file in the current folder:
<!--#include file="myfile.txt"-->
- The virtual element represents paths that are relative to the base folder of the Web server. The following example includes a file in the /scripts virtual folder:
<!--#include virtual="/scripts/myfile.txt"-->
REFERENCES
For additional information on using SSI with IIS, click the following article numbers to view the articles in the Microsoft Knowledge Base:
- 169996 To run an ISAPI DLL with #exec, use the CGI statement
- 172024 INFO: Server Side Include Directives Are Not Processed by ASP
- 195291 How to disable #exec in Server-Side Include files
- 289496 Error Messages Appear and Access Violations Occur After You Upload SSI ASPs in IIS 5.0
- 299982 How to create server-side include files to package ASP scripts
- 308176 BUG: SSI #EXEC CMD Directive Does Not Work in IIS 5.1
- 318176 SSI Output Disappears After You Apply Security Patches
- 954754 Mappings for server-side include (SSI) directives do not work after you upgrade from IIS 6.0 to IIS 7.0
For more Microsoft Knowledge Base articles about using SSI with IIS, click here.
Note: This blog was originally posted at http://blogs.msdn.com/robert_mcmurray/
Disabling Local Loopback Checks on Web Servers that Run IIS
17 December 2010 • by Bob • IIS, Windows
I've run into this situation more times that I can count: I set up a new web server and no matter what I do, I cannot log into websites on the server that require authentication while I am browsing to them from the console. I used to pull my hair out over this problem until I discovered the problem is in the Windows Local Security Authority (LSA) and it can be easily remedied.
- Open your registry editor by going to Start –> Run and enter regedit and click OK.
- Go to
HKEY_LOCAL_MACHINE\SYSTEM\CurrentControlSet\Control\Lsain the registry editor. - Right-click Lsa, click on New and select DWORD value.
- Enter DisableLoopbackCheck and press Enter.
- Right-click DisableloopbackCheck and select Modify.
- In the Value data box, enter 1 and click OK.
- Reboot your server.
Several years later someone wrote the following KB article that includes this fix with a description of the problem, as well as an alternate workaround:
http://support.microsoft.com/kb/896861
HTH
FrontPage Server Extensions and UNC Content
28 April 2010 • by Bob • FrontPage
How to get the FPSE2002 AllowUNC feature to work with Windows Server 2008
I've had a few questions about getting the FrontPage 2002 Server Extensions (FPSE2002) AllowUNC feature to work with Windows Server 2008, so I thought that I would put together a blog from some of the information that I had been giving out whenever someone was having problems.
As a little bit of background information, Windows 2003 Server shipped with a later version of FPSE2002 than had previously been released, and that version of FPSE2002 was used as the code base for the version of FPSE2002 that was later shipped for Windows Server 2008. One the great features of this release was the ability to host your content on a remote server using a UNC share, which is something that web administrators had been requesting for years. Microsoft wrote a full whitepaper that details all of the possible configurations and steps to configure FPSE2002 with this feature at the following URL:
That being said, that whitepaper is quite large, and not all of it is necessary if you simply want to host FPSE2002-based content on a UNC path. With that in mind, I have come up with an abbreviated set of steps that uses the whitepaper as a base for enabling this feature. To be more specific, I was able to implement this feature by using only the following sections of that whitepaper:
- "Configuring the File Server"
- "To Share the Folder"
- "Creating and Configuring a Virtual Server in IIS"
- "Configuring Security Settings for the Virtual Server"
- "To Configure the Registry for the Web server"
- "To Enable FrontPage Server Extensions 2002"
The body of this blog post is an excerpt from the whitepaper, and contains only the steps that I used to get my test scenario up and running. For my test, I set up a domain controller, a file server, and a web server; all running Windows Server 2008 or Windows Server 2003. I include notes when necessary to highlight issues that I ran into.
Additional Notes:
- I cannot stress enough that setting up this configuration is not an easy task to perform, if you skip any steps that I have listed - the functionality will not work.
- Some of the AllowUNC functionality is not implemented through the UI; you have to make changes to your registry to enable it.
- All servers must be Windows 2008 Servers or Windows 2003 Servers in an Active Directory domain.
- In the "To Share the Folder" steps I added the domain-level IUSR account to the permissions on the shared folder so that anonymous would work.
- In the "Configuring Security Settings for the Virtual Server" steps I used Basic Authentication as this is the most common Internet-based method.
- I only tested this with a UNC share on a Windows-based server, I did not test with SAN or NAS devices so I am not sure if they would work.
CONFIGURING THE FILE SERVER
You must configure a shared folder on the file server and grant the Web server access to the contents of that folder. Note that you must set the permissions for the folder itself, not a parent folder. It is recommended that you also implement IP Security on the file server, so that only the Web server, the domain controller, and other administrator computers can access the file server over TCP/IP. For more information about configuring IP Security, see Setting Up IPsec Domain and Server Isolation in a Test Lab.
To create a folder and set the folder ACLs
- In My Computer, create or locate the folder that will contain the Web site content.
- Right-click the folder, and click Properties.
- In the Properties dialog box, click the Security tab.
- Click Advanced. If you are using Windows Server 2008, click Edit.
- Click Add.
- Type Administrators, and then click OK.
- Select Full Control, and then click OK.
- Click Add.
- Click Object Types, and then in the Object Types box, select the Computers check box, and then click OK.
- In the Enter the object names to select box, type the Web server computer name, followed by a dollar sign ($) and then click OK.
- Select Full Control, and then click OK.
- Clear the check box for allowing inheritable permissions to propagate to the folder.
- On Windows Server 2008 this check box is labeled "Include inheritable permissions from this object's parent".
- On Windows Server 2003 this check box is labeled "Allow inheritable permissions from the parent object to propagate to this object and all child objects".
- Click Remove to clear the inherited permissions for the folder.
- Click OK, and then click OK again to close the Properties dialog box.
- The folder now only allows file access to the Administrators group and the Web server computer you specified. When you extend the virtual server on the Web server computer, the access control list (ACL) will be automatically updated with any additional required users or security principals.
To share the folder
- On Windows Server 2008:
- Right-click the folder, and click Properties.
- On the Sharing tab, click Advanced Sharing.
- Check the Share this folder check box.
- In the Share name box, type the name to use for the share. Be sure to use the format sharename$ for the share name to make the folder hidden when users browse the machine.
- Click Permissions.
- Select Everyone, and then click Full Control.
- Click OK, and then click OK again, and then click Close to close the Properties dialog box.
- On Windows Server 2003:
- Right-click the folder, and click Properties.
- On the Sharing tab, select Share this folder.
- In the Share name box, type the name to use for the share. Be sure to use the format sharename$ for the share name to make the folder hidden when users browse the machine.
- Click Permissions.
- Select Everyone, and then click Full Control.
- Click OK, and then click OK again to close the Properties dialog box.
About File System Security
Giving Everyone full control to your server share is necessary so that all users of your Web site can view the Web site information and run the ASP pages required to use FrontPage 2002 Server Extensions. However, you do not want to allow other computers or other servers access to the file share and those ASP pages. It is recommended that you implement Internet Protocol (IP) Security to help prevent users and computers from circumventing the FrontPage 2002 Server Extensions and Internet Information Services security for the file share and ASP pages.
Note - The separate user management feature for FrontPage 2002 Server Extensions also helps secure the process for accessing ASP pages through the file system. It is recommended that you implement this feature if you are connecting Web sites to UNC shares. For more information about managing users separately, see Authenticating Users Separately For Each Virtual Server.
CREATING AND CONFIGURING A VIRTUAL SERVER IN IIS
You use Internet Information Services (IIS) to create your new virtual server. You must also decide how to configure the security settings for your virtual server.
To create a virtual server on Windows Server 2008
- Click Start, point to Administration Tools, and then click Internet Information Services (IIS) Manager.
- Click the plus sign (+) next to the server name in the Connections pane that you want to add the virtual server to.
- Right-click Sites, and then click Add Web Site.
- In the Site name box, enter the name of the Web site.
- In the Physical path box, type the path to the network share where the site content will go. Note that if you used the format name$ for the share, you cannot browse to the share. You must type the path exactly.
- In the Type box, choose HTTP or HTTPS.
- In the IP address box, select the IP address you want to use.
- In the Port box, type the port number to assign to the virtual server.
- In the Host name box, type the host name that you want to use (if any).
- Click OK.
- Highlight the Web site you just created in the Connection pane.
- Double-click the Authentication feature in the Web site's Home pane.
- Highlight Anonymous Authentication in the Authentication pane.
- Click Edit... in the Actions pane.
- Click Specific user, and then click Set.
- Enter the domain and user name of your domain-level IUSR account in the User name box.
- Enter the password of your domain-level IUSR account in the Password and Confirm Password boxes.
- Click OK.
- Click OK.
- Verify that the application pool for the new Web site is running as Network Service:
- Highlight the web site that you just created in the Connections pane.
- Click Basic Settings... in the Actions pane.
- Make a note of the application pool name, and then click OK.
- Click Application Pools in the Connections pane.
- Highlight the application pool from the step that you completed previously.
- Click Advanced Settings... in the Actions pane.
- Verify that IIS lists NetworkServicein the Identity field. If it does not, use the following steps:
- Click the ellipsis (...) to the right of the Identity field.
- Click Built-in account, and then select NetworkService from the drop-down menu.
- Click OK to close the Application Pool Identity dialog box.
- Click OK to close the Advanced Settings dialog box.
To create a virtual server on Windows Server 2003
- Click Start, point to Administration Tools, and then click Internet Information Services (IIS) Manager.
- Click the plus sign (+) next to the server name that you want to add the virtual server to.
- Right-click Web Sites, click New, and then click Web site.
- Click Next.
- In the Description box, type the description of your virtual server, and then click Next.
- In the Enter the IP address to use for this Web site box, select the IP address you want to use.
- In the TCP port this web site should use (Default: 80) box, type the port number to assign to the virtual server.
- In the Host Header for this site (Default: None) box, type the host name that you want to use (if any), and then click Next.
- In the Path box, type the path to the network share where the site content will go. Note that if you used the format name$ for the share, you cannot browse to the share. You must type the path exactly.
- If you do not want to allow anonymous access to your virtual server, clear the Allow anonymous access to this Web site check box.
- Click Next.
- On the Web Site Security Credentials panel, verify that the Always use the authenticated users credentials when validating access to the network directory check box is selected, and then click Next.
- On the Permissions panel, select the permissions to use, and then click Next. If your virtual server allows scripts to be run, you must also select the Run scripts (such as ASP) check box. If you want to allow ISAPI applications or CGI scripts to be used on your virtual server, you must also select the Execute (such as ISAPI applications or CGI) check box.
- Click Next, and then click Finish.
Note - If you chose to allow anonymous access for the virtual server, you must specify the domain account to use for anonymous users. When you use a local folder, you can use the default anonymous user (usually IUSR or IUSR_Machinename). To connect to a shared resource on a domain, however, you must specify an account with rights to the domain. Be sure to use an account with limited rights to the computers and resources in your domain. Do not unintentionally give anonymous users the ability to administer your server or print to your network printers.
Note from me:
As stated by me earlier, this entire article does not appear to work unless you specify a domain-level IUSR account in IIS, even if you are going to not allow anonymous access. In my testing, it seems to fail when anonymous is disabled and the anonymous user had been local, whereas it succeeded when the anonymous user is a domain-account with rights to the share, even though anonymous is disabled for the site.
CONFIGURING SECURITY SETTINGS FOR THE VIRTUAL SERVER
After you have created the virtual server, you must configure the security settings. When a Web site user requests a file that actually resides on a network share, there are two methods that FrontPage Server Extensions can use to provide the required authentication information:
- Basic Authentication - Forwards the Web site requestor's username and password to the file server. If the user doesn't have access to the file server, he or she will not have access to the UNC-based files on the Web site. This method is best used for intranet Web sites.
- Another authentication method used with Kerberos delegation If you want to use another authentication method, it is more secure to use it in conjunction with Kerberos delegation. For more information about configuring Kerberos, see the Help systems for Windows Server 2003 and Internet Information Services (IIS) 6.0.
Warning - Basic authentication forwards the requestor's username and password over the network. This means that usernames and passwords can be captured using a network packet analyzer. Only use basic authentication if you are sure that potential hackers don't have access to your network cabling or wireless media.
To configure the new virtual server to use basic authentication on Windows Server 2008
- In Internet Information Services (IIS) Manager, highlight the Web site you just created in the Connection pane.
- Double-click the Authentication feature in the Web site's Home pane.
- Highlight Basic Authentication in the Authentication pane.
- Click Enable in the Actions pane.
To configure the new virtual server to use basic authentication on Windows Server 2003
- In Internet Information Services (IIS) Manager, right-click the Web site you just created, and then click Properties.
- On the Directory Security tab, under Authentication and Access Control, click Edit.
- Check the Enable anonymous access check box.
- In the User name box for the anonymous user, type a domain user account to use for anonymous access. Note that because you are allowing access across computers, the default anonymous account (which is specific to each server) will not work. You must use a domain account for anonymous access.
- In the Password box, type the password that corresponds to the user account.
- In the Authenticated Access section, clear the Integrated Windows authentication check box, and check the Basic authentication (password is sent in clear text) check box.
- Click Yes to verify that you want to enable Basic authentication, and then click OK.
- Type the password again to confirm it, and then click OK.
- Click OK again to close the Properties dialog box.
Note from me:
As stated by me earlier, I only tested with Basic Authentication; I did not try Kerberos. Since we are making a single hop to another server, I would expect simple NTLM to fail. See KB 315673 for a description of single versus double hop setups when working with IIS configurations. But that being said, Windows Authentication in an Internet environment is impractical, so in most scenarios this point is moot.
After you create the virtual server, and before you can extend it with FrontPage 2002 Server Extensions, you must set the following registry entries to enable your Web server to work with a shared UNC folder:
- NoMachineGroups: determines whether or not FrontPage 2002 Server Extensions can create local machine accounts for new users. Because local machine accounts on one server have no rights on another server, you must disable local machine accounts and use only domain accounts to work with a shared UNC folder. Set NoMachineGroups to "1" to disable local machine accounts. Note that because this is a global setting, you should only change it before you have extended your virtual servers. If you change this setting after a virtual server has been extended, the administration pages may not work.
- AllowUNC: specifies whether or not to allow shared UNC folders. You must set this entry to "1" to enable UNC folder sharing.
Both subkeys are under the following path in the registry depending on your version of Windows:
- On a 32-bit server:
- HKEY_LOCAL_MACHINE\Software\Microsoft\Shared Tools\Web Server Extensions\All Ports
- On a 64-bit server:
- HKEY_LOCAL_MACHINE\Software\Wow6432Node\Microsoft\Shared Tools\Web Server Extensions\All Ports
If these subkeys do not exist yet, you can add them as new string values, and then set them to 1.
To configure the registry for the Web server
- Open the Registry Editor on your Web server computer. To do so, click Start, click Run, and then type regedit.
- Open the correct subkey for your version of Windows:
- On a 32-bit server:
- HKEY_LOCAL_MACHINE\Software\Microsoft\Shared Tools\Web Server Extensions\All Ports
- On a 64-bit server:
- HKEY_LOCAL_MACHINE\Software\Wow6432Node\Microsoft\Shared Tools\Web Server Extensions\All Ports
- On a 32-bit server:
- If you see the NoMachineGroups and AllowUNCkeys, skip to step 4. If not, you must create these keys as described in the next step.
- Right-click in the right pane of the Registry Editor Window, click New, and then click String value.
- Type the name for the new entry: NoMachineGroups
- Right-click in the right pane of the Registry Editor Window, click New, and then click String value.
- Type the name for the new entry: AllowUNC
- In the right pane, right-click NoMachineGroups, and then click Modify.
- In the Value data box, type 1, and then click OK.
- In the right pane, right-click AllowUNC, and then click Modify.
- In the Value data box, type 1, and then click OK.
EXTENDING THE VIRTUAL SERVER
After the virtual server has been created and configured, you are ready to extend it with FrontPage 2002 Server Extensions. You must extend the virtual server before you can publish Web site content to it.
To enable the FrontPage Server Extensions 2002 Web Server Extension on Windows Server 2003
- Click Start, point to Administrative Tools, and then click Internet Information Services (IIS).
- In the console tree, click the name of the computer where you will create the virtual server, and then click Web Server Extensions.
- In Web Server Extensions, click FrontPage Server Extensions 2002, and then click Allow.
To extend the new virtual server and create a Web site
- Click Start, point to Administrative Tools, and then click Microsoft SharePoint Administrator.
- Click Extend next to the virtual server you just created in IIS.
- In the Administrator user name box, type the user name, and then click Submit.
After you extend the site, it is recommended that you run server health to make sure the permissions are set correctly and do not allow unauthorized access. To run server health, use the following command-line operations:
cd /d "%ProgramFiles%\Common Files\Microsoft Shared\Web Server Extensions\50\bin"
owsadm.exe -o check -p 80 -w /
As I mentioned in the beginning of this post, there are a lot of steps to get this working, but it's possible to do so.
I hope this helps. ;-]
IIS 6.0 WebDAV and Compound Document Format Files
22 April 2010 • by Bob • IIS, WebDAV, IIS 6
We recently ran into a situation where a customer thought that they were seeing file corruption when they were transferring files from a Windows 7 client to their IIS 6.0 server using WebDAV. More specifically, the file sizes were increasing for several specific file types, and for obvious reasons the checksums for these files would not match for verification. Needless to say this situation caused a great deal of alarm on the WebDAV team when we heard about it - file corruption issues are simply unacceptable.
To alleviate any fears, I should tell you right up front that no corruption was actually taking place, and the increase in file size was easily explained once we discovered what was really going on. All of that being said, I thought that a detailed explanation of the scenario would make a great blog entry in case anyone else runs into the situation.
The Customer Scenario
First of all, the customer was copying installation files using a batch file over WebDAV; more specifically the batch file was copying a collection of MSI and MST files. After the batch file copied the files to the destination server it would call the command-line comp utility to compare the files. Each MSI and MST file that was copied would increase by a small number of bytes so the comparison would fail. The customer computed checksums for the files to troubleshoot the issue and found that the checksums for the files on the source and destination did not match. Armed with this knowledge the customer contacted Microsoft for support, and eventually I got involved and I explained what the situation was.
The Architecture Explanation
Windows has a type of file format called a Compound Document, and many Windows applications make use of this file format. For example, several Microsoft Office file formats prior to Office 2007 used a compound document format to store information.
A compound document file is somewhat analogous to a file-based database, or in some situations like a mini file system that is hosted inside another file system. In the case of an MST or MSI file these are both true: MST and MSI files store information in various database-style tables with rows and columns, and they also store files for installation.
With that in mind, here's a behind-the-scenes view of WebDAV in IIS 6.0:
The WebDAV protocol extension allows you to store information in "properties", and copying files over the WebDAV redirector stores several properties about a file when it sends the file to the server. If you were to examine a protocol trace for the WebDAV traffic between a Windows 7 client and an IIS server, you will see the PUT command for the document followed by several PROPPATCH commands for the properties.
IIS needs a way to store the properties for a file in a way where they will remain associated with the file in question, so the big question is - where do you store properties?
In IIS 7 we have a simple property provider that stores the properties in a file named "properties.dav," but for IIS 5.0 and IIS 6.0 WebDAV code we chose to write the properties in the compound document file format because there are lots of APIs for doing so. Here's the way that it works in IIS 5 and IIS 6.0:
- If the file is already in the compound document file format, IIS simply adds the WebDAV properties to the existing file. This data will not be used by the application that created the file - it will only be used by WebDAV. This is exactly what the customer was seeing - the file size was increasing because the WebDAV properties were being added to the compound document.
- For other files, WebDAV stores a compound document in an NTFS alternate data stream that is attached to the file. You will never see this additional data from any directory listing, and the file size doesn't change because it's in an alternate data stream.
So believe it or not, no harm is done by modifying a compound document file to store the WebDAV properties. Each application that wants to pull information from a compound document file simply asks for the data that it wants, so adding additional data to a compound document file in this scenario was essentially expected behavior. I know that this may seem counter-intuitive, but it's actually by design. ;-]
The Resolution
Once I was able to explain what was actually taking place, the customer was able to verify that their MST and MSI files still worked exactly as expected. Once again, no harm was done by adding the WebDAV properties to the compound document files.
You needn't take my word for this, you can easily verify this yourself. Here's a simple test: Word 2003 documents (*.DOC not *.DOCX) are in the compound document file format. So if you were to create a Word 2003 document and then copy that document to an IIS 6.0 server over WebDAV, you'll notice that the file size increases by several bytes. That being said, if you open the document in Word, you will see no corruption - the file contains the same data that you had originally entered.
I hope this helps. ;-]
eWeek Reviews for IIS 7.5 and FTP 7.5
23 September 2009 • by Bob • IIS, FTP, Windows
One of my coworkers, Vijay Sen, just forwarded the following eWeek review of IIS 7.5 to me:
The review was written by Jim Rapoza, and he said some great things about IIS 7.5, which ships with both Windows Server 2008 R2 and Windows 7 client. But what really made my day was the following things that he said about FTP 7.5:
Another welcome change in IIS 7.5 is the elevation of FTP as a full-fledged part of the server. In previous versions, setup and management of an FTP server in IIS were done pretty much separately from Web server management. In IIS 7.5, FTP administration is fully integrated into the IIS Management Console.
I found this to be a very good implementation of FTP, making it possible to quickly set up secure FTP servers and tie them to my Websites. Especially nice was the ability to easily use virtual host names for the FTP sites. All in all, the FTP implementation in IIS 7.5 is one of the best I've seen, even when compared with dedicated FTP server products.
It's great to see all of our hard work being recognized!
![]()
My thanks once again to everyone on the FTP and IIS feature teams that helped make this version of the FTP service: Jaroslav, Emily, Daniel, Umer, Suditi, Ciprian, Jeong, Dave, Andrew, Carlos, Brian, Wade, Ulad, Nazim, Reagan, Claudia, Rick, Tim, Tobin, Kern, Jenny, Nitasha, Venkat, Vijay. (I hope that I didn't leave anyone out!)
Note: This blog was originally posted at http://blogs.msdn.com/robert_mcmurray/
A Little Scripting Saved My Day (;-])
27 July 2009 • by Bob • IIS, Scripting
I have mentioned in previous blog posts that I tend to write many of my blog posts and walkthroughs for IIS.NET based on code that I've written for myself, and today's blog post is the story of how one of my samples saved my rear over this past weekend.
One of the servers that I manage is used to host web sites for several friends of mine. (It's their hobby to have a web site and it's my hobby to host it for them.) Anyway, sometime on Sunday someone let me know that one of my sites didn't seem to be behaving correctly, so I browsed it with Internet Explorer and saw that I was getting an HTTP 503 error. I've seen this error when an application pool goes offline for some reason, so I didn't panic - yet - because I knew that the web site was in a separate application pool. With that in mind, I browsed to a web site that is in a different application pool. Same thing - HTTP 503 error. This was beginning to concern me.
I logged into the web server and ran iisreset from a command-line - this threw the following error - and now I was really starting to become agitated:
CMD>iisreset
Attempting stop...
Internet services successfully stopped
Attempting start...
Restart attempt failed.
The IIS Admin Service or the World Wide Web Publishing Service, or a service dependent on them failed to start. The service, or dependent services, may had an error during its startup or may be disabled.
CMD>
I knew that the cause of the error should be in the Windows Event Viewer, so I opened the System log in Event Viewer and saw the following error:
| Log Name: | System |
|---|---|
| Source: | Microsoft-Windows-WAS |
| Date: | 7/26/2009 10:59:52 AM |
| Event ID: | 5172 |
| Task Category: | None |
| Level: | Error |
| Keywords: | Classic |
| User: | N/A |
| Computer: | MYSERVER |
| Description: | The Windows Process Activation Service encountered an error trying to read configuration data from file '\\?\C:\Windows\system32\inetsrv\config\applicationHost.config', line number '308'. The error message is: 'Configuration file is not well-formed XML'. The data field contains the error number. |
| Event Xml: | |
| <Event xmlns="http://schemas.microsoft.com/win/2004/08/events/event"> | |
Now that I was armed with the file name and line number of the failure in my configuration settings, I was able to go straight to the source of the problem. (I love IIS 7's descriptive error messages - don't you?) Once I opened the file and jumped to the correct location, I saw several lines of unintelligible garbage. For reasons that are still unknown to me - my applicationHost.config file had become corrupted and IIS was dead in the water until I fixed the problem. I looked through the file and removed most of the garbage and saved the edited file to IIS - this got the web sites working, but only partially. Some necessary settings had obviously been removed while I was clearing all of out the unintelligible garbage, and it might take me a long time to discover what those settings were.
The next thing that I did was to take a look in my two readily-accessible backup drives; I have two external hard drives that keep a backup of the web server - one hard drive is directly plugged into the web server via a USB cable, and the other hard drive is plugged into a physically separate server that rotates drives with off-site storage on a monthly basis. The problem is, my weekly backups had just run, so the copy in each backup location had been overwritten with the corrupted version. (I'm going to have to rethink my backup strategy after this - but that's another story.) The backup copy in my off-site storage location should be intact, but that copy would be a few weeks old so I would be missing some settings, and I would have to drive an hour or so round-trip in order to pick up the drive. This wasn't an ideal solution - but it was definitely a feasible strategy.
It was at this point that I remembered that I had written following blog post some time ago:
Automating IIS 7 Backups
/post/automating-iis-7-backups
I wrote the script in that blog post for the server that I was currently managing, and because of this preventative measure I had dozens of backups going back several weeks to choose from. So I was able to quickly find a copy with no corruption and I restored that copy to my IIS config directory. At this point all of my web sites came online with all of their functionality. Having fixed the major issues, I used WinDiff to verify any settings that might have been changed between the restored copy and the corrupted copy.
So in conclusion, this story had a happy ending, and it left me with a few lessons learned:
- You can never have too many backups
- I need to rethink how I roll out my backup strategy with regard to using external hard drives
- Writing cool scripts to automate your backups can save your rear end
That sums it up for today's post. ![]()
Note: This blog was originally posted at http://blogs.msdn.com/robert_mcmurray/
Advertising IIS Around the World
10 April 2009 • by Bob • IIS, Humor, Travel
In case you haven't already surmised from some of my other blog posts, I've been around IIS for a long time, so it should go without saying that I'm a big fan of IIS.
I remember when we first released IIS 1.0 for Windows NT 3.51 and we were handing out IIS CD-ROMs at trade shows way back in early 1996; everyone kept asking, "What is this for?" (Obviously the Internet was still a new concept to a lot of people back then.) Out of nostalgia, I kept a shrink-wrapped copy of IIS 1.0 for myself, and I think that I have one of the few boxes left. It usually sits in my office next to my IIS 4.0 Limited Edition CD-ROM...


Anyway, over the years the IIS team has printed up an assortment of IIS shirts, and I have been wearing several of these various IIS shirts as I have travelled around the world. Because I have been doing so for some time, I've found myself advertising IIS in some unexpected places. For example, my wife and I were visiting our daughter in Peru this past March, and we took the following photograph of my daughter and me (wearing one of my IIS shirts) at Machu Picchu:

So - you may ask, "What does IIS have to do with one of the newest wonders of the world?" My answer is, "Um... nothing, really." I happened to be wearing my IIS shirt that day, and it made a pretty good photo. (Obviously, it was a bad hair day for me... so I'm blaming the mountain winds. ;-] )
As another example, my son and I took a road trip down the California coast this past summer to visit my brother in San Francisco, and we posed for the following photo before boarding the boat to Alcatraz:

There are other times where I have taken advantage of a situation to deliberately and shamelessly pose for IIS. For example, I was scuba diving in Hawaii a couple of years ago, and I borrowed someone's dive slate to write the following message:

Actually, I tend to wear IIS shirts when I go scuba diving as a matter of habit - it's kind of a good luck charm for me - and this behavior of mine has led to some interesting experiences.
For example, my wife and I were going scuba diving in the Bahamas several years ago, and once again I was wearing one of my IIS t-shirts that day. The dive company had sent a van to our hotel to pick up several divers, and as I climbed aboard, one of the other passengers saw my shirt and remarked, "Oh, we have an IIS person today. I'm more of an Apache Girl myself." I quickly replied, "That's okay, everybody needs a hobby." I really only expected her to get the joke, but apparently we had a tech-savvy group that day because everyone else on the bus chimed in with, "Ooooooh - you're in trouble." I didn't realize what everyone meant until we got to the dive boat where Apache Girl came walking up to me holding an air tank and said, "I'm your dive guide today, and I picked this air tank especially for you." We both had a good laugh, and I survived the dive so she can thankfully take a joke.

All that being said, I really like to show off IIS. It's a lot of fun to demonstrate the many features of IIS to customers at trade shows, and it's a lot of fun to unofficially advertise IIS when I'm traveling on vacation in various places around the world. So if you see me when I'm on vacation somewhere, the chances are good that you'll be able to find me in a crowd - because I'll be the geek wearing the IIS shirt.
Note: This blog was originally posted at http://blogs.msdn.com/robert_mcmurray/