Sending WebDAV Requests in .NET Revisited
18 October 2011 • by Bob • WebDAV
I recently spoke with a great customer in India, and he was experimenting with the code from my Sending WebDAV Requests in .NET blog post. He had a need to send the WebDAV LOCK/UNLOCK commands, so I wrote a quick addition to the code in my original blog post to send those commands, and I thought that I'd share that code in an updated blog post.
Using WebDAV Locks
First of all, you may need to enable WebDAV locks on your server. To do so, follow the instructions in the following walkthrough:
How to Use WebDAV Locks
http://learn.iis.net/page.aspx/596/how-to-use-webdav-locks/
If you were writing a WebDAV client, sending the LOCK/UNLOCK commands would help to avoid two clients attempting to author the same resource. So if your WebDAV client was editing a file named "foo.txt", the flow of events would be something like the following:
- LOCK foo.txt
- GET foo.txt
- [make some changes to foo.txt]
- PUT foo.txt
- UNLOCK foo.txt
Description for the Sample Application
The updated code sample in this blog post shows how to send most of the common WebDAV requests using C# and common .NET libraries. In addition to adding the LOCK/UNLOCK commands to this version, I also changed the sample files to upload/download Classic ASP pages instead of text files; I did this so you can see that the WebDAV requests are correctly accessing the source code of the ASP pages instead of the translated output.
Having said that, I need to mention once again that I create more objects than are necessary for each section of the sample, which creates several intentional redundancies; I did this because I wanted to make each section somewhat self-sufficient, which helps you to copy and paste a little easier. I present the WebDAV methods the in the following order:
| WebDAV Method | Notes |
|---|---|
| PUT | This section of the sample writes a string as a text file to the destination server as "foobar1.asp". Sending a raw string is only one way of writing data to the server, in a more common scenario you would probably open a file using a steam object and write it to the destination. One thing to note in this section of the sample is the addition of the "Overwrite" header, which specifies that the destination file can be overwritten. |
| LOCK | This section of the sample sends a WebDAV request to lock the "foobar1.asp" before downloading it with a GET request. |
| GET | This section of the sample sends a WebDAV-specific form of the HTTP GET method to retrieve the source code for the destination URL. This is accomplished by sending the "Translate: F" header and value, which instructs IIS to send the source code instead of the processed URL. In this specific sample I am using Classic ASP, but if the requests were for ASP.NET or PHP files you would also need to specify the "Translate: F" header/value pair. |
| PUT | This section of the sample sends an updated version of the "foobar1.asp" script to the server, which overwrites the original file. The purpose of this PUT command is to simulate creating a WebDAV client that can update files on the server. |
| GET | This section of the sample retrieves the updated version of the "foobar1.asp" script from the server, just to show that the updated version was saved successfully. |
| UNLOCK | This section of the sample uses the lock token from the earlier LOCK request to unlock the "foobar1.asp" |
| COPY | This section of the sample copies the file from "foobar1.asp" to "foobar2.asp", and uses the "Overwrite" header to specify that the destination file can be overwritten. One thing to note in this section of the sample is the addition of the "Destination" header, which obviously specifies the destination URL. The value for this header can be a relative path or an FQDN, but it may not be an FQDN to a different server. |
| MOVE | This section of the sample moves the file from "foobar2.asp" to "foobar1.asp", thereby replacing the original uploaded file. As with the previous two sections of the sample, this section of the sample uses the "Overwrite" and "Destination" headers. |
| DELETE | This section of the sample deletes the original file, thereby removing the sample file from the destination server. |
| MKCOL | This section of the sample creates a folder named "foobar3" on the destination server; as far as WebDAV on IIS is concerned, the MKCOL method is a lot like the old DOS MKDIR command. |
| DELETE | This section of the sample deletes the folder from the destination server. |
Source Code for the Sample Application
Here is the source code for the updated sample application:
using System;
using System.Net;
using System.IO;
using System.Text;

class WebDavTest
{
  static void Main(string[] args)
  {
    try
    {
      // Define the URLs.
      string szURL1 = @"http://localhost/foobar1.asp";
      string szURL2 = @"http://localhost/foobar2.asp";
      string szURL3 = @"http://localhost/foobar3";

      // Some sample code to put in an ASP file.
      string szAspCode1 = @"<%=Year()%>";
      string szAspCode2 = @"<%=Time()%>";

      // Some XML to put in a lock request.
      string szLockXml = "<?xml version=\"1.0\" encoding=\"utf-8\" ?>" +
        "<D:lockinfo xmlns:D='DAV:'>" +
        "<D:lockscope><D:exclusive/></D:lockscope>" +
        "<D:locktype><D:write/></D:locktype>" +
        "<D:owner><D:href>mailto:someone@example.com</D:href></D:owner>" +
        "</D:lockinfo>";

      // Define username, password, and lock token strings.
      string szUsername  = @"username";
      string szPassword  = @"password";
      string szLockToken = null;

      // --------------- PUT REQUEST #1 --------------- //

      // Create an HTTP request for the URL.
      HttpWebRequest httpPutRequest1 =
         (HttpWebRequest)WebRequest.Create(szURL1);

      // Set up new credentials.
      httpPutRequest1.Credentials =
         new NetworkCredential(szUsername, szPassword);

      // Pre-authenticate the request.
      httpPutRequest1.PreAuthenticate = true;

      // Define the HTTP method.
      httpPutRequest1.Method = @"PUT";

      // Specify that overwriting the destination is allowed.
      httpPutRequest1.Headers.Add(@"Overwrite", @"T");

      // Specify the content length.
      httpPutRequest1.ContentLength = szAspCode1.Length;

      // Optional, but allows for larger files.
      httpPutRequest1.SendChunked = true;

      // Retrieve the request stream.
      Stream putRequestStream1 =
         httpPutRequest1.GetRequestStream();

      // Write the string to the destination as text bytes.
      putRequestStream1.Write(
         Encoding.UTF8.GetBytes((string)szAspCode1),
         0, szAspCode1.Length);

      // Close the request stream.
      putRequestStream1.Close();

      // Retrieve the response.
      HttpWebResponse httpPutResponse1 =
         (HttpWebResponse)httpPutRequest1.GetResponse();

      // Write the response status to the console.
      Console.WriteLine(@"PUT Response #1: {0}",
         httpPutResponse1.StatusDescription);

      // --------------- LOCK REQUEST --------------- //

      // Create an HTTP request for the URL.
      HttpWebRequest httpLockRequest =
         (HttpWebRequest)WebRequest.Create(szURL1);

      // Set up new credentials.
      httpLockRequest.Credentials =
         new NetworkCredential(szUsername, szPassword);

      // Pre-authenticate the request.
      httpLockRequest.PreAuthenticate = true;

      // Define the HTTP method.
      httpLockRequest.Method = @"LOCK";

      // Specify the request timeout.
      httpLockRequest.Headers.Add(@"Timeout", "Infinite");

      // Specify the request content type.
      httpLockRequest.ContentType = "text/xml; charset=\"utf-8\"";

      // Retrieve the request stream.
      Stream lockRequestStream =
         httpLockRequest.GetRequestStream();

      // Write the lock XML to the destination.
      lockRequestStream.Write(
         Encoding.UTF8.GetBytes((string)szLockXml),
         0, szLockXml.Length);

      // Close the request stream.
      lockRequestStream.Close();

      // Retrieve the response.
      HttpWebResponse httpLockResponse =
         (HttpWebResponse)httpLockRequest.GetResponse();

      // Retrieve the lock token for the request.
      szLockToken = httpLockResponse.GetResponseHeader("Lock-Token");

      // Write the response status to the console.
      Console.WriteLine(
         @"LOCK Response: {0}",
         httpLockResponse.StatusDescription);
      Console.WriteLine(
         @" LOCK Token: {0}",
         szLockToken);

      // --------------- GET REQUEST #1 --------------- //

      // Create an HTTP request for the URL.
      HttpWebRequest httpGetRequest1 =
         (HttpWebRequest)WebRequest.Create(szURL1);

      // Set up new credentials.
      httpGetRequest1.Credentials =
         new NetworkCredential(szUsername, szPassword);

      // Pre-authenticate the request.
      httpGetRequest1.PreAuthenticate = true;

      // Define the HTTP method.
      httpGetRequest1.Method = @"GET";

      // Specify the request for source code.
      httpGetRequest1.Headers.Add(@"Translate", "F");

      // Retrieve the response.
      HttpWebResponse httpGetResponse1 =
         (HttpWebResponse)httpGetRequest1.GetResponse();

      // Retrieve the response stream.
      Stream getResponseStream1 =
         httpGetResponse1.GetResponseStream();

      // Create a stream reader for the response.
      StreamReader getStreamReader1 =
         new StreamReader(getResponseStream1, Encoding.UTF8);

      // Write the response status to the console.
      Console.WriteLine(
         @"GET Response #1: {0}",
         httpGetResponse1.StatusDescription);
      Console.WriteLine(
         @" Response Length: {0}",
         httpGetResponse1.ContentLength);
      Console.WriteLine(
         @" Response Text: {0}",
         getStreamReader1.ReadToEnd());

      // Close the response streams.
      getStreamReader1.Close();
      getResponseStream1.Close();

      // --------------- PUT REQUEST #2 --------------- //

      // Create an HTTP request for the URL.
      HttpWebRequest httpPutRequest2 =
         (HttpWebRequest)WebRequest.Create(szURL1);

      // Set up new credentials.
      httpPutRequest2.Credentials =
         new NetworkCredential(szUsername, szPassword);

      // Pre-authenticate the request.
      httpPutRequest2.PreAuthenticate = true;

      // Define the HTTP method.
      httpPutRequest2.Method = @"PUT";

      // Specify that overwriting the destination is allowed.
      httpPutRequest2.Headers.Add(@"Overwrite", @"T");

      // Specify the lock token.
      httpPutRequest2.Headers.Add(@"If",
        String.Format(@"({0})",szLockToken));

      // Specify the content length.
      httpPutRequest2.ContentLength = szAspCode1.Length;

      // Optional, but allows for larger files.
      httpPutRequest2.SendChunked = true;

      // Retrieve the request stream.
      Stream putRequestStream2 =
         httpPutRequest2.GetRequestStream();

      // Write the string to the destination as a text file.
      putRequestStream2.Write(
         Encoding.UTF8.GetBytes((string)szAspCode2),
         0, szAspCode1.Length);

      // Close the request stream.
      putRequestStream2.Close();

      // Retrieve the response.
      HttpWebResponse httpPutResponse2 =
         (HttpWebResponse)httpPutRequest2.GetResponse();

      // Write the response status to the console.
      Console.WriteLine(@"PUT Response #2: {0}",
         httpPutResponse2.StatusDescription);

      // --------------- GET REQUEST #2 --------------- //

      // Create an HTTP request for the URL.
      HttpWebRequest httpGetRequest2 =
         (HttpWebRequest)WebRequest.Create(szURL1);

      // Set up new credentials.
      httpGetRequest2.Credentials =
         new NetworkCredential(szUsername, szPassword);

      // Pre-authenticate the request.
      httpGetRequest2.PreAuthenticate = true;

      // Define the HTTP method.
      httpGetRequest2.Method = @"GET";

      // Specify the request for source code.
      httpGetRequest2.Headers.Add(@"Translate", "F");

      // Retrieve the response.
      HttpWebResponse httpGetResponse2 =
         (HttpWebResponse)httpGetRequest2.GetResponse();

      // Retrieve the response stream.
      Stream getResponseStream2 =
         httpGetResponse2.GetResponseStream();

      // Create a stream reader for the response.
      StreamReader getStreamReader2 =
         new StreamReader(getResponseStream2, Encoding.UTF8);

      // Write the response status to the console.
      Console.WriteLine(
         @"GET Response #2: {0}",
         httpGetResponse2.StatusDescription);
      Console.WriteLine(
         @" Response Length: {0}",
         httpGetResponse2.ContentLength);
      Console.WriteLine(
         @" Response Text: {0}",
         getStreamReader2.ReadToEnd());

      // Close the response streams.
      getStreamReader2.Close();
      getResponseStream2.Close();

      // --------------- UNLOCK REQUEST --------------- //

      // Create an HTTP request for the URL.
      HttpWebRequest httpUnlockRequest =
         (HttpWebRequest)WebRequest.Create(szURL1);

      // Set up new credentials.
      httpUnlockRequest.Credentials =
         new NetworkCredential(szUsername, szPassword);

      // Pre-authenticate the request.
      httpUnlockRequest.PreAuthenticate = true;

      // Define the HTTP method.
      httpUnlockRequest.Method = @"UNLOCK";

      // Specify the lock token.
      httpUnlockRequest.Headers.Add(@"Lock-Token", szLockToken);

      // Retrieve the response.
      HttpWebResponse httpUnlockResponse =
         (HttpWebResponse)httpUnlockRequest.GetResponse();

      // Write the response status to the console.
      Console.WriteLine(
         @"UNLOCK Response: {0}",
         httpUnlockResponse.StatusDescription);

      // --------------- COPY REQUEST --------------- //

      // Create an HTTP request for the URL.
      HttpWebRequest httpCopyRequest =
         (HttpWebRequest)WebRequest.Create(szURL1);

      // Set up new credentials.
      httpCopyRequest.Credentials =
         new NetworkCredential(szUsername, szPassword);

      // Pre-authenticate the request.
      httpCopyRequest.PreAuthenticate = true;

      // Define the HTTP method.
      httpCopyRequest.Method = @"COPY";

      // Specify the destination URL.
      httpCopyRequest.Headers.Add(@"Destination", szURL2);

      // Specify that overwriting the destination is allowed.
      httpCopyRequest.Headers.Add(@"Overwrite", @"T");

      // Retrieve the response.
      HttpWebResponse httpCopyResponse =
         (HttpWebResponse)httpCopyRequest.GetResponse();

      // Write the response status to the console.
      Console.WriteLine(@"COPY Response: {0}",
         httpCopyResponse.StatusDescription);

      // --------------- MOVE REQUEST --------------- //

      // Create an HTTP request for the URL.
      HttpWebRequest httpMoveRequest =
         (HttpWebRequest)WebRequest.Create(szURL2);

      // Set up new credentials.
      httpMoveRequest.Credentials =
         new NetworkCredential(szUsername, szPassword);

      // Pre-authenticate the request.
      httpMoveRequest.PreAuthenticate = true;

      // Define the HTTP method.
      httpMoveRequest.Method = @"MOVE";

      // Specify the destination URL.
      httpMoveRequest.Headers.Add(@"Destination", szURL1);

      // Specify that overwriting the destination is allowed.
      httpMoveRequest.Headers.Add(@"Overwrite", @"T");

      // Retrieve the response.
      HttpWebResponse httpMoveResponse =
         (HttpWebResponse)httpMoveRequest.GetResponse();

      // Write the response status to the console.
      Console.WriteLine(@"MOVE Response: {0}",
         httpMoveResponse.StatusDescription);

      // --------------- DELETE FILE REQUEST --------------- //

      // Create an HTTP request for the URL.
      HttpWebRequest httpDeleteFileRequest =
         (HttpWebRequest)WebRequest.Create(szURL1);

      // Set up new credentials.
      httpDeleteFileRequest.Credentials =
         new NetworkCredential(szUsername, szPassword);

      // Pre-authenticate the request.
      httpDeleteFileRequest.PreAuthenticate = true;

      // Define the HTTP method.
      httpDeleteFileRequest.Method = @"DELETE";

      // Retrieve the response.
      HttpWebResponse httpDeleteFileResponse =
         (HttpWebResponse)httpDeleteFileRequest.GetResponse();

      // Write the response status to the console.
      Console.WriteLine(@"DELETE File Response: {0}",
         httpDeleteFileResponse.StatusDescription);

      // --------------- MKCOL REQUEST --------------- //

      // Create an HTTP request for the URL.
      HttpWebRequest httpMkColRequest =
         (HttpWebRequest)WebRequest.Create(szURL3);

      // Set up new credentials.
      httpMkColRequest.Credentials =
         new NetworkCredential(szUsername, szPassword);

      // Pre-authenticate the request.
      httpMkColRequest.PreAuthenticate = true;

      // Define the HTTP method.
      httpMkColRequest.Method = @"MKCOL";

      // Retrieve the response.
      HttpWebResponse httpMkColResponse =
         (HttpWebResponse)httpMkColRequest.GetResponse();

      // Write the response status to the console.
      Console.WriteLine(@"MKCOL Response: {0}",
         httpMkColResponse.StatusDescription);

      // --------------- DELETE FOLDER REQUEST --------------- //

      // Create an HTTP request for the URL.
      HttpWebRequest httpDeleteFolderRequest =
         (HttpWebRequest)WebRequest.Create(szURL3);

      // Set up new credentials.
      httpDeleteFolderRequest.Credentials =
         new NetworkCredential(szUsername, szPassword);

      // Pre-authenticate the request.
      httpDeleteFolderRequest.PreAuthenticate = true;

      // Define the HTTP method.
      httpDeleteFolderRequest.Method = @"DELETE";

      // Retrieve the response.
      HttpWebResponse httpDeleteFolderResponse =
         (HttpWebResponse)httpDeleteFolderRequest.GetResponse();

      // Write the response status to the console.
      Console.WriteLine(@"DELETE Folder Response: {0}",
         httpDeleteFolderResponse.StatusDescription);
    }
    catch (Exception ex)
    {
      Console.WriteLine(ex.Message);
    }
  }
}
Running the Sample Application
When you run the code sample, if there are no errors you should see something like the following output:
If you looked at the IIS logs after running the sample application, you should see entries like the following example:
#Software: Microsoft Internet Information Services 7.5
#Version: 1.0
#Date: 2011-10-18 06:49:07
#Fields: date time s-ip cs-method cs-uri-stem cs-uri-query s-port cs-username c-ip sc-status sc-substatus sc-win32-status
2011-10-18 06:49:07 ::1 PUT /foobar1.asp - 80 - ::1 401 2 5
2011-10-18 06:49:07 ::1 PUT /foobar1.asp - 80 username ::1 201 0 0
2011-10-18 06:49:07 ::1 LOCK /foobar1.asp - 80 username ::1 200 0 0
2011-10-18 06:49:07 ::1 GET /foobar1.asp - 80 username ::1 200 0 0
2011-10-18 06:49:07 ::1 PUT /foobar1.asp - 80 username ::1 204 0 0
2011-10-18 06:49:07 ::1 GET /foobar1.asp - 80 username ::1 200 0 0
2011-10-18 06:49:07 ::1 UNLOCK /foobar1.asp - 80 username ::1 204 0 0
2011-10-18 06:49:07 ::1 COPY /foobar1.asp http://localhost/foobar2.asp 80 username ::1 201 0 0
2011-10-18 06:49:07 ::1 MOVE /foobar2.asp http://localhost/foobar1.asp 80 username ::1 204 0 0
2011-10-18 06:49:07 ::1 DELETE /foobar1.asp - 80 username ::1 200 0 0
2011-10-18 06:49:07 ::1 MKCOL /foobar3 - 80 username ::1 201 0 0
2011-10-18 06:49:07 ::1 DELETE /foobar3 - 80 username ::1 200 0 0
Closing Notes
Since the code sample cleans up after itself, you should not see any files or folders on the destination server when it has completed executing. To see the files and folders that are actually created and deleted on the destination server, you would need to step through the code in a debugger.
This updated version does not include examples of the WebDAV PROPPATCH/PROPFIND methods in this sample for the same reason that I did not do so in my previous blog - those commands require processing the XML responses, and that is outside the scope of what I wanted to do with this sample.
I hope this helps!
Note: This blog was originally posted at http://blogs.msdn.com/robert_mcmurray/
How to create an HTML Application to configure your WebDAV Redirector settings
07 October 2011 • by Bob • IIS, Scripting, WebDAV
I've mentioned in previous blog posts that I use the Windows WebDAV Redirector a lot. (And believe me, I use it a lot.) Having said that, there are a lot of registry settings that control how the Windows WebDAV Redirector operates, and I tend to tweak those settings fairly often.
I documented all of those registry settings in my Using the WebDAV Redirector walkthrough, but unfortunately there isn't a built-in interface for managing the settings. With that in mind, I decided to write my own user interface.
I knew that it would be pretty simple to create a basic Windows Form application that does everything, but my trouble is that I would want to share the code in a blog, and the steps create a Windows application are probably more than I would want to write in such a short space. So I decided to reach into my scripting past and create an HTML Application for Windows that configures all of the Windows WebDAV Redirector settings.
It should be noted, like everything else these days, that this code is provided as-is. ;-]
Using the HTML Application
When you run the application, it will present you with the following user interface, which allows you to configure most of the useful Windows WebDAV Redirector settings:

Creating the HTML Application
To create this HTML Application, save the following HTMLA code as "WebDAV Redirector Settings.hta" to your computer, and then double-click its icon to run the application.
<html> <head> <title>WebDAV Redirector Settings</title> <HTA:APPLICATION APPLICATIONNAME="WebDAV Redirector Settings" ID="WebDAV Redirector Settings" VERSION="1.0" BORDER="dialog" BORDERSTYLE="static" INNERBORDER="no" SYSMENU="no" MAXIMIZEBUTTON="no" MINIMIZEBUTTON="no" SCROLL="no" SCROLLFLAT="yes" SINGLEINSTANCE="yes" CONTEXTMENU="no" SELECTION="no"/> <script language="vbscript"> ' ---------------------------------------- ' Start of main code section. ' ---------------------------------------- Option Explicit Const intDialogWidth = 700 Const intDialogHeight = 620 Const HKEY_LOCAL_MACHINE = &H80000002 Const strWebClientKeyPath = "SYSTEM\CurrentControlSet\Services\WebClient\Parameters" Const strLuaKeyPath = "Software\Microsoft\Windows\CurrentVersion\Policies\System" Dim objRegistry Dim blnHasChanges ' ---------------------------------------- ' Start the application. ' ---------------------------------------- Sub Window_OnLoad On Error Resume Next ' Set up the UI dimensions. Self.resizeTo intDialogWidth,intDialogHeight Self.moveTo (Screen.AvailWidth - intDialogWidth) / 2, _ (Screen.AvailHeight - intDialogHeight) / 2 ' Retrieve the current settings. Document.all.TheBody.ClassName = "hide" Set objRegistry = GetObject( _ "winmgmts:{impersonationLevel=impersonate}!\\.\root\default:StdRegProv") Call CheckForLUA() Call GetValues() Document.All.TheBody.ClassName = "show" End Sub ' ---------------------------------------- ' Check for User Access Control ' ---------------------------------------- Sub CheckForLUA() If GetRegistryDWORD(strLuaKeyPath,"EnableLUA",1)<> 0 Then MsgBox "User Access Control (UAC) is enabled on this computer." & _ vbCrLf & vbCrLf & "UAC must be disabled in order to edit " & _ "the registry and restart the service for the WebDAV Redirector. " & _ "Please disable UAC before running this application again. " & _ "This application will now exit.", _ vbCritical, "User Access Control" Self.close End If End Sub ' ---------------------------------------- ' Exit the application. ' ---------------------------------------- Sub ExitApplication() If blnHasChanges = False Then If MsgBox("Are you sure you want to exit?", _ vbQuestion Or vbYesNo Or vbDefaultButton2, _ "Exit Application") = vbNo Then Exit Sub End If Else Dim intRetVal intRetVal = MsgBox("You have unsaved changes. " & _ "Do you want to save them before you exit?", _ vbQuestion Or vbYesNoCancel Or vbDefaultButton1, _ "Exit Application") If intRetVal = vbYes Then Call SetValues() ElseIf intRetVal = vbCancel Then Exit Sub End If End If Self.close End Sub ' ---------------------------------------- ' Flag the application as having changes. ' ---------------------------------------- Sub FlagChanges() blnHasChanges = True End Sub ' ---------------------------------------- ' Retrieve the settings from the registry. ' ---------------------------------------- Sub GetValues() On Error Resume Next Dim tmpCount,tmpArray,tmpString ' Get the radio button values Call SetRadioValue(Document.all.BasicAuthLevel, _ GetRegistryDWORD(strWebClientKeyPath, _ "BasicAuthLevel",1)) Call SetRadioValue(Document.all.SupportLocking, _ GetRegistryDWORD(strWebClientKeyPath, _ "SupportLocking",1)) ' Get the text box values Document.all.InternetServerTimeoutInSec.Value = _ GetRegistryDWORD(strWebClientKeyPath, _ "InternetServerTimeoutInSec",30) Document.all.FileAttributesLimitInBytes.Value = _ GetRegistryDWORD(strWebClientKeyPath, _ "FileAttributesLimitInBytes",1000000) Document.all.FileSizeLimitInBytes.Value = _ GetRegistryDWORD(strWebClientKeyPath, _ "FileSizeLimitInBytes",50000000) Document.all.LocalServerTimeoutInSec.Value = _ GetRegistryDWORD(strWebClientKeyPath, _ "LocalServerTimeoutInSec",15) Document.all.SendReceiveTimeoutInSec.Value = _ GetRegistryDWORD(strWebClientKeyPath, _ "SendReceiveTimeoutInSec",60) Document.all.ServerNotFoundCacheLifeTimeInSec.Value = _ GetRegistryDWORD(strWebClientKeyPath, _ "ServerNotFoundCacheLifeTimeInSec",60) ' Get the text area values tmpArray = GetRegistryMULTISZ( _ strWebClientKeyPath,"AuthForwardServerList") For tmpCount = 0 To UBound(tmpArray) tmpString = tmpString & tmpArray(tmpCount) & vbTab Next If Len(tmpString)>0 Then Document.all.AuthForwardServerList.Value = _ Replace(Left(tmpString,Len(tmpString)-1),vbTab,vbCrLf) End If blnHasChanges = False End Sub ' ---------------------------------------- ' Save the settings in the registry. ' ---------------------------------------- Sub SetValues() On Error Resume Next ' Set the radio button values Call SetRegistryDWORD( _ strWebClientKeyPath, _ "BasicAuthLevel", _ GetRadioValue(Document.all.BasicAuthLevel)) Call SetRegistryDWORD( _ strWebClientKeyPath, _ "SupportLocking", _ GetRadioValue(Document.all.SupportLocking)) ' Set the text box values Call SetRegistryDWORD( _ strWebClientKeyPath, _ "InternetServerTimeoutInSec", _ Document.all.InternetServerTimeoutInSec.Value) Call SetRegistryDWORD( _ strWebClientKeyPath, _ "FileAttributesLimitInBytes", _ Document.all.FileAttributesLimitInBytes.Value) Call SetRegistryDWORD( _ strWebClientKeyPath, _ "FileSizeLimitInBytes", _ Document.all.FileSizeLimitInBytes.Value) Call SetRegistryDWORD( _ strWebClientKeyPath, _ "LocalServerTimeoutInSec", _ Document.all.LocalServerTimeoutInSec.Value) Call SetRegistryDWORD( _ strWebClientKeyPath, _ "SendReceiveTimeoutInSec", _ Document.all.SendReceiveTimeoutInSec.Value) Call SetRegistryDWORD( _ strWebClientKeyPath, _ "ServerNotFoundCacheLifeTimeInSec", _ Document.all.ServerNotFoundCacheLifeTimeInSec.Value) ' Set the text area values Call SetRegistryMULTISZ( _ strWebClientKeyPath, _ "AuthForwardServerList", _ Split(Document.all.AuthForwardServerList.Value,vbCrLf)) ' Prompt to restart the WebClient service If MsgBox("Do you want to restart the WebDAV Redirector " & _ "service so your settings will take effect?", _ vbQuestion Or vbYesNo Or vbDefaultButton2, _ "Restart WebDAV Redirector") = vbYes Then ' Restart the WebClient service. Call RestartWebClient() End If Call GetValues() End Sub ' ---------------------------------------- ' Start the WebClient service. ' ---------------------------------------- Sub RestartWebClient() On Error Resume Next Dim objWMIService,colServices,objService Document.All.TheBody.ClassName = "hide" Set objWMIService = GetObject( _ "winmgmts:{impersonationLevel=impersonate}!\\.\root\cimv2") Set colServices = objWMIService.ExecQuery( _ "Select * from Win32_Service Where Name='WebClient'") For Each objService in colServices objService.StopService() objService.StartService() Next Document.All.TheBody.ClassName = "show" End Sub ' ---------------------------------------- ' Retrieve a DWORD value from the registry. ' ---------------------------------------- Function GetRegistryDWORD( _ ByVal tmpKeyPath, _ ByVal tmpValueName, _ ByVal tmpDefaultValue) On Error Resume Next Dim tmpDwordValue If objRegistry.GetDWORDValue( _ HKEY_LOCAL_MACHINE, _ tmpKeyPath, _ tmpValueName, _ tmpDwordValue)=0 Then GetRegistryDWORD = CLng(tmpDwordValue) Else GetRegistryDWORD = CLng(tmpDefaultValue) End If End Function ' ---------------------------------------- ' Set a DWORD value in the registry. ' ---------------------------------------- Sub SetRegistryDWORD( _ ByVal tmpKeyPath, _ ByVal tmpValueName, _ ByVal tmpDwordValue) On Error Resume Next Call objRegistry.SetDWORDValue( _ HKEY_LOCAL_MACHINE, _ tmpKeyPath, _ tmpValueName, _ CLng(tmpDwordValue)) End Sub ' ---------------------------------------- ' Retrieve a MULTISZ value from the registry. ' ---------------------------------------- Function GetRegistryMULTISZ( _ ByVal tmpKeyPath, _ ByVal tmpValueName) On Error Resume Next Dim tmpMultiSzValue If objRegistry.GetMultiStringValue( _ HKEY_LOCAL_MACHINE, _ tmpKeyPath, _ tmpValueName, _ tmpMultiSzValue)=0 Then GetRegistryMULTISZ = tmpMultiSzValue Else GetRegistryMULTISZ = Array() End If End Function ' ---------------------------------------- ' Set a MULTISZ value in the registry. ' ---------------------------------------- Sub SetRegistryMULTISZ( _ ByVal tmpKeyPath, _ ByVal tmpValueName, _ ByVal tmpMultiSzValue) On Error Resume Next Call objRegistry.SetMultiStringValue( _ HKEY_LOCAL_MACHINE, _ tmpKeyPath, _ tmpValueName, _ tmpMultiSzValue) End Sub ' ---------------------------------------- ' Retrieve the value of a radio button group. ' ---------------------------------------- Function GetRadioValue(ByVal tmpRadio) On Error Resume Next Dim tmpCount For tmpCount = 0 To (tmpRadio.Length-1) If tmpRadio(tmpCount).Checked Then GetRadioValue = CLng(tmpRadio(tmpCount).Value) Exit For End If Next End Function ' ---------------------------------------- ' Set the value for a radio button group. ' ---------------------------------------- Sub SetRadioValue(ByVal tmpRadio, ByVal tmpValue) On Error Resume Next Dim tmpCount For tmpCount = 0 To (tmpRadio.Length-1) If CLng(tmpRadio(tmpCount).Value) = CLng(tmpValue) Then tmpRadio(tmpCount).Checked = True Exit For End If Next End Sub ' ---------------------------------------- ' ' ---------------------------------------- Sub Validate(tmpField) Dim tmpRegEx, tmpMatches Set tmpRegEx = New RegExp tmpRegEx.Pattern = "[0-9]" tmpRegEx.IgnoreCase = True tmpRegEx.Global = True Set tmpMatches = tmpRegEx.Execute(tmpField.Value) If tmpMatches.Count = Len(CStr(tmpField.Value)) Then If CDbl(tmpField.Value) => 0 And _ CDbl(tmpField.Value) =< 4294967295 Then Exit Sub End If End If MsgBox "Please enter a whole number between 0 and 4294967295.", _ vbCritical, "Validation Error" tmpField.Focus End Sub ' ---------------------------------------- ' ' ---------------------------------------- Sub BasicAuthWarning() MsgBox "WARNING:" & vbCrLf & vbCrLf & _ "Using Basic Authentication over non-SSL connections can cause " & _ "serious security issues. Usernames and passwords are transmitted " & _ "in clear text, therefore the use of Basic Authentication with " & _ "WebDAV is disabled by default for non-SSL connections. That " & _ "being said, this setting can override the default behavior for " & _ "Basic Authentication, but it is strongly discouraged.", _ vbCritical, "Basic Authentication Warning" End Sub ' ---------------------------------------- ' End of main code section. ' ---------------------------------------- </script> <style> body { color:#000000; background-color:#cccccc; font-family:'Segoe UI',Tahoma,Verdana,Arial; font-size:9pt; } fieldset { padding:10px; width:640px; } .button { width:150px; } .textbox { width:200px; height:22px; text-align:right; } .textarea { width:300px; height:50px; text-align:left; } .radio { margin-left:-5px; margin-top: -2px; } .hide { display:none; } .show { display:block; } select { width:300px; text-align:left; } table { border-collapse:collapse; empty-cells:hide; } h1 { font-size:14pt; } th { font-size:9pt; text-align:left; vertical-align:top; padding:2px; } td { font-size:9pt; text-align:left; vertical-align:top; padding:2px; } big { font-size:11pt; } small { font-size:8pt; } </style> </head> <body id="TheBody" class="hide"> <h1 align="center" id="TheTitle" style="margin-bottom:-20px;">WebDAV Redirector Settings</h1> <div align="center"> <p style="margin-bottom:-20px;"><i><small><b>Note</b>: See <a target="_blank" href="https://docs.microsoft.com/iis/publish/using-webdav/using-the-webdav-redirector/">Using the WebDAV Redirector</a> for additional details.</small></i></p> <form> <center> <table border="0" cellpadding="2" cellspacing="2" style="width:600px;"> <tr> <td style="width:600px;text-align:left"><fieldset title="Security Settings"> <legend> <b>Security Settings</b> </legend> These values affect the security behavior for the WebDAV Redirector.<br> <table style="width:600px;"> <tr title="Specifies whether the WebDAV Redirector can use Basic Authentication to communicate with a server."> <td style="width:300px"> <table border="0"> <tr> <td style="width:300px"><b>Basic Authentication Level</b></td> </tr> <tr> <td style="width:300px;"><span style="width:280px;padding-left:20px;"><small><i><b>Note</b>: Using basic authentication can cause <u>serious security issues</u> as the username and password are transmitted in clear text, therefore the use of basic authentication over WebDAV is disabled by default unless the connection is using SSL.</i></small></span></td> </tr> </table> </td> <td style="width:300px"> <table style="width:300px"> <tr> <td style="width:020px"><input class="radio" type="radio" value="0" name="BasicAuthLevel" onchange="VBScript:FlagChanges()" id="BasicAuthLevel0"></td> <td style="width:280px"><label for="BasicAuthLevel0">Basic Authentication is disabled</label></td> </tr> <tr> <td style="width:020px"><input class="radio" type="radio" value="1" checked name="BasicAuthLevel" onchange="VBScript:FlagChanges()" id="BasicAuthLevel1"></td> <td style="width:280px"><label for="BasicAuthLevel1">Basic Authentication is enabled for SSL web sites only</label></td> </tr> <tr> <td style="width:020px"><input class="radio" type="radio" value="2" name="BasicAuthLevel" onchange="VBScript:FlagChanges()" id="BasicAuthLevel2" onClick="VBScript:BasicAuthWarning()"></td> <td style="width:280px"><label for="BasicAuthLevel2">Basic Authentication is enabled for SSL and non-SSL web sites</label></td> </tr> </table> </td> </tr> <tr title="Specifies a list of local URLs for forwarding credentials that bypasses any proxy settings. (Note: This requires Windows Vista SP1 or later.)"> <td style="width:300px"> <table border="0"> <tr> <td style="width:300px"><b>Authentication Forwarding Server List</b></td> </tr> <tr> <td style="width:300px;"><span style="width:280px;padding-left:20px;"><small><i><b>Note</b>: Include one server name per line.</i></small></span></td> </tr> </table> </td> <td style="width:300px"><textarea class="textarea" name="AuthForwardServerList" onchange="VBScript:FlagChanges()"></textarea></td> </tr> <tr title="Specifies whether the WebDAV Redirector supports locking."> <td style="width:300px"><b>Support for WebDAV Locking</b></td> <td style="width:300px"> <table style="width:300px"> <tr> <td style="width:020px"><input class="radio" type="radio" value="1" checked name="SupportLocking" onchange="VBScript:FlagChanges()" id="SupportLocking1"></td> <td style="width:280px"><label for="SupportLocking1">Enable Lock Support</label></td> </tr> <tr> <td style="width:020px"><input class="radio" type="radio" value="0" name="SupportLocking" onchange="VBScript:FlagChanges()" id="SupportLocking0"></td> <td style="width:280px"><label for="SupportLocking0">Disable Lock Support</label></td> </tr> </table> </td> </tr> </table> </fieldset> </td> </tr> <tr> <td style="width:600px;text-align:left"><fieldset title="Time-outs"> <legend> <b>Time-outs and Maximum Sizes</b> </legend> These values affect the behavior for WebDAV Client/Server operations.<br> <table border="0" style="width:600px;"> <tr title="Specifies the connection time-out for the WebDAV Redirector uses when communicating with non-local WebDAV servers."> <td style="width:300px"><b>Internet Server Time-out</b> <small>(In Seconds)</small></td> <td style="width:300px"><input class="textbox" type="text" name="InternetServerTimeoutInSec" onchange="VBScript:FlagChanges()" onblur="VBScript:Validate(Me)" value="30"></td> </tr> <tr title="Specifies the connection time-out for the WebDAV Redirector uses when communicating with a local WebDAV server."> <td style="width:300px"><b>Local Server Time-out</b> <small>(In Seconds)</small></td> <td style="width:300px"><input class="textbox" type="text" name="LocalServerTimeoutInSec" onchange="VBScript:FlagChanges()" onblur="VBScript:Validate(Me)" value="15"></td> </tr> <tr title="Specifies the time-out in seconds that the WebDAV Redirector uses after issuing a request."> <td style="width:300px"><b>Send/Receive Time-out</b> <small>(In Seconds)</small></td> <td style="width:300px"><input class="textbox" type="text" name="SendReceiveTimeoutInSec" onchange="VBScript:FlagChanges()" onblur="VBScript:Validate(Me)" value="60"></td> </tr> <tr title="Specifies the period of time that a server is cached as non-WebDAV by the WebDAV Redirector. If a server is found in this list, a fail is returned immediately without attempting to contact the server."> <td style="width:300px"><b>Server Not Found Cache Time-out</b> <small>(In Seconds)</small></td> <td style="width:300px"><input class="textbox" type="text" name="ServerNotFoundCacheLifeTimeInSec" onchange="VBScript:FlagChanges()" onblur="VBScript:Validate(Me)" value="60"></td> </tr> <tr title="Specifies the maximum size in bytes that the WebDAV Redirector allows for file transfers."> <td style="width:300px"><b>Maximum File Size</b> <small>(In Bytes)</small></td> <td style="width:300px"><input class="textbox" type="text" name="FileSizeLimitInBytes" onchange="VBScript:FlagChanges()" onblur="VBScript:Validate(Me)" value="50000000"></td> </tr> <tr title="Specifies the maximum size that is allowed by the WebDAV Redirector for all properties on a specific collection."> <td style="width:300px"><b>Maximum Attributes Size</b> <small>(In Bytes)</small></td> <td style="width:300px"><input class="textbox" type="text" name="FileAttributesLimitInBytes" onchange="VBScript:FlagChanges()" onblur="VBScript:Validate(Me)" value="1000000"></td> </tr> </table> </fieldset> </td> </tr> <tr> <td style="text-align:center"> <table border="0"> <tr> <td style="text-align:center"><input class="button" type="button" value="Apply Settings" onclick="VBScript:SetValues()"> <td style="text-align:center"><input class="button" type="button" value="Exit Application" onclick="VBScript:ExitApplication()"> </tr> </table> </td> </tr> </table> </center> </form> </div> </body> </html>
Additional Notes
You will need to run this HTML Application as an administrator in order to save the settings and restart the Windows WebDAV Redirector. (Which is listed as the "WebClient" service in your Administrative Tools.)
This HTML Application performs basic validation for the numeric fields, and it prevents you from exiting the application when you have unsaved changes, but apart from that there's not much functionality other than setting and retrieving the registry values. How else can you get away with posting an application in a blog with only 500 lines of code and no compilation required? ;-]
Note: This blog was originally posted at http://blogs.msdn.com/robert_mcmurray/
IIS 6: Setting up SSL - Appendix C: Processing a Certificate Request using Windows 2003 Certificate Services
03 August 2011 • by Bob • IIS, SSL
In this last appendix for my blog series about using SSL with IIS 6, I'll discuss processing a certificate request by using Windows 2003 Certificate Services. When you are running a certificate server for your network environment, you will need to physically issue the certificates that clients will request from your certificate server. There is a way that you can configure certificate services to automatically issue certificates, but I'd advise against that, unless you are only issuing certificates for testing purposes. If so, then you should read the Set the default action upon receipt of a certificate request topic on Microsoft's TechNet website.
That being said, the procedure to approve and issue a certificate is relatively easy; to do so, use the following steps:
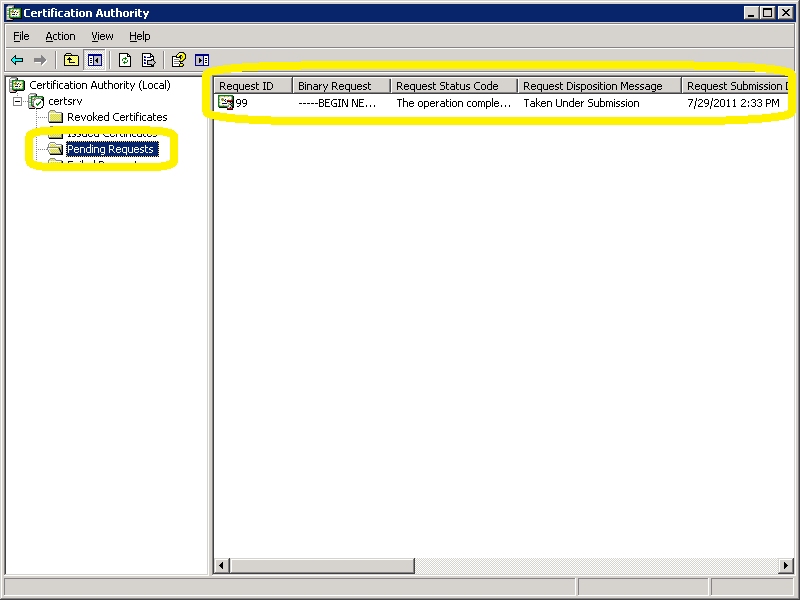
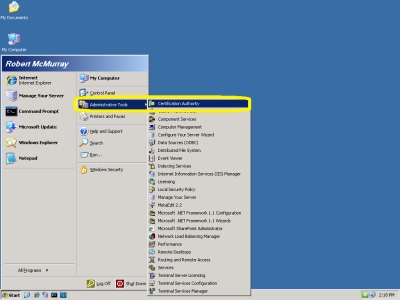
- Open the "Certificate Authority" administrative tool:
- Click on "Pending Requests":

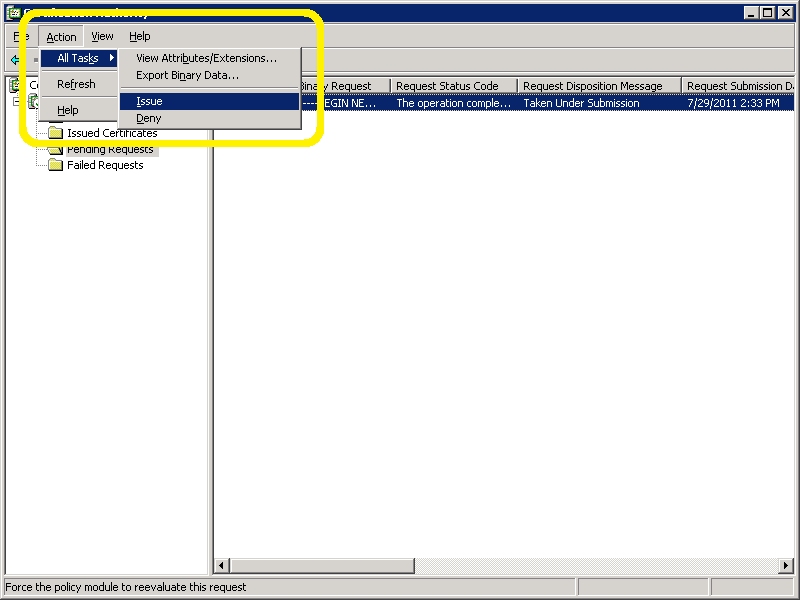
- Right-click the pending request and choose "All Tasks", then click "Issue":

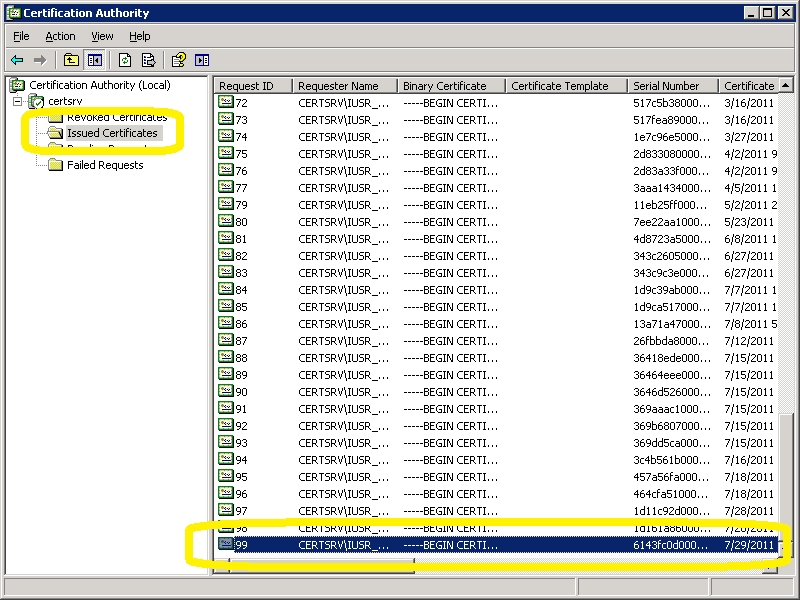
- The certificate will now show up under "Issued Certificates":

That wraps up the last post in this blog series about using Secure Sockets Layer (SSL) with IIS 6.0, as well as some related information about using Windows 2003 Certificate Services. I hope this information helps administrators that have yet to upgrade to Windows Server 2008 or Windows Server 2008 R2. ;-]
Note: This blog was originally posted at http://blogs.msdn.com/robert_mcmurray/
IIS 6: Setting up SSL - Appendix B: Obtaining a Root Certificate from Windows Server 2003 Certificate Services
29 July 2011 • by Bob • IIS, SSL
In this second appendix for my blog series about using SSL with IIS 6, I'm going to discuss obtaining the root certificate from Windows Server 2003 Certificate Services. By way of explanation, obtaining a root certificate is one of the most important steps for servers or clients that will use certificates that you issue. While this step is not necessary on the server where you installed Certificate Services, it is absolutely essential on your other servers or clients, because this step will allow those computers to trust your certificate server as a Certificate Authority (CA). Without that trust in place, you will either receive error messages or SSL simply won't work.
I've broken this process into two steps:
Downloading the Root Certificate
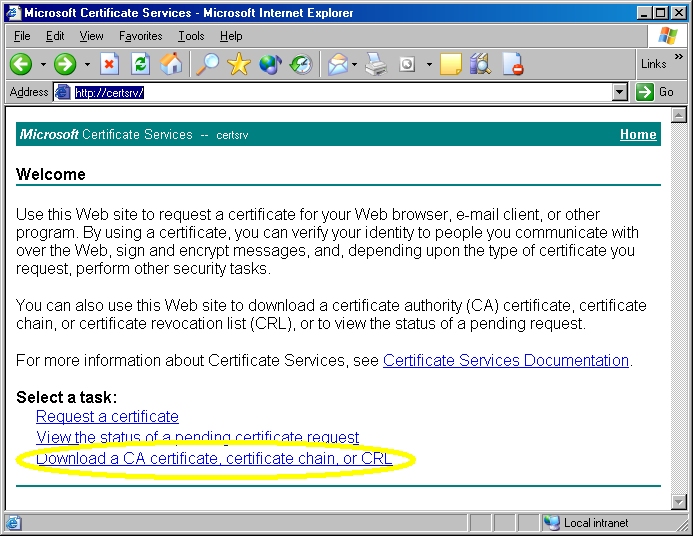
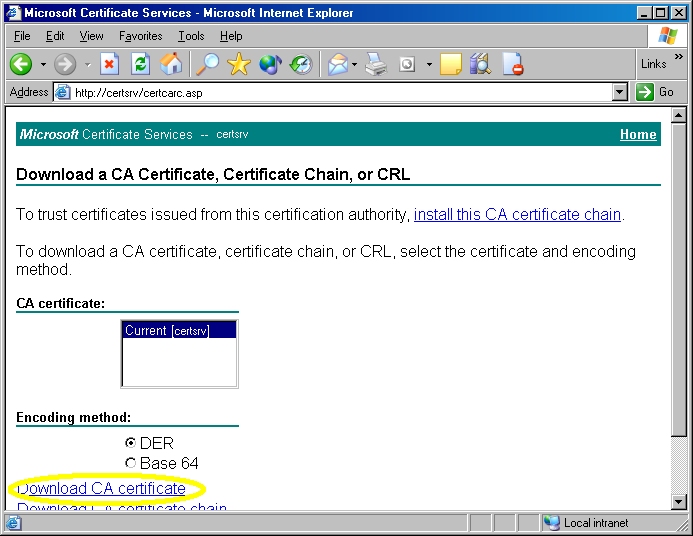
- Browse to your certificate server's address, (e.g. http://<server-name>/certsrv/), and choose to retrieve the CA certificate:

- Click the link to download the CA certificate:

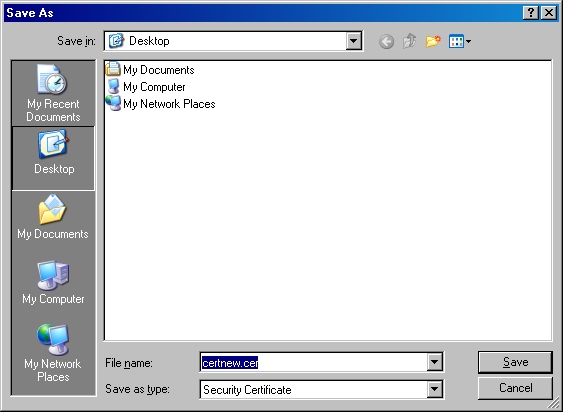
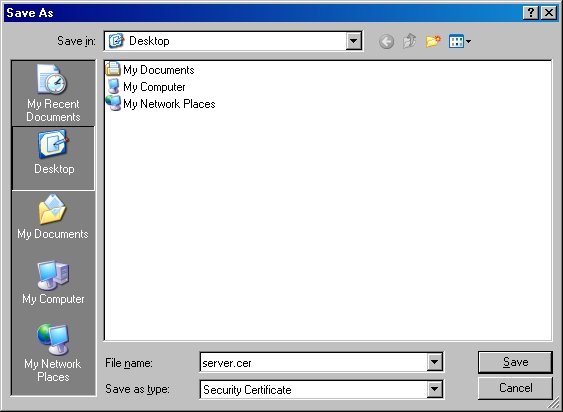
- Choose to save the certificate file to disk:

- Save the file to your desktop:

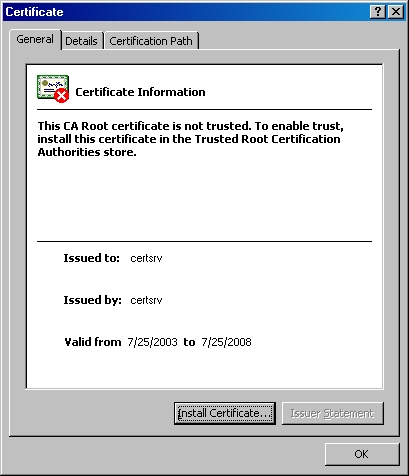
Note: If you were to bring up the properties for the root certificate, the certificate's icon should show an error; this is because the certificate has not been imported.
Installing the Root Certificate
Before using any certificates that you issue on a computer, you need to install the Root Certificate. (This includes web servers and clients.)
- Double-click the file on your desktop:

- Click the "Install Certificate" button:

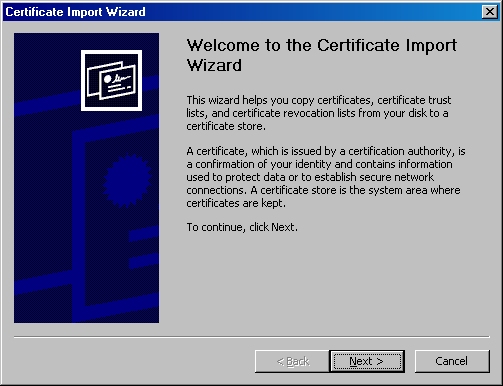
- Click "Next" to start the Certificate Import Wizard:

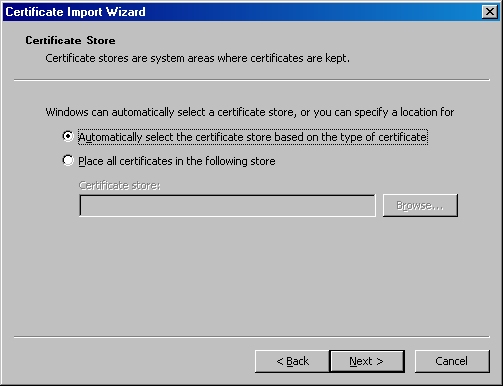
- Choose to automatically choose the store:

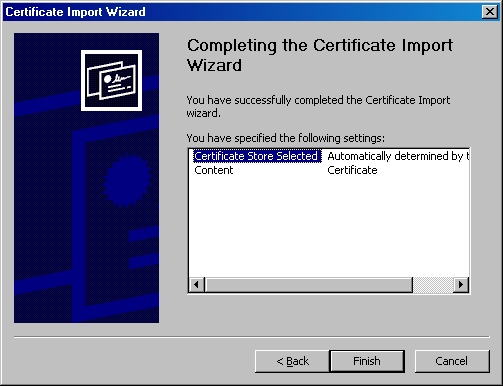
- Click the "Finish" button:

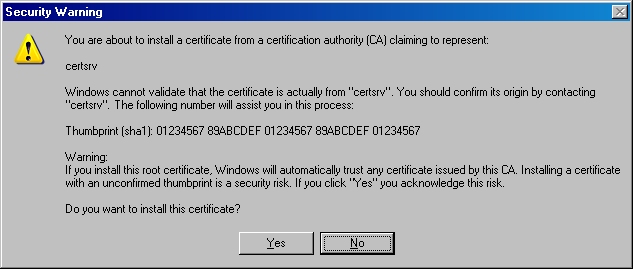
- Click "Yes" when asked if you want to add the certificate:
NOTE: This step is very important. If you do not see this dialog, something went wrong, and you may need to manually place the certificate in the correct store.
- Click "OK" when informed that the import was successful.

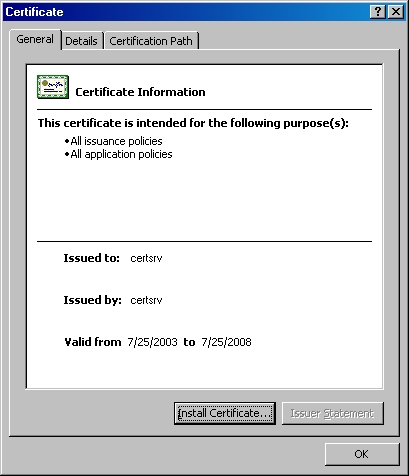
Note: If you were to bring up the properties for the root certificate after you have installed it on your computer, you should see that the icon for the certificate no longer shows an error.
That's it for this post. In my next blog post, I'll discuss processing a certificate request.
Note: This blog was originally posted at http://blogs.msdn.com/robert_mcmurray/
IIS 6: Setting up SSL - Appendix A: Installing Windows Server 2003 Certificate Services
28 July 2011 • by Bob • IIS, SSL
I needed to take a short break from my blog series about using SSL with IIS 6 in order to work on some other projects, but I wanted to finish the series by giving you a few appendices that give you some additional details that you might want to know if you are using SSL with IIS 6.
In this first appendix, I'll discuss how to install Certificate Services for Windows Server 2003. Installing Certificate Services will allow you to have your own Certificate Authority (CA), and thereby you will be able to issue certificates for your organization. It should be noted that Internet clients that are not part of your organization will not inherently trust your certificates - you will need to export your Root CA certificate, which I will describe in a later appendix for this blog series.
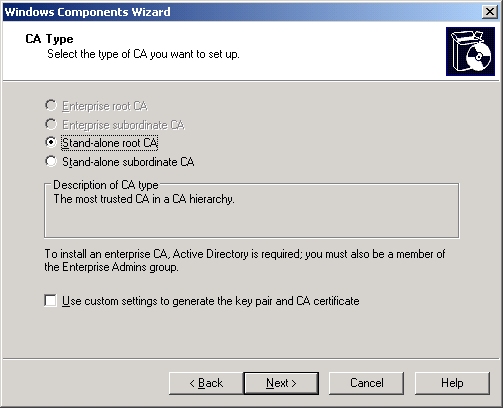
There are four different configurations that you can choose from when you are installing Certificate Services:
| Enterprise root CA | Integrated with Active Directory Acts as the root CA for your organization |
|---|---|
| Enterprise subordinate CA | Integrated with Active Directory Child of your organization's root CA |
| Stand-alone root CA | Not integrated with Active Directory Acts as the root CA for your certificate chain |
| Stand-alone subordinate CA | Not integrated with Active Directory Child of your certificate chain's root CA |
Note: More information about these options is available at http://technet.microsoft.com/en-us/library/cc756989.aspx
For this blog, I will discuss setting up a Stand-alone root CA.
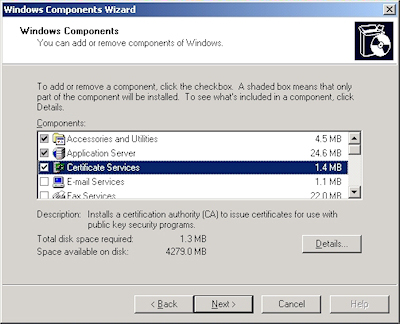
- Run the "Windows Component Wizard" in "Add/Remove Programs", choose "Certificate Services", and click "Next":
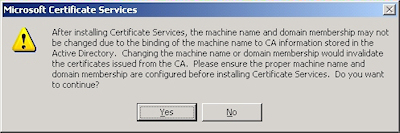
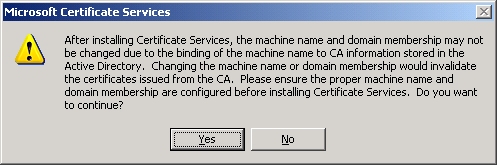
- Click "Yes" when prompted to continue:
- Accept the defaults, then click "Next":

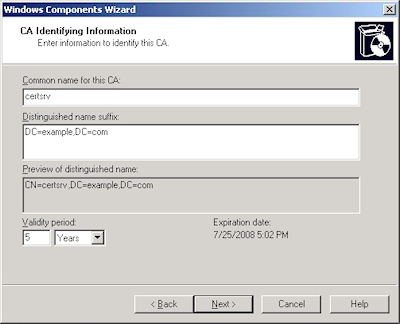
- Enter all requested information, then click "Next":
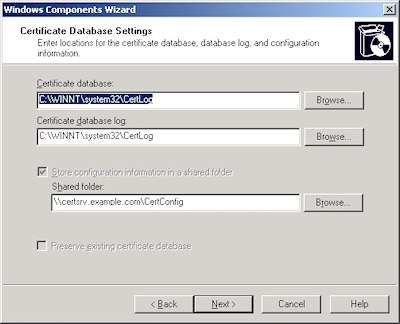
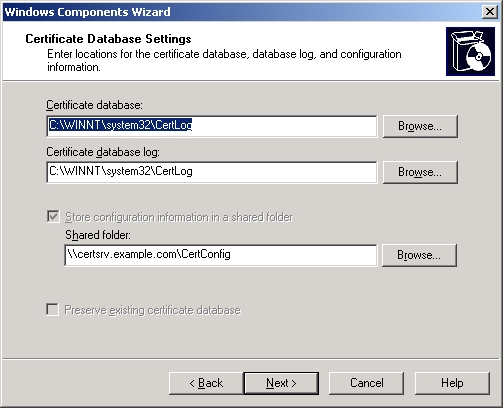
- Accept the defaults for the data locations and click "Next":
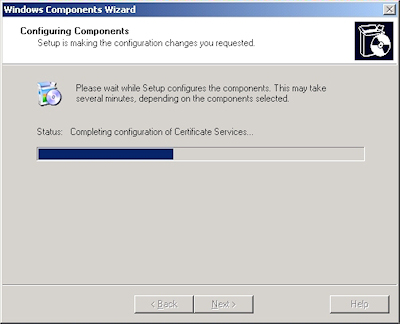
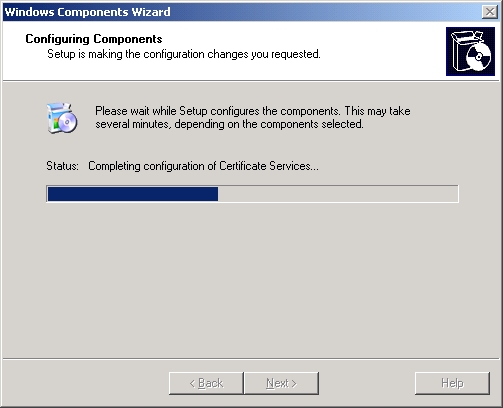
- The wizard will step through installing the services:
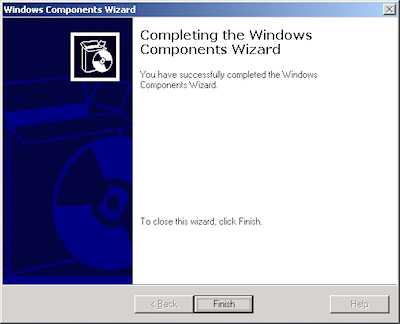
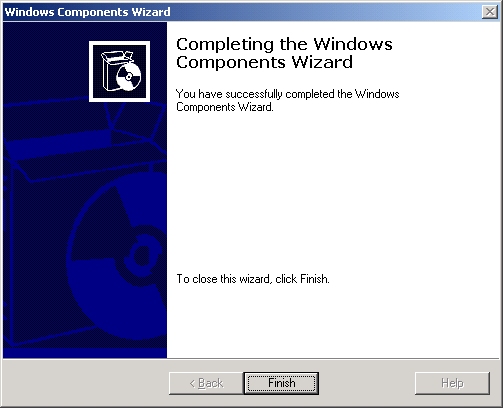
- When the wizard has completed, click "Finish" to exit the wizard:


That wraps up this blog post. In my next post I'll discuss obtaining the root certificate for your certificate server so you can install it on a client computer or an IIS server; this will allow other computers to trust the certificates that you issue.
Note: This blog was originally posted at http://blogs.msdn.com/robert_mcmurray/
How to add
01 June 2011 • by Bob • IIS, Scripting
I had a question recently where someone was trying to add <clear /> or <remove /> elements to a collection in their IIS 7 configuration settings. With that in mind, for today's blog I thought that I would discuss a couple of ways to add <clear /> and <remove /> elements by using two specific scripting methods: AppCmd and VBScript.
It should be noted that you can also use JavaScript or PowerShell, but I'm not covering those because the syntax for those is available elsewhere. (JavaScript syntax is available in the Configuration Editor in IIS Manager, and the PowerShell syntax is available through the Web Server (IIS) Administration Cmdlet Reference.) You can also use Managed-Code, and the syntax for that is also available in the Configuration Editor in IIS Manager; but compiled code isn't scripting, is it? :-)
Here's the scenario, IIS makes it possible to modify the contents of an inherited collection in two ways:
- You can clear the contents of an inherited configuration section, as illustrated by the following configuration excerpt:
<configuration>
   <system.webServer>
      <defaultDocument enabled="true">
         <files>
            <clear />
         </files>
      </defaultDocument>
   </system.webServer>
</configuration>
- You can remove an item from an inherited collection, as illustrated by the following configuration excerpt:
<configuration>
   <system.webServer>
      <defaultDocument enabled="true">
         <files>
            <remove value="index.html" />
         </files>
      </defaultDocument>
   </system.webServer>
</configuration>
With that in mind, let's look at scripting those settings.
Using AppCmd
AppCmd.exe is a great utility that ships with IIS 7, which allows editing the configuration settings for IIS from a command line. This also allows you to create batch scripts that automate large numbers of configuration changes. For example, the following batch file enables ASP session state, sets the maximum number of ASP sessions to 1000, and then sets the session time-out to 10 minutes for the Default Web Site:
appcmd.exe set config "Default Web Site" -section:system.webServer/asp /session.allowSessionState:"True" /commit:apphost
appcmd.exe set config "Default Web Site" -section:system.webServer/asp /session.max:"1000" /commit:apphost
appcmd.exe set config "Default Web Site" -section:system.webServer/asp
I'm a big fan of IIS 7's AppCmd.exe, but unfortunately it has two rather large limitations:
- AppCmd.exe does not directly support clearing the contents of a configuration section. (But there's a workaround that I list below.)
- AppCmd.exe does not support removing an item from a collection.
These limitations have caused me some grief from time to time, because I often want to script the modification of collections, and I would love to remove items or clear a collection.
How to add a <clear /> element using AppCmd:
Although it's kind of a hack, there is a way to force AppCmd.exe to add a <clear /> element.
Here's what you need to do in order to clear the list of default documents for the Default Web Site:
- Create an XML file like the following and save it as "CLEAR.XML":
<?xml version="1.0" encoding="UTF-8"?>
<appcmd>
    <CONFIG CONFIG.SECTION="system.webServer/defaultDocument" path="MACHINE/WEBROOT/APPHOST" overrideMode="Allow" locked="false">
        <system.webServer-defaultDocument  enabled="true">
            <files>
                <clear />
            </files>
        </system.webServer-defaultDocument>
    </CONFIG>
</appcmd>
- Run the following command:
appcmd.exe set config /in "Default Web Site" < CLEAR.xml
Unfortunately this technique does not work for <remove /> elements. :-( But that being said, you can add a <remove /> element through VBScript; for more information, see the Using VBScript section.
Using VBScript
Fortunately, VBScript doesn't have AppCmd.exe's limitations, so you can add both <clear /> and <remove /> elements.
How to add a <clear /> element in VBScript:
The following steps will clear the list of default documents for the Default Web Site:
- Save the following VBScript code as "clear.vbs":
Set adminManager = WScript.CreateObject("Microsoft.ApplicationHost.WritableAdminManager")
adminManager.CommitPath = "MACHINE/WEBROOT/APPHOST/Default Web Site"
Set defaultDocumentSection = adminManager.GetAdminSection("system.webServer/defaultDocument", _
  "MACHINE/WEBROOT/APPHOST/Default Web Site")
Set filesCollection = defaultDocumentSection.ChildElements.Item("files").Collection
filesCollection.Clear
adminManager.CommitChanges
- Run the VBscript code by double-clicking the "clear.vbs" file.
How to add a <remove /> element in VBScript:
The following steps will remove a single item from the list of default documents for the Default Web Site:
- Save the following VBScript code as "remove.vbs":
Set adminManager = WScript.CreateObject("Microsoft.ApplicationHost.WritableAdminManager")
adminManager.CommitPath = "MACHINE/WEBROOT/APPHOST/Default Web Site"
Set defaultDocumentSection = adminManager.GetAdminSection("system.webServer/defaultDocument", _
  "MACHINE/WEBROOT/APPHOST/Default Web Site")
Set filesCollection = defaultDocumentSection.ChildElements.Item("files").Collection
addElementPos = FindElement(filesCollection, "add", Array("value", "index.html"))
If (addElementPos = -1) Then
   WScript.Echo "Element not found!"
   WScript.Quit
End If
filesCollection.DeleteElement(addElementPos)
adminManager.CommitChanges

Function FindElement(collection, elementTagName, valuesToMatch)
   For i = 0 To CInt(collection.Count) - 1
      Set element = collection.Item(i)
      If element.Name = elementTagName Then
         matches = True
         For iVal = 0 To UBound(valuesToMatch) Step 2
            Set property = element.GetPropertyByName(valuesToMatch(iVal))
            value = property.Value
            If Not IsNull(value) Then
               value = CStr(value)
            End If
            If Not value = CStr(valuesToMatch(iVal + 1)) Then
               matches = False
               Exit For
            End If
         Next
         If matches Then
            Exit For
         End If
      End If
   Next
   If matches Then
      FindElement = i
   Else
      FindElement = -1
   End If
End Function
- Run the VBscript code by double-clicking the "remove.vbs" file.
More Information
For more information about scripting and IIS configuration settings, see the following:
- Getting Started with AppCmd.exe
- IIS 7 Configuration Reference
- Web Server (IIS) Administration Cmdlets in Windows PowerShell
Note: This blog was originally posted at http://blogs.msdn.com/robert_mcmurray/
Bad Characters to Use in Web-based Filenames
27 April 2011 • by Bob • IIS
My good friend Wade Hilmo recently posted an excellent blog titled "How IIS blocks characters in URLs" that discusses some of the internal workings for how IIS deals with several characters in file names that do not work well in URLs. Wade’s blog does a great job explaining all of the internal IIS URL parsing logic in detail, and his post reminded me of some related notes that I had published on an internal website at Microsoft. As a complement to Wade’s outstanding blog post, I’m reposting my notes in this blog.
Recently a Microsoft Technical Account Manager (TAM) mentioned that he was working on an issue with a customer that was using SharePoint 2007 on IIS 7. The customer's problem was this: his company had several Word documents that were stored in SharePoint that had the plus sign (+) in the filenames, and HTTP requests for these documents were failing. The TAM configured IIS 7's request filtering feature to allow doubly-escaped characters by setting the allowDoubleEscaping attribute to true. This seemed to alleviate the problem, but I had to point out that this probably wasn't the right thing to do. As a general rule, I don't like changing many of the default configuration options for the IIS 7 request filtering feature, because they are designed to keep my servers safe. But in this specific scenario, modifying those settings is simply looking in the wrong place.
Let me explain:
There are several characters that are perfectly valid in a Windows filename that are really bad when you post those files on websites, and either the server or the client could wreak havoc with them. In most scenarios the HTTP requests will receive an HTTP 404 File Not Found error, but in some cases that might cause an HTTP 400 Bad Request error. As such, even though you might find a way to work around the problem, it's a really bad idea to use those characters when you are posting files to a website.
RFC 2396 is the governing document for "Uniform Resource Identifiers (URI): Generic Syntax." This RFC defines what can and can't be used in a URI, as well as what shouldn't be used.
First, section "2.2. Reserved Characters" contains the following list of reserved characters:
reserved = ";" | "/" | "?" | ":" | "@" |
           "&" | "=" | "+" | "$" | ","
Second, section "2.4.3. Excluded US-ASCII Characters" contains the following lists of delimiter and unwise characters:
delims = "<" | ">" | "#" | "%" | <">

unwise = "{" | "}" | "|" | "\" | "^" | "[" | "]" | "`"
Several of the characters in those lists cannot be used in Windows filenames, but the remaining characters should not be used for filenames if you intend to upload those files to a website.
Here are my explanations for why some of those characters will cause problems if you attempt to use them in filenames that you upload to a website:
- Plus Sign (+) - this character is often translated as a URI-encoded space, so the URI "http://localhost/foo+bar.doc" could be misinterpreted as the URI "http://localhost/foo bar.doc".
- Percent Sign (%) - this character is used for URI escaping, and I've seen this cause a lot of problems because the two characters that follow the percent sign are assumed to be hex digits for an escaped ASCII code, so the URI "http://localhost/foo%bar.doc" could be misinterpreted as the URI "http://localhost/fooºr.doc".
- Number/Pound Sign (#) - this character is used to delimit a URI from a fragment identifier (aka bookmarks), so the URI "http://localhost/foo#bar.doc" could be misinterpreted as the URI "http://localhost/foo" with a bookmark of "bar.doc".
So once again, just because you might be able to get this to work on your server doesn't mean that you should be using a character in a web-based filename that's reserved for something else. It's like building an atomic bomb - just because you can doesn't mean that you should. Your best answer in this scenario is to rename your files to something else.
;-]
Note: This blog was originally posted at http://blogs.msdn.com/robert_mcmurray/
Credential Caching in FTP 7.0 and FTP 7.5
08 April 2011 • by Bob • FTP, IIS
I've seen a few situations where people that are using the FTP 7.0 and FTP 7.5 service have noticed that it takes a while for their password changes to be reflected by the FTP service. To put this another way, here are the typical symptoms that people describe to me:
- A user successfully logs into their FTP site using their username and password
- The user logs out of their FTP site
- The user changes their password
- The user attempts to log into their FTP site using their username and their new password, but this fails
- The user can successfully log into their FTP site using their username and their old password
- (Note: As a corollary, restarting the FTP service fixes the symptoms)
Here's why this happens: to help improve the performance for authentication requests, the FTP service caches the credentials for successful logins. (The cache duration is set to 15 minutes by default.) This means that if you change your password, your changes may not be reflected for the cache duration.
The good news is, the FTP credential cache settings can be changed easily, and I have documented all of the settings for FTP caching in the IIS configuration reference at the following URLs:
- FTP Caching <caching>
http://www.iis.net/ConfigReference/system.ftpServer/caching - FTP Credentials Cache <credentialsCache>
http://www.iis.net/ConfigReference/system.ftpServer/caching/credentialsCache
Quoting and paraphrasing the above documentation, there are the two settings that you can configure on the <credentialsCache> element:
| Attribute | Description |
|---|---|
enabled |
Optional Boolean attribute. true if credential caching is enabled; otherwise, false. The default value is true. |
flushInterval |
Optional uint attribute. Specifies the cache lifetime, in seconds, for credentials that are stored in the cache. Note: This value must be between 5 and 604,800 seconds. The default value is 900. |
What this means to you is - you can completely disable credential caching, or you can specify a different timeout. For example, on several of my development servers I often disable credential caching; this allows me to change passwords whenever I want, which is very useful when I am creating custom authentication providers. For my production servers I tend to stick with the default values, although I might change those values when I'm troubleshooting a problem.
I usually configure the settings from a command line or a batch file, although the articles that I listed earlier have steps for using the IIS Manager to change the settings for FTP credential caching. Just the same, here are some examples for setting the values by using appcmd.exe:
How to Disable FTP Credential Caching
cd /d "%SystemRoot%\System32\Inetsrv"
appcmd.exe set config -section:system.ftpServer/caching /credentialsCache.enabled:"False" /commit:apphost
net stop FTPSVC
net start FTPSVC
How to Specify a Custom Timeout for FTP Credential Caching
cd /d "%SystemRoot%\System32\Inetsrv"
appcmd.exe set config -section:system.ftpServer/caching /credentialsCache.enabled:"True" /commit:apphost
appcmd.exe set config -section:system.ftpServer/caching /credentialsCache.flushInterval:"300" /commit:apphost
net stop FTPSVC
net start FTPSVC
I hope this helps. ;-]
Note: This blog was originally posted at http://blogs.msdn.com/robert_mcmurray/
IIS 6: Setting up SSL - Part 3: Installing the Certificate
17 February 2011 • by Bob • IIS, SSL
In part three of my series on setting up SSL on IIS 6, I'll describe the steps that are necessary to install an SSL certificate. Simply out of convenience I broke this process into two sections:
- Installing Your Certificate (Required)
- Verifying Your Certificate (Optional)
Installing Your Certificate
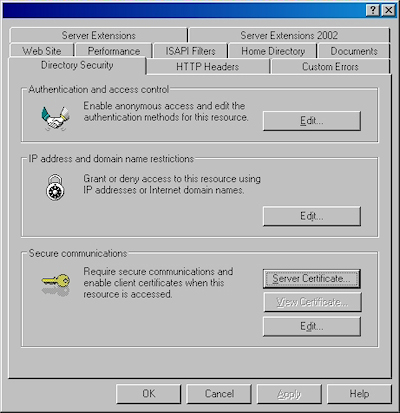
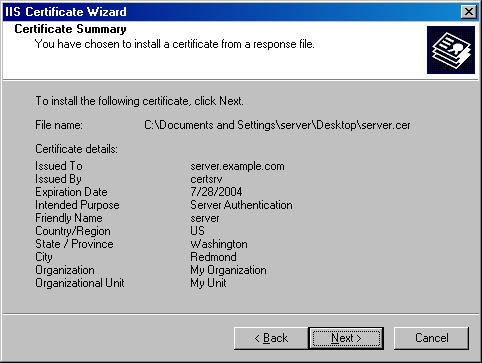
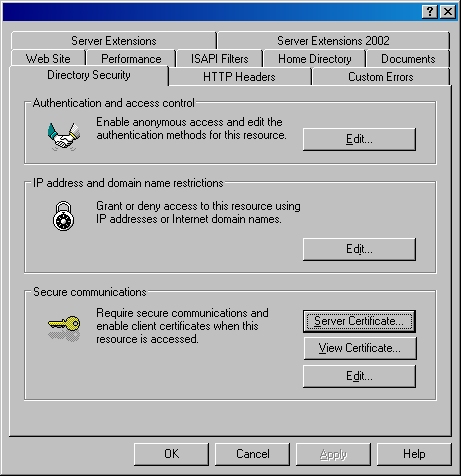
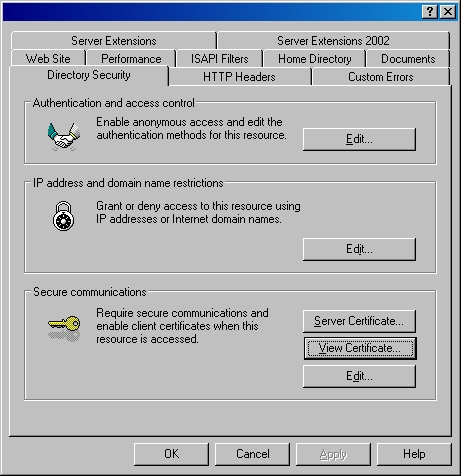
- Bring up the properties for a website:
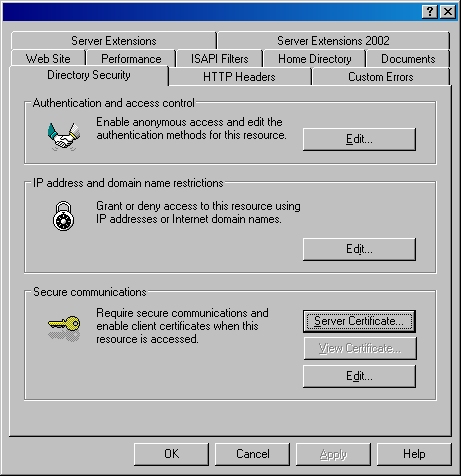
- Switch to the "Directory Security" tab and click "Server Certificate:"
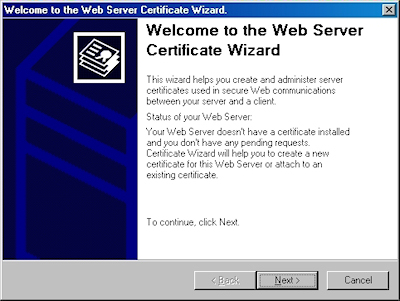
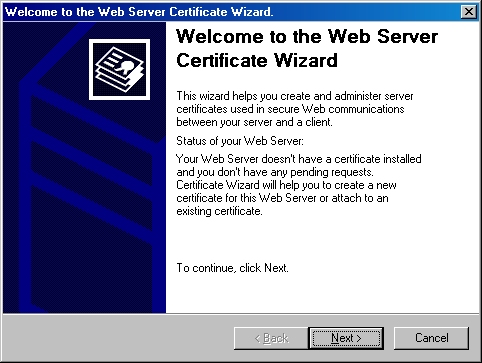
- Click "Next" to bypass the first page:
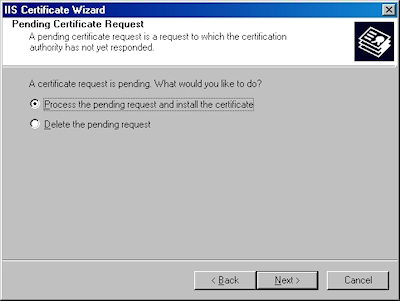
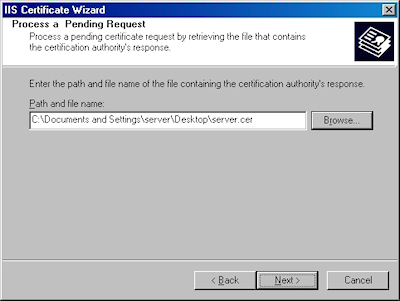
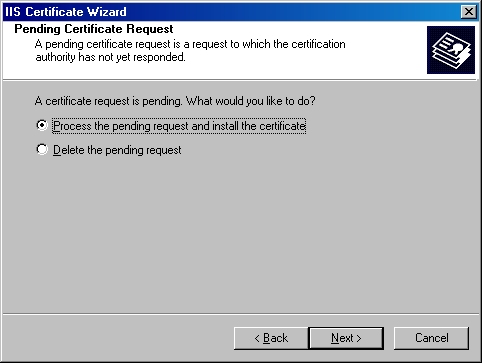
- Choose to process the request and click "Next":
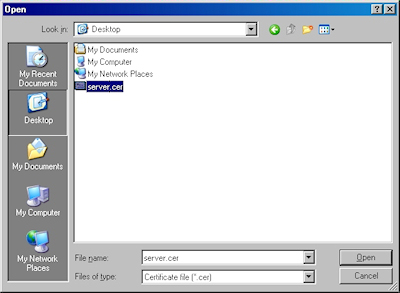
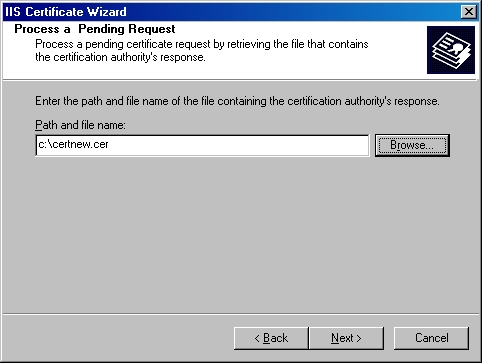
- Click "Browse" to the locate your certificate request:
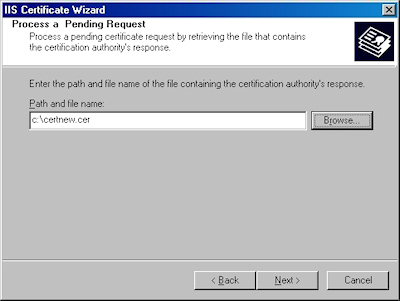
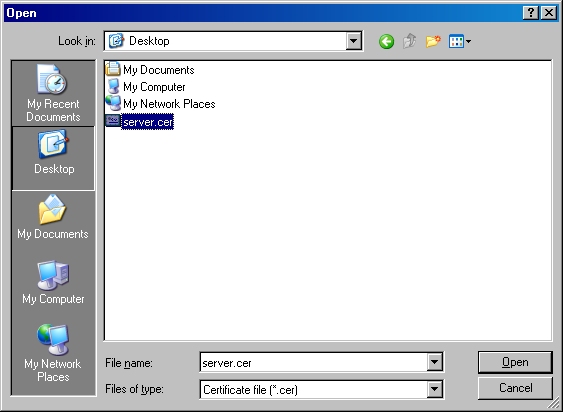
- Browse to the location of your certificate, highlight it, and click "Open":
- Verify the location of your certificate and click "Next":
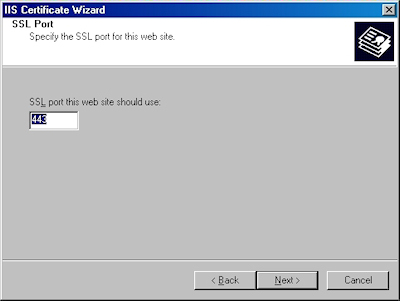
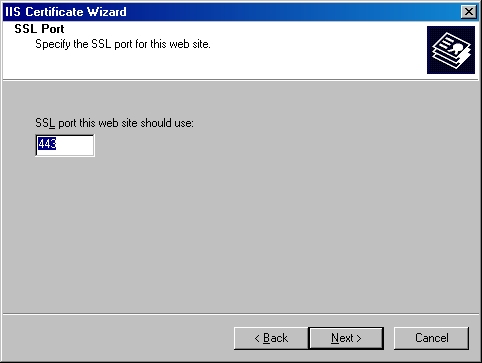
- Choose your SSL port and click "Next":
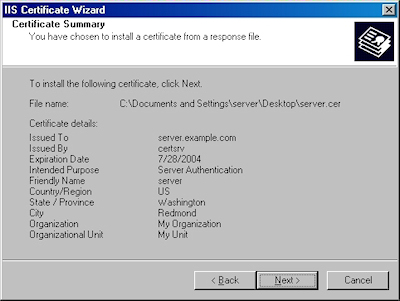
- Review the information to make sure it is correct and click "Next":
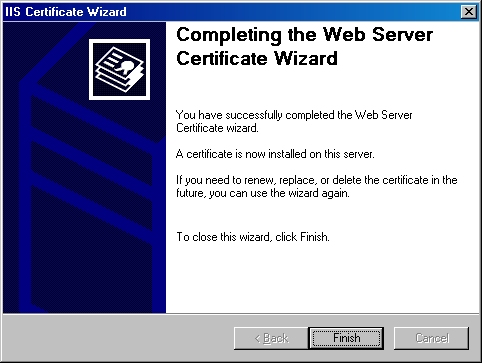
- Click "Finish" to close the wizard:
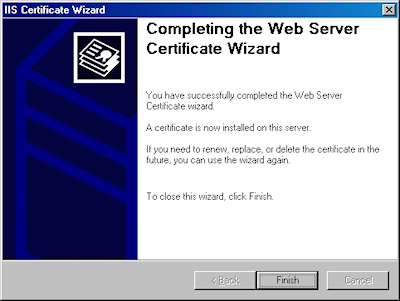
- Notice that you now have all the buttons available for SSL.
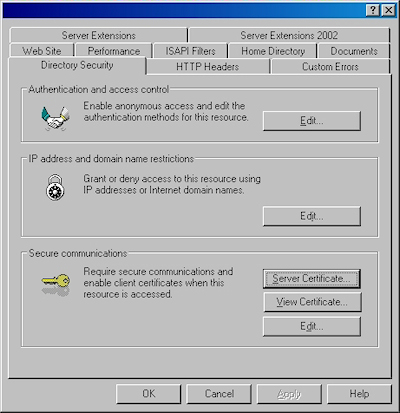


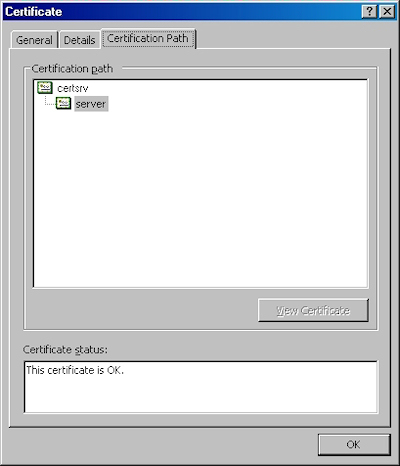
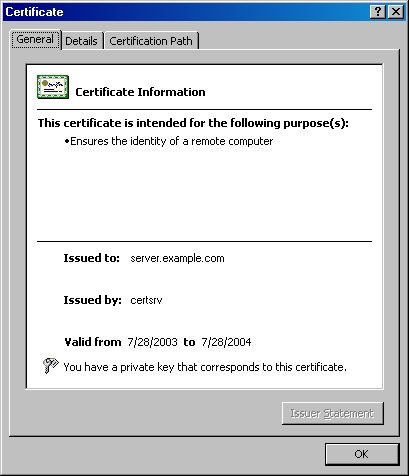
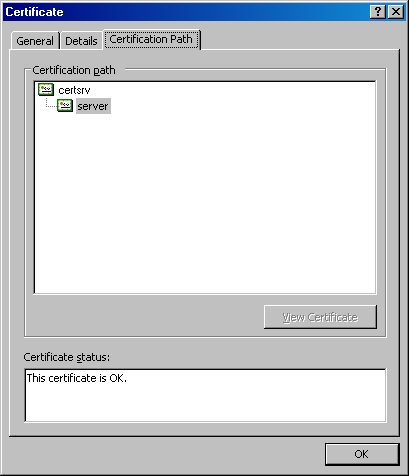
Verifying Your Certificate
- Click the "View Certificate" button:

- On the "General" tab, if the certificate is good you will see a normal certificate icon. (If no, you will see a warning or error icon.)
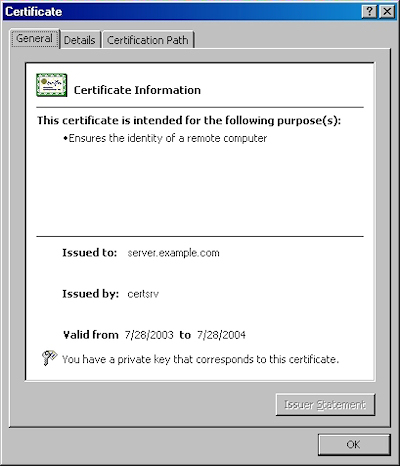
- On the "Certification Path" tab you will see your certificate hierarchy:
That wraps it up for creating, submitting, obtaining, and installing a certificate. In subsequent blogs I'll post some appendices with instructions about setting up Certificate Services on Windows Server 2003.
Note: This blog was originally posted at http://blogs.msdn.com/robert_mcmurray/
IIS 6: Setting up SSL - Part 2: Submitting a Certificate Request and Obtaining a Certificate
16 February 2011 • by Bob • IIS, SSL
In part two of my series on setting up SSL on IIS 6, I'll describe the steps that are necessary to obtain an SSL certificate. Typically you would submit your certificate request to any one of several Certificate Authorities (CA); and there are several that are available. Here are just a few:
- Thawte Digital Certificates
http://www.thawte.com/ - VeriSign Digital Certificates
http://www.verisign.com/
The steps to obtain a certificate differ for each CA, and it would be way outside the scope of my limited blogspace to include the steps for every CA on the Internet. So for my blog series I'm going to show how to use Certificate Services on Windows Server 2003 to obtain a certificate. This part of the process is broken into three steps:
Submit the Certificate Request
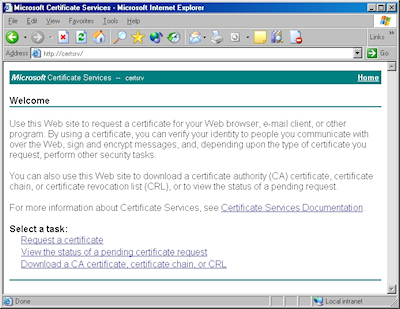
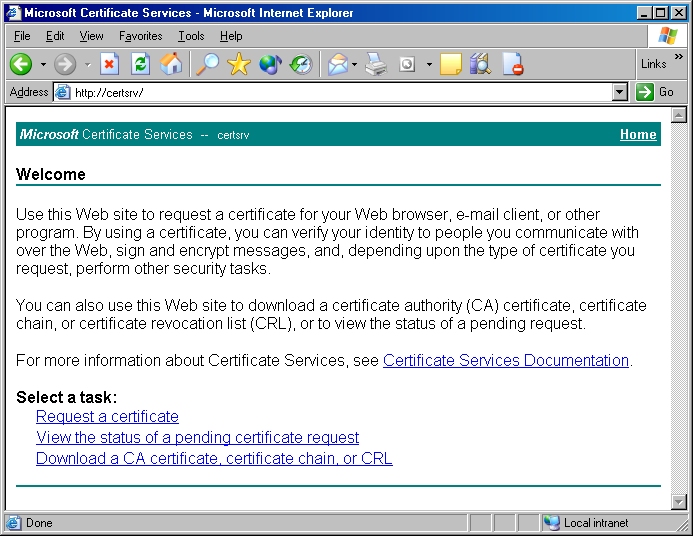
- Browse to the "Certificate Services" website, and then click the link to "Request a Certificate":
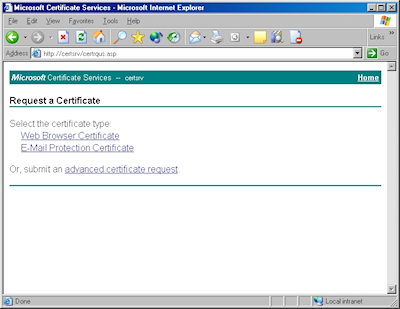
- Click the link to submit an "advanced certificate request":
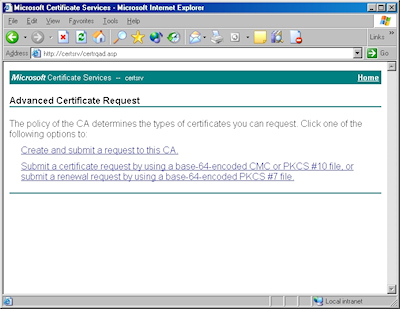
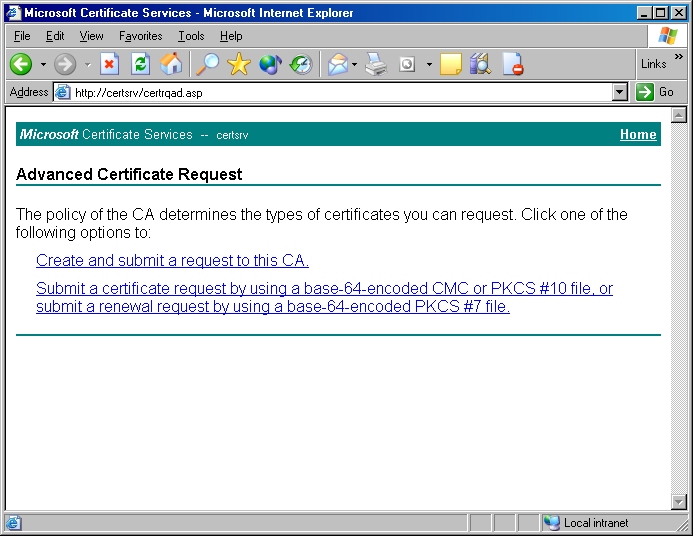
- Click the link to "Submit a certificate request by using a base-64 encoded file":
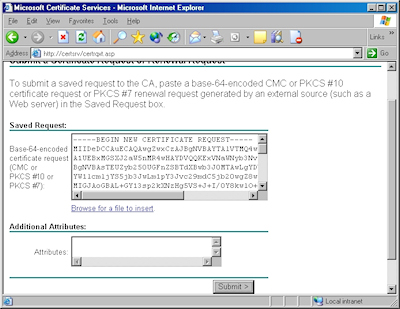
- Copy the text from your certificate request file and paste it into the "Base-64 Encoded Certificate Request" text box, then click "Submit":
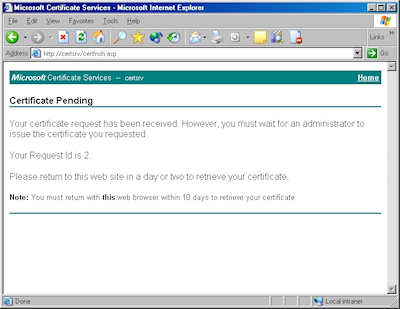
- By default, Certificate Services will return a message stating that your certificate is pending. You will need to notify your Certificate Services administrator that your certificate needs to be approved.

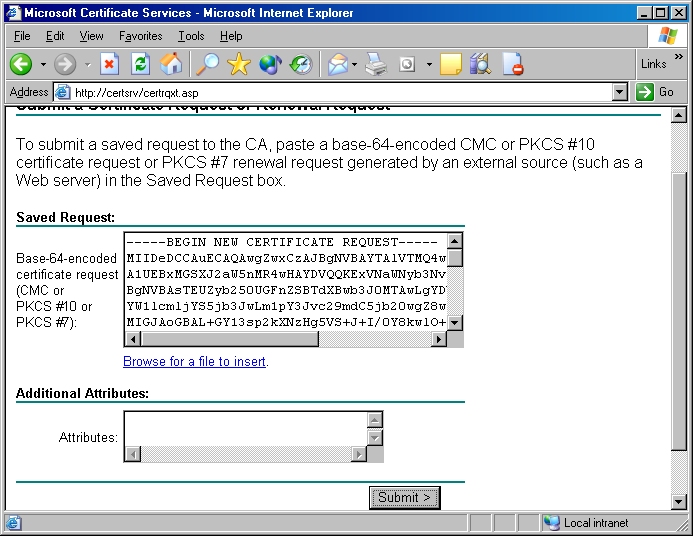

Note: As an alternative to copying the text from your certificate request file, when you are using Certificate Services on Windows Server 2003, you can use the application to read the file for you. To do so, you would need to change the step where you copy and paste the text to the following steps:
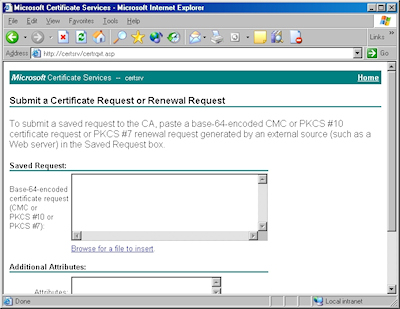
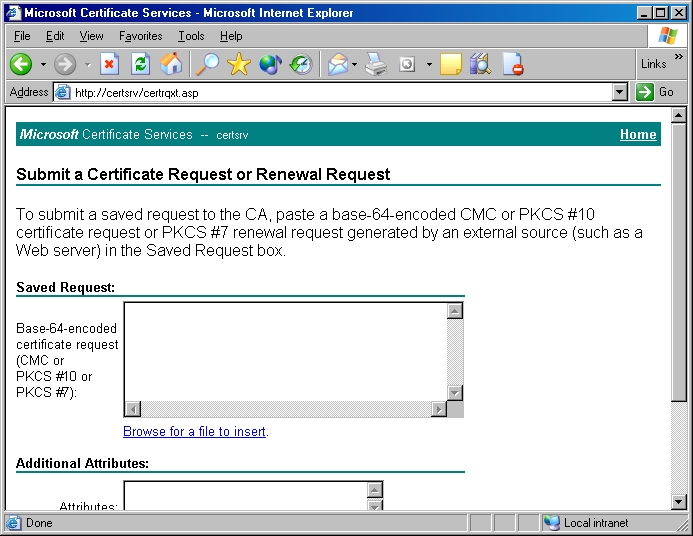
- Click the link to "Browse for a file to insert":
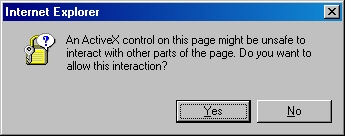
- You may be prompted whether to allow an ActiveX control to run; this warning may appear because the web application uses an ActiveX control to read the certificate request file. In order to continue, you need to click "Yes":
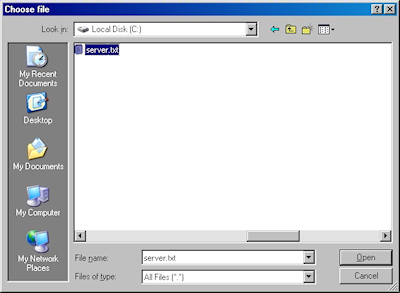
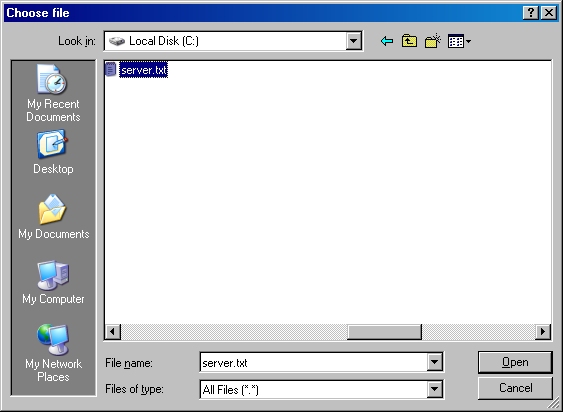
- When the subform appears, click the Browse button:

- Locate your certificate request file, and then click "Open":
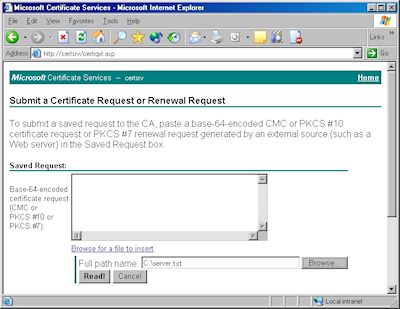
- Click the "Read" button to load the text from your certificate request file, this will insert it into the form:
- Once the text from your certificate request file has been inserted, you can submit the form as you would have done if you had copied and pasted the text manually.


Certificate Processing
At this point the Certificate Authority (CA) will consider your request. I'll post a blog later with details about processing a request using Certificate Services on Windows Server 2003.
Obtain the Certificate
When your certificate request has been processed, you need to use the following steps to save your certificate to your system before you can process it.
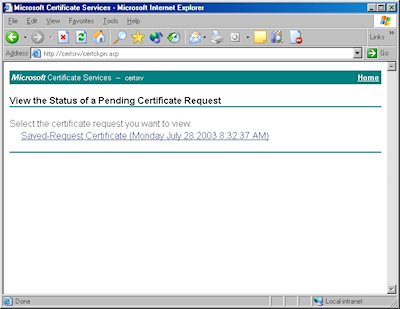
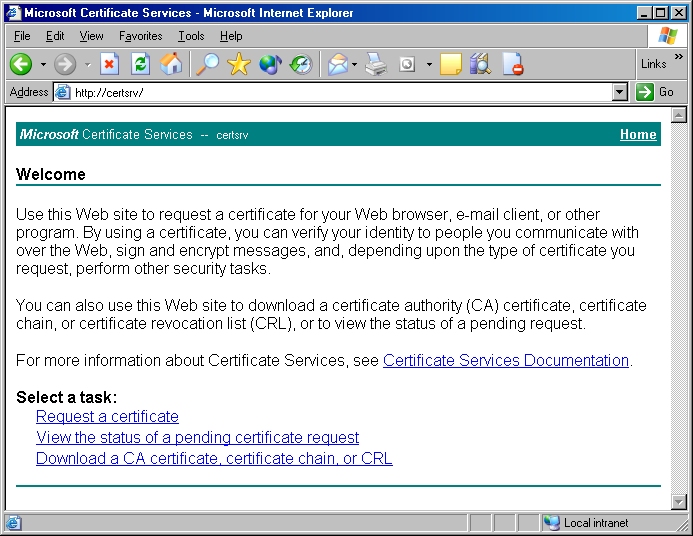
- Browse to the "Certificate Services" website, and then click the link to "View the status of a pending certificate request":

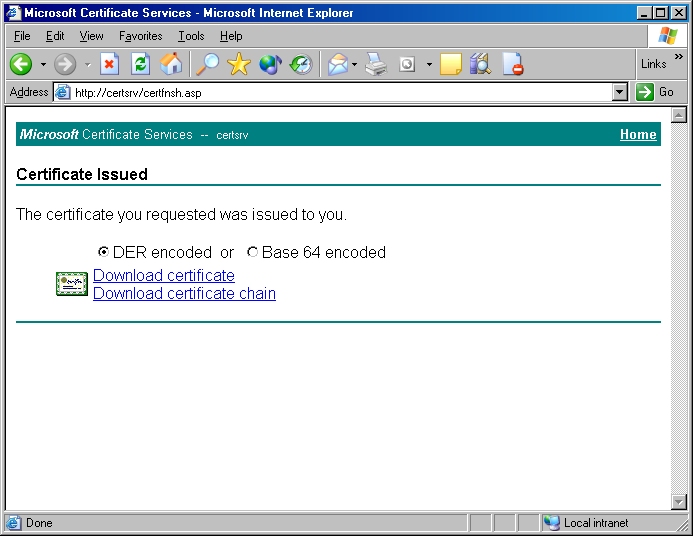
- Click the link for your approved request.
- Click the link to "Download CA certificate":
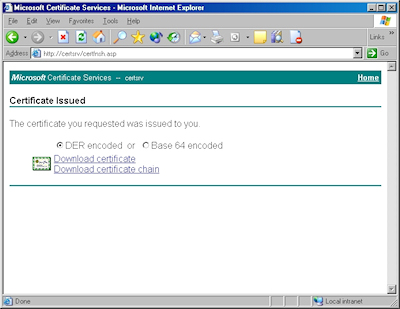
- When prompted, click "Save":
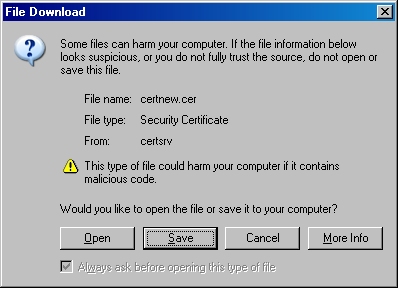
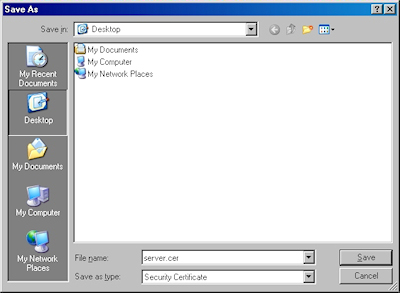
- Save the file to somewhere convenient, like your desktop:

In the next post of this blog series, I'll show you how to install your certificate on IIS 6.
Note: This blog was originally posted at http://blogs.msdn.com/robert_mcmurray/