Updating my HTML Application for Configuring your WebDAV Redirector Settings
20 September 2013 • by Bob • IIS, Scripting, WebDAV
A couple of years ago I wrote a blog that was titled "How to create an HTML Application to configure your WebDAV Redirector settings", where I showed how to use HTMLA to create a simple editor for most of the WebDAV Redirector settings. These settings have no other user interface, so prior to my blog post users had to manually edit the registry in order to modify their WebDAV Redirector settings.
 |
| Click image to expand |
In the past two years since I wrote that blog, I have found myself using that simple application so often that I now keep it in my personal utilities folder on my SkyDrive so I can have it with me no matter where I am travelling. But that being said, I ran into an interesting situation the other day that made me want to update the application, so I thought that it was time to write a new blog with the updated changes.
Here's what happened - I had opened my application for modifying my WebDAV Redirector settings, but then something happened which distracted me, and then I headed off to lunch before I committed my changes to the registry. When I came back to my office, I noticed that my WebDAV Redirector settings application was still open and I clicked the Exit Application button. The application popped up a dialog which informed me that I had changes that hadn't been saved to the registry, but I forgot what they were. This put me in a quandary - I could simply click Yes and hope for the best, or I could click No and lose whatever changes that I had made and re-open the application to start over.
It was at that time that I thought to myself, "If only I had a Reset Values button..."
By now you can probably see where this blog is going, and here's what the new application looks like - it's pretty much the same as the last application, with the additional button that allows you to reset your values without exiting the application. (Note - the application will prompt you for confirmation if you attempt to reset the values and you have unsaved changes.)
 |
| Click image to expand |
Creating the Updated HTML Application
To create this HTML Application, you need to use the same steps as my last blog: save the following HTMLA code as "WebDAV Redirector Settings.hta" to your computer, and then double-click its icon to run the application.
<html> <head> <title>WebDAV Redirector Settings</title> <HTA:APPLICATION APPLICATIONNAME="WebDAV Redirector Settings" ID="WebDAV Redirector Settings" VERSION="1.0" BORDER="dialog" BORDERSTYLE="static" INNERBORDER="no" SYSMENU="no" MAXIMIZEBUTTON="no" MINIMIZEBUTTON="no" SCROLL="no" SCROLLFLAT="yes" SINGLEINSTANCE="yes" CONTEXTMENU="no" SELECTION="no"/> <script language="vbscript"> ' ---------------------------------------- ' Start of main code section. ' ---------------------------------------- Option Explicit Const intDialogWidth = 700 Const intDialogHeight = 620 Const HKEY_LOCAL_MACHINE = &H80000002 Const strWebClientKeyPath = "SYSTEM\CurrentControlSet\Services\WebClient\Parameters" Const strLuaKeyPath = "Software\Microsoft\Windows\CurrentVersion\Policies\System" Dim objRegistry Dim blnHasChanges ' ---------------------------------------- ' Start the application. ' ---------------------------------------- Sub Window_OnLoad On Error Resume Next ' Set up the UI dimensions. Self.resizeTo intDialogWidth,intDialogHeight Self.moveTo (Screen.AvailWidth - intDialogWidth) / 2, _ (Screen.AvailHeight - intDialogHeight) / 2 ' Retrieve the current settings. Document.all.TheBody.ClassName = "hide" Set objRegistry = GetObject( _ "winmgmts:{impersonationLevel=impersonate}!\\.\root\default:StdRegProv") Call CheckForLUA() Call GetValues() Document.All.TheBody.ClassName = "show" End Sub ' ---------------------------------------- ' Check for User Access Control ' ---------------------------------------- Sub CheckForLUA() If GetRegistryDWORD(strLuaKeyPath,"EnableLUA",1)<> 0 Then MsgBox "User Access Control (UAC) is enabled on this computer." & _ vbCrLf & vbCrLf & "UAC must be disabled in order to edit " & _ "the registry and restart the service for the WebDAV Redirector. " & _ "Please disable UAC before running this application again. " & _ "This application will now exit.", _ vbCritical, "User Access Control" Self.close End If End Sub ' ---------------------------------------- ' Exit the application. ' ---------------------------------------- Sub ExitApplication() If blnHasChanges = False Then If MsgBox("Are you sure you want to exit?", _ vbQuestion Or vbYesNo Or vbDefaultButton2, _ "Exit Application") = vbNo Then Exit Sub End If Else Dim intRetVal intRetVal = MsgBox("You have unsaved changes. " & _ "Do you want to save them before you exit?", _ vbQuestion Or vbYesNoCancel Or vbDefaultButton1, _ "Reset Application") If intRetVal = vbYes Then Call SetValues() ElseIf intRetVal = vbCancel Then Exit Sub End If End If Self.close End Sub ' ---------------------------------------- ' Reset the application. ' ---------------------------------------- Sub ResetApplication() If blnHasChanges = True Then Dim intRetVal intRetVal = MsgBox("You have unsaved changes. " & _ "Do you want to save them before you reset the values?", _ vbQuestion Or vbYesNoCancel Or vbDefaultButton1, _ "Reset Application") If intRetVal = vbYes Then Call SetValues() ElseIf intRetVal = vbCancel Then Exit Sub End If End If Call GetValues() End Sub ' ---------------------------------------- ' Flag the application as having changes. ' ---------------------------------------- Sub FlagChanges() blnHasChanges = True End Sub ' ---------------------------------------- ' Retrieve the settings from the registry. ' ---------------------------------------- Sub GetValues() On Error Resume Next Dim tmpCount,tmpArray,tmpString ' Get the radio button values Call SetRadioValue(Document.all.BasicAuthLevel, _ GetRegistryDWORD(strWebClientKeyPath, _ "BasicAuthLevel",1)) Call SetRadioValue(Document.all.SupportLocking, _ GetRegistryDWORD(strWebClientKeyPath, _ "SupportLocking",1)) ' Get the text box values Document.all.InternetServerTimeoutInSec.Value = _ GetRegistryDWORD(strWebClientKeyPath, _ "InternetServerTimeoutInSec",30) Document.all.FileAttributesLimitInBytes.Value = _ GetRegistryDWORD(strWebClientKeyPath, _ "FileAttributesLimitInBytes",1000000) Document.all.FileSizeLimitInBytes.Value = _ GetRegistryDWORD(strWebClientKeyPath, _ "FileSizeLimitInBytes",50000000) Document.all.LocalServerTimeoutInSec.Value = _ GetRegistryDWORD(strWebClientKeyPath, _ "LocalServerTimeoutInSec",15) Document.all.SendReceiveTimeoutInSec.Value = _ GetRegistryDWORD(strWebClientKeyPath, _ "SendReceiveTimeoutInSec",60) Document.all.ServerNotFoundCacheLifeTimeInSec.Value = _ GetRegistryDWORD(strWebClientKeyPath, _ "ServerNotFoundCacheLifeTimeInSec",60) ' Get the text area values tmpArray = GetRegistryMULTISZ( _ strWebClientKeyPath,"AuthForwardServerList") For tmpCount = 0 To UBound(tmpArray) tmpString = tmpString & tmpArray(tmpCount) & vbTab Next If Len(tmpString)>0 Then Document.all.AuthForwardServerList.Value = _ Replace(Left(tmpString,Len(tmpString)-1),vbTab,vbCrLf) End If blnHasChanges = False End Sub ' ---------------------------------------- ' Save the settings in the registry. ' ---------------------------------------- Sub SetValues() On Error Resume Next ' Set the radio button values Call SetRegistryDWORD( _ strWebClientKeyPath, _ "BasicAuthLevel", _ GetRadioValue(Document.all.BasicAuthLevel)) Call SetRegistryDWORD( _ strWebClientKeyPath, _ "SupportLocking", _ GetRadioValue(Document.all.SupportLocking)) ' Set the text box values Call SetRegistryDWORD( _ strWebClientKeyPath, _ "InternetServerTimeoutInSec", _ Document.all.InternetServerTimeoutInSec.Value) Call SetRegistryDWORD( _ strWebClientKeyPath, _ "FileAttributesLimitInBytes", _ Document.all.FileAttributesLimitInBytes.Value) Call SetRegistryDWORD( _ strWebClientKeyPath, _ "FileSizeLimitInBytes", _ Document.all.FileSizeLimitInBytes.Value) Call SetRegistryDWORD( _ strWebClientKeyPath, _ "LocalServerTimeoutInSec", _ Document.all.LocalServerTimeoutInSec.Value) Call SetRegistryDWORD( _ strWebClientKeyPath, _ "SendReceiveTimeoutInSec", _ Document.all.SendReceiveTimeoutInSec.Value) Call SetRegistryDWORD( _ strWebClientKeyPath, _ "ServerNotFoundCacheLifeTimeInSec", _ Document.all.ServerNotFoundCacheLifeTimeInSec.Value) ' Set the text area values Call SetRegistryMULTISZ( _ strWebClientKeyPath, _ "AuthForwardServerList", _ Split(Document.all.AuthForwardServerList.Value,vbCrLf)) ' Prompt to restart the WebClient service If MsgBox("Do you want to restart the WebDAV Redirector " & _ "service so your settings will take effect?", _ vbQuestion Or vbYesNo Or vbDefaultButton2, _ "Restart WebDAV Redirector") = vbYes Then ' Restart the WebClient service. Call RestartWebClient() End If Call GetValues() End Sub ' ---------------------------------------- ' Start the WebClient service. ' ---------------------------------------- Sub RestartWebClient() On Error Resume Next Dim objWMIService,colServices,objService Document.All.TheBody.ClassName = "hide" Set objWMIService = GetObject( _ "winmgmts:{impersonationLevel=impersonate}!\\.\root\cimv2") Set colServices = objWMIService.ExecQuery( _ "Select * from Win32_Service Where Name='WebClient'") For Each objService in colServices objService.StopService() objService.StartService() Next Document.All.TheBody.ClassName = "show" End Sub ' ---------------------------------------- ' Retrieve a DWORD value from the registry. ' ---------------------------------------- Function GetRegistryDWORD( _ ByVal tmpKeyPath, _ ByVal tmpValueName, _ ByVal tmpDefaultValue) On Error Resume Next Dim tmpDwordValue If objRegistry.GetDWORDValue( _ HKEY_LOCAL_MACHINE, _ tmpKeyPath, _ tmpValueName, _ tmpDwordValue)=0 Then GetRegistryDWORD = CLng(tmpDwordValue) Else GetRegistryDWORD = CLng(tmpDefaultValue) End If End Function ' ---------------------------------------- ' Set a DWORD value in the registry. ' ---------------------------------------- Sub SetRegistryDWORD( _ ByVal tmpKeyPath, _ ByVal tmpValueName, _ ByVal tmpDwordValue) On Error Resume Next Call objRegistry.SetDWORDValue( _ HKEY_LOCAL_MACHINE, _ tmpKeyPath, _ tmpValueName, _ CLng(tmpDwordValue)) End Sub ' ---------------------------------------- ' Retrieve a MULTISZ value from the registry. ' ---------------------------------------- Function GetRegistryMULTISZ( _ ByVal tmpKeyPath, _ ByVal tmpValueName) On Error Resume Next Dim tmpMultiSzValue If objRegistry.GetMultiStringValue( _ HKEY_LOCAL_MACHINE, _ tmpKeyPath, _ tmpValueName, _ tmpMultiSzValue)=0 Then GetRegistryMULTISZ = tmpMultiSzValue Else GetRegistryMULTISZ = Array() End If End Function ' ---------------------------------------- ' Set a MULTISZ value in the registry. ' ---------------------------------------- Sub SetRegistryMULTISZ( _ ByVal tmpKeyPath, _ ByVal tmpValueName, _ ByVal tmpMultiSzValue) On Error Resume Next Call objRegistry.SetMultiStringValue( _ HKEY_LOCAL_MACHINE, _ tmpKeyPath, _ tmpValueName, _ tmpMultiSzValue) End Sub ' ---------------------------------------- ' Retrieve the value of a radio button group. ' ---------------------------------------- Function GetRadioValue(ByVal tmpRadio) On Error Resume Next Dim tmpCount For tmpCount = 0 To (tmpRadio.Length-1) If tmpRadio(tmpCount).Checked Then GetRadioValue = CLng(tmpRadio(tmpCount).Value) Exit For End If Next End Function ' ---------------------------------------- ' Set the value for a radio button group. ' ---------------------------------------- Sub SetRadioValue(ByVal tmpRadio, ByVal tmpValue) On Error Resume Next Dim tmpCount For tmpCount = 0 To (tmpRadio.Length-1) If CLng(tmpRadio(tmpCount).Value) = CLng(tmpValue) Then tmpRadio(tmpCount).Checked = True Exit For End If Next End Sub ' ---------------------------------------- ' ' ---------------------------------------- Sub Validate(tmpField) Dim tmpRegEx, tmpMatches Set tmpRegEx = New RegExp tmpRegEx.Pattern = "[0-9]" tmpRegEx.IgnoreCase = True tmpRegEx.Global = True Set tmpMatches = tmpRegEx.Execute(tmpField.Value) If tmpMatches.Count = Len(CStr(tmpField.Value)) Then If CDbl(tmpField.Value) => 0 And _ CDbl(tmpField.Value) =< 4294967295 Then Exit Sub End If End If MsgBox "Please enter a whole number between 0 and 4294967295.", _ vbCritical, "Validation Error" tmpField.Focus End Sub ' ---------------------------------------- ' ' ---------------------------------------- Sub BasicAuthWarning() MsgBox "WARNING:" & vbCrLf & vbCrLf & _ "Using Basic Authentication over non-SSL connections can cause " & _ "serious security issues. Usernames and passwords are transmitted " & _ "in clear text, therefore the use of Basic Authentication with " & _ "WebDAV is disabled by default for non-SSL connections. That " & _ "being said, this setting can override the default behavior for " & _ "Basic Authentication, but it is strongly discouraged.", _ vbCritical, "Basic Authentication Warning" End Sub ' ---------------------------------------- ' End of main code section. ' ---------------------------------------- </script> <style> body { color:#000000; background-color:#cccccc; font-family:'Segoe UI',Tahoma,Verdana,Arial; font-size:9pt; } fieldset { padding:10px; width:640px; } .button { width:150px; } .textbox { width:200px; height:22px; text-align:right; } .textarea { width:300px; height:50px; text-align:left; } .radio { margin-left:-5px; margin-top: -2px; } .hide { display:none; } .show { display:block; } select { width:300px; text-align:left; } table { border-collapse:collapse; empty-cells:hide; } h1 { font-size:14pt; } th { font-size:9pt; text-align:left; vertical-align:top; padding:2px; } td { font-size:9pt; text-align:left; vertical-align:top; padding:2px; } big { font-size:11pt; } small { font-size:8pt; } </style> </head> <body id="TheBody" class="hide"> <h1 align="center" id="TheTitle" style="margin-bottom:-20px;">WebDAV Redirector Settings</h1> <div align="center"> <p style="margin-bottom:-20px;"><i><small><b>Note</b>: See <a target="_blank" href="http://go.microsoft.com/fwlink/?LinkId=324291">Using the WebDAV Redirector</a> for additional details.</small></i></p> <form> <center> <table border="0" cellpadding="2" cellspacing="2" style="width:600px;"> <tr> <td style="width:600px;text-align:left"><fieldset title="Security Settings"> <legend> <b>Security Settings</b> </legend> These values affect the security behavior for the WebDAV Redirector.<br> <table style="width:600px;"> <tr title="Specifies whether the WebDAV Redirector can use Basic Authentication to communicate with a server."> <td style="width:300px"> <table border="0"> <tr> <td style="width:300px"><b>Basic Authentication Level</b></td> </tr> <tr> <td style="width:300px;"><span style="width:280px;padding-left:20px;"><small><i><b>Note</b>: Using basic authentication can cause <u>serious security issues</u> as the username and password are transmitted in clear text, therefore the use of basic authentication over WebDAV is disabled by default unless the connection is using SSL.</i></small></span></td> </tr> </table> </td> <td style="width:300px"> <table style="width:300px"> <tr> <td style="width:020px"><input class="radio" type="radio" value="0" name="BasicAuthLevel" onchange="VBScript:FlagChanges()" id="BasicAuthLevel0"></td> <td style="width:280px"><label for="BasicAuthLevel0">Basic Authentication is disabled</label></td> </tr> <tr> <td style="width:020px"><input class="radio" type="radio" value="1" checked name="BasicAuthLevel" onchange="VBScript:FlagChanges()" id="BasicAuthLevel1"></td> <td style="width:280px"><label for="BasicAuthLevel1">Basic Authentication is enabled for SSL web sites only</label></td> </tr> <tr> <td style="width:020px"><input class="radio" type="radio" value="2" name="BasicAuthLevel" onchange="VBScript:FlagChanges()" id="BasicAuthLevel2" onClick="VBScript:BasicAuthWarning()"></td> <td style="width:280px"><label for="BasicAuthLevel2">Basic Authentication is enabled for SSL and non-SSL web sites</label></td> </tr> </table> </td> </tr> <tr title="Specifies a list of local URLs for forwarding credentials that bypasses any proxy settings. (Note: This requires Windows Vista SP1 or later.)"> <td style="width:300px"> <table border="0"> <tr> <td style="width:300px"><b>Authentication Forwarding Server List</b></td> </tr> <tr> <td style="width:300px;"><span style="width:280px;padding-left:20px;"><small><i><b>Note</b>: Include one server name per line.</i></small></span></td> </tr> </table> </td> <td style="width:300px"><textarea class="textarea" name="AuthForwardServerList" onchange="VBScript:FlagChanges()"></textarea></td> </tr> <tr title="Specifies whether the WebDAV Redirector supports locking."> <td style="width:300px"><b>Support for WebDAV Locking</b></td> <td style="width:300px"> <table style="width:300px"> <tr> <td style="width:020px"><input class="radio" type="radio" value="1" checked name="SupportLocking" onchange="VBScript:FlagChanges()" id="SupportLocking1"></td> <td style="width:280px"><label for="SupportLocking1">Enable Lock Support</label></td> </tr> <tr> <td style="width:020px"><input class="radio" type="radio" value="0" name="SupportLocking" onchange="VBScript:FlagChanges()" id="SupportLocking0"></td> <td style="width:280px"><label for="SupportLocking0">Disable Lock Support</label></td> </tr> </table> </td> </tr> </table> </fieldset> </td> </tr> <tr> <td style="width:600px;text-align:left"><fieldset title="Time-outs"> <legend> <b>Time-outs and Maximum Sizes</b> </legend> These values affect the behavior for WebDAV Client/Server operations.<br> <table border="0" style="width:600px;"> <tr title="Specifies the connection time-out for the WebDAV Redirector uses when communicating with non-local WebDAV servers."> <td style="width:300px"><b>Internet Server Time-out</b> <small>(In Seconds)</small></td> <td style="width:300px"><input class="textbox" type="text" name="InternetServerTimeoutInSec" onchange="VBScript:FlagChanges()" onblur="VBScript:Validate(Me)" value="30"></td> </tr> <tr title="Specifies the connection time-out for the WebDAV Redirector uses when communicating with a local WebDAV server."> <td style="width:300px"><b>Local Server Time-out</b> <small>(In Seconds)</small></td> <td style="width:300px"><input class="textbox" type="text" name="LocalServerTimeoutInSec" onchange="VBScript:FlagChanges()" onblur="VBScript:Validate(Me)" value="15"></td> </tr> <tr title="Specifies the time-out in seconds that the WebDAV Redirector uses after issuing a request."> <td style="width:300px"><b>Send/Receive Time-out</b> <small>(In Seconds)</small></td> <td style="width:300px"><input class="textbox" type="text" name="SendReceiveTimeoutInSec" onchange="VBScript:FlagChanges()" onblur="VBScript:Validate(Me)" value="60"></td> </tr> <tr title="Specifies the period of time that a server is cached as non-WebDAV by the WebDAV Redirector. If a server is found in this list, a fail is returned immediately without attempting to contact the server."> <td style="width:300px"><b>Server Not Found Cache Time-out</b> <small>(In Seconds)</small></td> <td style="width:300px"><input class="textbox" type="text" name="ServerNotFoundCacheLifeTimeInSec" onchange="VBScript:FlagChanges()" onblur="VBScript:Validate(Me)" value="60"></td> </tr> <tr title="Specifies the maximum size in bytes that the WebDAV Redirector allows for file transfers."> <td style="width:300px"><b>Maximum File Size</b> <small>(In Bytes)</small></td> <td style="width:300px"><input class="textbox" type="text" name="FileSizeLimitInBytes" onchange="VBScript:FlagChanges()" onblur="VBScript:Validate(Me)" value="50000000"></td> </tr> <tr title="Specifies the maximum size that is allowed by the WebDAV Redirector for all properties on a specific collection."> <td style="width:300px"><b>Maximum Attributes Size</b> <small>(In Bytes)</small></td> <td style="width:300px"><input class="textbox" type="text" name="FileAttributesLimitInBytes" onchange="VBScript:FlagChanges()" onblur="VBScript:Validate(Me)" value="1000000"></td> </tr> </table> </fieldset> </td> </tr> <tr> <td style="text-align:center"> <table border="0"> <tr> <td style="text-align:center"><input class="button" type="button" value="Apply Settings" onclick="VBScript:SetValues()"> <td style="text-align:center"><input class="button" type="button" value="Reset Values" onclick="VBScript:ResetApplication()"> <td style="text-align:center"><input class="button" type="button" value="Exit Application" onclick="VBScript:ExitApplication()"> </tr> </table> </td> </tr> </table> </center> </form> </div> </body> </html>
Additional Notes
As with the last version of this HTML Application, you will need to run this application as an administrator in order to save the settings to the registry and restart the WebDAV Redirector service.
Have fun! ;-]
Note: This blog was originally posted at http://blogs.msdn.com/robert_mcmurray/
How to Create a Blind Drop WebDAV Share
17 September 2013 • by Bob • IIS, WebDAV, URL Rewrite
I had an interesting WebDAV question earlier today that I had not considered before: how can someone create a "Blind Drop Share" using WebDAV? By way of explanation, a Blind Drop Share is a path where users can copy files, but never see the files that are in the directory. You can setup something like this by using NTFS permissions, but that environment can be a little difficult to set up and maintain.
With that in mind, I decided to research a WebDAV-specific solution that didn't require mangling my NTFS permissions. In the end it was pretty easy to achieve, so I thought that it would make a good blog for anyone who wants to do this.
A Little Bit About WebDAV
NTFS permissions contain access controls that configure the directory-listing behavior for files and folders; if you modify those settings, you can control who can see files and folders when they connect to your shared resources. However, there are no built-in features for the WebDAV module which ships with IIS that will approximate the NTFS behavior. But that being said, there is an interesting WebDAV quirk that you can use that will allow you to restrict directory listings, and I will explain how that works.
WebDAV uses the PROPFIND command to retrieve the properties for files and folders, and the WebDAV Redirector will use the response from a PROPFIND command to display a directory listing. (Note: Official WebDAV terminology has no concept of files and folders, those physical objects are respectively called Resources and Collections in WebDAV jargon. But that being said, I will use files and folders throughout this blog post for ease of understanding.)
In any event, one of the HTTP headers that WebDAV uses with the PROPFIND command is the Depth header, which is used to specify how deep the folder/collection traversal should go:
- If you sent a
PROPFINDcommand for the root of your website with aDepth:0header/value, you would get the properties for just the root directory - with no files listed; aDepth:0header/value only retrieves properties for the single resource that you requested. - If you sent a
PROPFINDcommand for the root of your website with aDepth:1header/value, you would get the properties for every file and folder in the root of your website; aDepth:1header/value retrieves properties for the resource that you requested and all siblings. - If you sent a
PROPFINDcommand for the root of your website with aDepth:infinityheader/value, you would get the properties for every file and folder in your entire website; aDepth:infinityheader/value retrieves properties for every resource regardless of its depth in the hierarchy. (Note that retrieving directory listings with infinite depth are disabled by default in IIS 7 and IIS 8 because it can be CPU intensive.)
By analyzing the above information, it should be obvious that what you need to do is to restrict users to using a Depth:0 header/value. But that's where this scenario gets interesting: if your end-users are using the Windows WebDAV Redirector or other similar technology to map a drive to your HTTP website, you have no control over the value of the Depth header. So how can you restrict that?
In the past I would have written custom native-code HTTP module or ISAPI filter to modify the value of the Depth header; but once you understand how WebDAV works, you can use the URL Rewrite module to modify the headers of incoming HTTP requests to accomplish some pretty cool things - like modifying the values WebDAV-related HTTP headers.
Adding URL Rewrite Rules to Modify the WebDAV Depth Header
Here's how I configured URL Rewrite to set the value of the Depth header to 0, which allowed me to create a "Blind Drop" WebDAV site:
- Open the URL Rewrite feature in IIS Manager for your website.

Click image to expand - Click the Add Rules link in the Actionspane.

Click image to expand - When the Add Rules dialog box appears, highlight Blank rule and click OK.

Click image to expand - When the Edit Inbound Rulepage appears, configure the following settings:
- Name the rule "Modify Depth Header".

Click image to expand - In the Match URLsection:
- Choose Matches the Pattern in the Requested URL drop-down menu.
- Choose Wildcards in the Using drop-down menu.
- Type a single asterisk "*" in the Pattern text box.

Click image to expand - Expand the Server Variables collection and click Add.

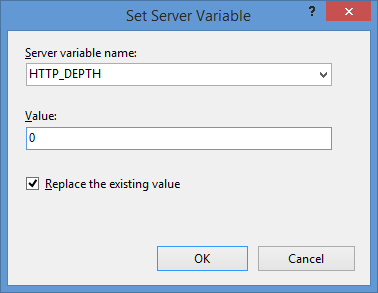
Click image to expand - When the Set Server Variabledialog box appears:
- Type "HTTP_DEPTH" in the Server variable name text box.
- Type "0" in the Value text box.
- Make sure that Replace the existing value checkbox is checked.
- Click OK.
- In the Action group, choose None in the Action typedrop-down menu.

Click image to expand - Click Apply in the Actions pane, and then click Back to Rules.

Click image to expand
- Name the rule "Modify Depth Header".
- Click View Server Variables in the Actionspane.

Click image to expand - When the Allowed Server Variablespage appears, configure the following settings:
- Click Add in the Actionspane.

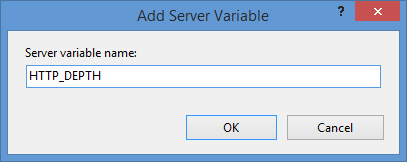
Click image to expand - When the Add Server Variabledialog box appears:
- Type "HTTP_DEPTH" in the Server variable name text box.
- Click OK.
- Click Back to Rules in the Actionspane.

Click image to expand
- Click Add in the Actionspane.
If all of these changes were saved to your applicationHost.config file, the resulting XML might resemble the following example - with XML comments added by me to highlight some of the major sections:
<location path="Default Web Site">
    <system.webServer>

        <-- Start of Security Settings -->
        <security>
            <authentication>
                <anonymousAuthentication enabled="false" />
                <basicAuthentication enabled="true" />
            </authentication>
            <requestFiltering>
                <fileExtensions applyToWebDAV="false" />
                <verbs applyToWebDAV="false" />
                <hiddenSegments applyToWebDAV="false" />
            </requestFiltering>
        </security>

        <-- Start of WebDAV Settings -->
        <webdav>
            <authoringRules>
                <add roles="administrators" path="*" access="Read, Write, Source" />
            </authoringRules>
            <authoring enabled="true">
                <properties allowAnonymousPropfind="false" allowInfinitePropfindDepth="true">
                    <clear />
                    <add xmlNamespace="*" propertyStore="webdav_simple_prop" />
                </properties>
            </authoring>
        </webdav>

        <-- Start of URL Rewrite Settings -->
        <rewrite>
            <rules>
                <rule name="Modify Depth Header" enabled="true" patternSyntax="Wildcard">
                    <match url="*" />
                    <serverVariables>
                        <set name="HTTP_DEPTH" value="0" />
                    </serverVariables>
                    <action type="None" />
                </rule>
            </rules>
            <allowedServerVariables>
                <add name="HTTP_DEPTH" />
            </allowedServerVariables>
        </rewrite>

    </system.webServer>
</location>
In all likelihood, some of these settings will be stored in your applicationHost.config file, and the remaining settings will be stored in the web.config file of your website.
Testing the URL Rewrite Settings
If you did not have the URL Rewrite rule in place, or if you disabled the rule, then your web server might respond like the following example if you used the WebDAV Redirector to map a drive to your website from a command prompt:
C:\>net use z: http://www.contoso.com/
Enter the user name for 'www.contoso.com': www.contoso.com\robert
Enter the password for www.contoso.com:
The command completed successfully.

C:\>z:

Z:\>dir
Volume in drive Z has no label.
Volume Serial Number is 0000-0000

Directory of Z:\

09/16/2013 08:55 PM <DIR> .
09/16/2013 08:55 PM <DIR> ..
09/14/2013 12:39 AM <DIR> aspnet_client
09/16/2013 08:06 PM <DIR> scripts
09/16/2013 07:55 PM 66 default.aspx
09/14/2013 12:38 AM 98,757 iis-85.png
09/14/2013 12:38 AM 694 iisstart.htm
09/16/2013 08:55 PM 75 web.config
              4 File(s) 99,592 bytes
              8 Dir(s) 956,202,631,168 bytes free

Z:\>
However, when you have the URL Rewrite correctly configured and enabled, connecting to the same website will resemble the following example - notice how no files or folders are listed:
C:\>net use z: http://www.contoso.com/
Enter the user name for 'www.contoso.com': www.contoso.com\robert
Enter the password for www.contoso.com:
The command completed successfully.

C:\>z:

Z:\>dir
Volume in drive Z has no label.
Volume Serial Number is 0000-0000

Directory of Z:\

09/16/2013 08:55 PM <DIR> .
09/16/2013 08:55 PM <DIR> ..
              0 File(s) 0 bytes
              2 Dir(s) 956,202,803,200 bytes free

Z:\>
Despite the blank directory listing, you can still retrieve the properties for any file or folder if you know that it exists. So if you were to use the mapped drive from the preceding example, you could still use an explicit directory command for any object that you had uploaded or created:
Z:\>dir default.aspx
Volume in drive Z has no label.
Volume Serial Number is 0000-0000

Directory of Z:\

09/16/2013 07:55 PM 66 default.aspx
              1 File(s) 66 bytes
              0 Dir(s) 956,202,799,104 bytes free

Z:\>dir scripts
Volume in drive Z has no label.
Volume Serial Number is 0000-0000

Directory of Z:\scripts

09/16/2013 07:52 PM <DIR> .
09/16/2013 07:52 PM <DIR> ..
              0 File(s) 0 bytes
              2 Dir(s) 956,202,799,104 bytes free

Z:\>
The same is true for creating directories and files; you can create them, but they will not show up in the directory listings after you have created them unless you reference them explicitly:
Z:\>md foobar

Z:\>dir
Volume in drive Z has no label.
Volume Serial Number is 0000-0000

Directory of Z:\

09/16/2013 11:52 PM <DIR> .
09/16/2013 11:52 PM <DIR> ..
              0 File(s) 0 bytes
              2 Dir(s) 956,202,618,880 bytes free

Z:\>cd foobar

Z:\foobar>copy NUL foobar.txt
        1 file(s) copied.

Z:\foobar>dir
Volume in drive Z has no label.
Volume Serial Number is 0000-0000

Directory of Z:\foobar

09/16/2013 11:52 PM <DIR> .
09/16/2013 11:52 PM <DIR> ..
              0 File(s) 0 bytes
              2 Dir(s) 956,202,303,488 bytes free

Z:\foobar>dir foobar.txt
Volume in drive Z has no label.
Volume Serial Number is 0000-0000

Directory of Z:\foobar

09/16/2013 11:53 PM 0 foobar.txt
              1 File(s) 0 bytes
              0 Dir(s) 956,202,299,392 bytes free

Z:\foobar>
That wraps it up for today's post, although I should point out that if you see any errors when you are using the WebDAV Redirector, you should take a look at the Troubleshooting the WebDAV Redirector section of my Using the WebDAV Redirector article; I have done my best to list every error and resolution that I have discovered over the past several years.
Note: This blog was originally posted at http://blogs.msdn.com/robert_mcmurray/
What's New in IIS 8.5?
11 July 2013 • by Bob • IIS, IIS 8.5, Windows Server 2012 R2
Microsoft released the Windows 8.1 Preview on June 26, but some of the articles that the IIS team was working on for IIS 8.5 needed a little more work before we published them. That being said, those articles were published on IIS.net earlier today, and here is a quick preview of those articles and the new features in IIS 8.5 which they describe:
- Dynamic Website Activation in IIS 8.5
This feature allows IIS to scale to an even larger set of websites than before by only loading websites after an HTTP request has been received; this significantly reduces the startup time and initial resource allocation for IIS, and it prevents resources from being unnecessarily consumed for websites that are accessed infrequently. - Enhanced Logging for IIS 8.5
IIS now provides built-in functionality for adding custom logging fields to your W3C log files that are populated with values that are from request headers, response headers, or server variables. This functionality allows you to log a great deal of custom information about each HTTP request; for example, you could include the information an HTTP header like X-Forwarded-For, which would allow you to decode the request path through all firewalls/proxies, or you could insert information from a custom module into a server variable and have IIS add that information directly to your logs. - Idle Worker Process Page-Out in IIS 8.5
In previous versions of IIS, inactive worker processes were terminated when they reached their recycle interval, but IIS 8.5 allows you to configure your application pools so that inactive worker processes are swapped out to the page file; since IIS can restore a suspended worker process into service much faster than starting up a new worker process, this functionality significantly improves the user experience when a request is received for a suspended application. - Logging to Event Tracing for Windows in IIS 8.5
IIS 8.5 expands the logging capabilities for HTTP events to include Event Tracing for Windows (ETW); this functionality allows you monitor your IIS events in real-time, which can be extremely useful for troubleshooting and debugging/developing applications.
For examples of these technologies in action, you can watch one of the following presentations:
- Internet Information Services: What’s New in Window Server 2012 R2 (from TechEd USA)
- Internet Information Services: What’s New in Window Server 2012 R2 (from TechEd Europe)
Special thanks go to Gary Ericson for putting together and publishing these articles on IIS.net, and a big round of thanks to the IIS team for adding all of these new features!
(One quick note in closing: functionality similar to IIS 8.5's Enhanced Logging was available in the past by installing separate modules, but IIS 8.5 now makes this functionality available out-of-the-box.)
Note: This blog was originally posted at http://blogs.msdn.com/robert_mcmurray/
A Quick Discussion of Active and Passive FTP Connections
24 May 2013 • by Bob • IIS, FTP
I get a lot of questions about Active versus Passive FTP Connections, specifically when people are configuring their FTP firewall settings as described in my articles like Configuring FTP Firewall Settings in IIS and FTP Firewall Support, and I get related questions when people are trying to figure out why they can't use the command-line FTP.EXE utility that ships with Windows over the Internet. With all of this in mind, I thought that I would put together a quick blog that explains Active and Passive FTP connections and why those matter when you are connecting to an FTP server over the Internet.
Here is the briefest description that I can think of to describe the different between Active and Passive FTP:
- When you are using Active FTP, your FTP client determines how your data connections will work.
- When you are using Passive FTP, your FTP server determines how your data connections will work.
That sums up the whole concept into two bullet points. Unfortunately, neither of those bullet points are the least bit significant to you if you don't understand what they actually mean, so I will describe them in detail below.
How Active FTP Works
The following output shows the communication between an FTP client and FTP server using Active FTP to retrieve a simple directory listing, and I manually color-coded the output so that the client and server's responses would be a little easier to see:
OPEN ftp.contoso.com
Resolving ftp.contoso.com...
Connect socket #1920 to 169.254.10.1, port 21...
220 Microsoft FTP Service
HOST ftp.contoso.com
220 Host accepted.
USER robert
331 Password required for robert.
PASS **********
230 User logged in.
PWD
257 "/" is current directory.
PORT 169,254,10,2,72,50
200 PORT command successful.
LIST
125 Data connection already open; Transfer starting.
drwxrwxrwx 1 owner group 0 Feb 15 19:26 aspnet_client
-rwxrwxrwx 1 owner group 689 Jan 31 22:27 default.htm
226 Transfer complete.
Transferred 106 bytes in 0.008 seconds
QUIT
221 Goodbye.
In the beginning of this exchange, the client connects to the server from one of its ephemeral data ports to the server's port for the FTP command channel. After negotiating the FTP host, username, and password, the client retrieves the name of the current directory. So far all of the client/server communication has taken place over the FTP command channel, and up to now the conversation is identical to Passive FTP, but that is about to change.
The client's next task is to request a directory listing, which is denoted by the LIST command. The server will return its response to the client over the data channel, so before FTP client can send the LIST command, the client has to specify whether to use Active or Passive. In this example, the client has specified Active FTP by sending a PORT command. The syntax for this command is PORT A1,A2,A3,A4,P1,P2, where A1 through A4 are octets of the client's IPv4 address, and P1/P2 are two bytes that make up a 16-bit (0-65535) port address on the client. (Note: if you are using IPv6, there is a similar EPRT command that works with IPv6 addresses.)
Here's what the information in the PORT command means: the FTP client is essentially telling the FTP server, "For the upcoming data transfer, you need to talk to me at this IP address on this port." This means that the FTP client is actively in control of how the subsequent data communication is going to take place.
If we analyze this information, you can easily see why Active FTP will often fail to work over the Internet. As a relevant example, if you were to use the FTP.EXE client that ships with Windows, it can only use Active FTP. So when a client computer requests something from the server that needs to use the data channel, the client computer sends its IP address via a PORT command. If the FTP client is behind a firewall or NAT server, then the client is going to send its internal, LAN-based address, to which the FTP server will more than likely fail to connect. For example, if you are on a LAN that uses a NAT server and you have a 192.168.0.nnn IPv4 address, that IP address is invalid over the Internet, so the server will never be able to establish a data connection to your client to send the data. (Note: This is the reason why many customers contact me with the following problem description: "I can use FTP.EXE to connect to my server, and everything works until I try to retrieve a directory listing, then it hangs until the connection times out." What is actually happening is the FTP server is trying to connect to the FTP client's IP address and port that were specified by the PORT command, but the connection does not succeed because the server cannot connect to the private IP address of the client.)
How Passive FTP Works
The following output shows the communication between an FTP client and FTP server using Passive FTP to retrieve the same directory listing as my previous example, and once again I manually color-coded the output so that the client and server's responses would be a little easier to see:
OPEN ftp.contoso.com
Resolving ftp.contoso.com...
Connect socket #2076 to 169.254.10.1, port 21...
220 Microsoft FTP Service
HOST ftp.contoso.com
220 Host accepted.
USER robert
331 Password required for robert.
PASS **********
230 User logged in.
PWD
257 "/" is current directory.
PASV
227 Entering Passive Mode (169,254,10,1,197,19).
LIST
Connect socket #2104 to 169.254.10.1, port 50451...
150 Opening ASCII mode data connection.
drwxrwxrwx 1 owner group 0 Feb 15 19:26 aspnet_client
-rwxrwxrwx 1 owner group 689 Jan 31 22:27 default.htm
226 Transfer complete.
Transferred 106 bytes in 0.008 seconds
QUIT
221 Goodbye.
As I mentioned in my earlier example, the beginning of this conversation is identical to Active FTP: the client connects from one of its ephemeral data ports to the server's port for the FTP command channel. After negotiating the FTP host, username, and password, the client retrieves the name of the current directory as in my earlier example - and here's where the difference begins.
Once again the client's next task is to request the directory listing, which is still denoted by the LIST command. But in this second example, the client has specified Passive FTP by sending a PASV command. The server responds to this command with a reply that is in the format of 227 Entering Passive Mode (A1,A2,A3,A4,P1,P2), where A1 through A4 are octets of the server's IPv4 address, and P1/P2 are two bytes that make up a 16-bit (0-65535) port address on the server. (Note: if you are using IPv6, there is a similar EPSV command that works with IPv6 addresses.)
Here's what the information in the response to the PASV command means: the FTP client is essentially telling the FTP server, "For the upcoming data transfer, you need to tell me which IP address and port I should use to talk to you." This means that the FTP client is passively allowing the server to control how the subsequent data communication is going to take place.
If we analyze this information, you can easily see why Passive FTP often works over the Internet; when the FTP server is in control of the communication parameters, it doesn't matter whether the FTP client is behind a NAT server, because the server is telling the client how it should communicate with the server.
All of this leads to an obvious question: what happens when both the server and the client are behind NAT servers or firewalls? This is where a little bit of configuration comes into play. If you read my Configuring FTP Firewall Settings in IIS and FTP Firewall Support articles, you would notice that you can configure the IIS FTP service to tell the FTP client which IP address to use; when your FTP server is located behind a firewall, you would configure your FTP server to send the external IP address of your firewall, and then you would configure your firewall to route FTP requests on that IP address to your FTP server. Since the FTP server is sending the external IP address of your firewall, the client knows how to communicate to the FTP server even though it is behind a firewall, even if your server is using a LAN-based internal IP address.
In Closing...
Having explained everything in my preceding examples, you should now understand what I meant earlier when I described the difference between Active and Passive FTP with these two simple points:
- When you are using Active FTP, your FTP client determines how your data connections will work.
- When you are using Passive FTP, your FTP server determines how your data connections will work.
I hope this clears up some questions you might have about Active versus Passive FTP, why you sometimes need to configure your firewall settings for your FTP service, and why the built-in FTP client for Windows seldom works over the Internet.
That wraps it up for today's blog post. ;-]
Note: This blog was originally posted at http://blogs.msdn.com/robert_mcmurray/
Adding Custom FTP Providers with the IIS Configuration Editor - Part 2
02 May 2013 • by Bob • IIS, FTP, Extensibility
In Part 1 of this blog series about adding custom FTP providers with the IIS Configuration Editor, I showed you how to add a custom FTP provider with a custom setting for the provider that is stored in your IIS configuration settings. For my examples, I showed how to do this by using both the AppCmd.exe application from a command line and by using the IIS Configuration Editor. In part 2 of this blog series, I will show you how to use the IIS Configuration Editor to add custom FTP providers to your FTP sites.
As a brief review from Part 1, the following XML excerpt illustrates what the provider's settings should resemble when added to your IIS settings:
<system.ftpServer>
   <providerDefinitions>
     <add name="FtpXmlAuthorization"
       type="FtpXmlAuthorization, FtpXmlAuthorization, version=1.0.0.0, Culture=neutral, PublicKeyToken=426f62526f636b73" />
     <activation>
       <providerData name="FtpXmlAuthorization">
         <add key="xmlFileName"
           value="C:\inetpub\FtpUsers\Users.xml" />
       </providerData>
     </activation>
   </providerDefinitions>
 </system.ftpServer>
The above example shows the settings that are added globally to register an FTP provider. Note that this example only contains the settings for my custom provider; you would normally see the settings for the IisManagerAuth and AspNetAuth providers that ship with the FTP service in the providerDefinitions collection.
To actually use a provider for an FTP site, you would need to add the provider to the settings for the FTP site in your IIS settings. So for part 2 of this blog series, we will focus on how to add a custom provider to an FTP site by using the IIS Configuration Editor.
Having said all of that, the rest of this blog is broken down into the following sections:
- Step 1 - Looking at the configuration settings for custom FTP providers
- Step 2 - Navigate to an FTP Site in the Configuration Editor
- Step 3 - Add custom FTP providers to an FTP site
- Summary and Parting Thoughts
Before continuing, I should reiterate that custom FTP providers fall into two categories: providers that are used for authentication and providers that are used for everything else. This distinction is important, because the settings are stored in different sections of your IIS settings. With that in mind, let's take a look at the settings for an example FTP site.
Step 1 - Looking at the configuration settings for custom FTP providers
The following example shows an FTP site with several custom FTP providers added:
<site name="ftp.contoso.com" id="2">
   <application path="/">
     <virtualDirectory path="/"
       physicalPath="c:\inetpub\www.contoso.com\wwwroot" />
   </application>
   <bindings>
     <binding protocol="ftp"
       bindingInformation="*:21:ftp.contoso.com" />
   </bindings>
   <ftpServer>
     <security>
       <ssl controlChannelPolicy="SslAllow"
         dataChannelPolicy="SslAllow" />
       <authentication>
         <customAuthentication>
           <providers>
             <add name="MyCustomFtpAuthenticationProvider" />
           </providers>
         </customAuthentication>
       </authentication>
     </security>
     <customFeatures>
       <providers>
         <add name="MyCustomFtpHomeDirectoryProvider" />
         <add name="MyCustomFtpLoggingProvider" />
       </providers>
     </customFeatures>
     <userIsolation mode="Custom" />
   </ftpServer>
 </site>
If you look at the above example, you will notice the following providers have been added:
- A custom FTP authentication provider named MyCustomFtpAuthenticationProvider has been added to the ftpServer/security/authentication/customAuthentication/providers collection; this provider will obviously be used by the FTP service to validate usernames and passwords.
- A custom FTP home directory provider named MyCustomFtpHomeDirectoryProvider has been added to the ftpServer/customFeatures/providers collection; this will be used by the FTP service for custom user isolation. Note the mode for the userIsolation element is set to custom.
- A custom FTP logging provider named MyCustomFtpLoggingProvider has been added to the ftpServer/customFeatures/providers collection; this will be used by the FTP service for creating custom log files.
As I mentioned earlier, you will notice that the settings for FTP custom providers are stored in different sections of the ftpServer collection depending on whether they are used for authentication or some other purpose.
Step 2 - Navigate to an FTP Site in the Configuration Editor
Open the IIS Manager and click on the Configuration Editor at feature the server level:

Click the Section drop-down menu, expand the the system.applicationHost collection, and then highlight the sites node:

If you click on the Collection row, an ellipsis [...] will appear:

When you click the ellipsis [...], IIS will display the Collection Editor dialog box for your sites; both HTTP and FTP sites will be displayed:

Expand the ftpServer node, which is where all of the site-level settings for an FTP site are kept.
Step 3 - Add custom FTP providers to an FTP site
As I mentioned earlier, custom FTP providers fall into two categories: providers that are used for authentication and everything else. Because of this distinction, the following steps show you how to add a provider to the correct section of your settings depending on the provider's purpose.
Add a custom FTP provider to an FTP site that is not used for authentication
Expand the customFeatures node, which is located under the ftpServer node for an FTP site; this collection defines the custom providers for an FTP site that are not used for authentication, for example: home directory providers, logging providers, etc. When you highlight the providers row, an ellipsis [...] will appear:

When you click the ellipsis [...], IIS will display the Collection Editor dialog box for your custom features (providers). When you click Add in the Actions pane, you need to enter the name of an FTP provider that you entered by following the instructions in Part 1 of this blog series:

Once you enter the name of your FTP provider in the Collection Editor dialog box for your custom features, you can close that dialog box. The Collection Editor for your sites will reflect the updated provider count for your FTP site:

Important Note: If you are adding a custom FTP Home Directory Provider, you have to configure the mode for FTP's User Isolation features. To do so, you need to expand the userIsolation node, which is located under the ftpServer node for an FTP site. Once you have done so, click the mode drop-down menu and choose Custom from the list of choices:

When you close the Collection Editor dialog box for your sites, you need to click Apply in the Actions pane to commit the changes to your IIS settings:

Add a custom FTP authentication provider to an FTP site
First and foremost - there is built-in support for adding custom authentication providers in IIS Manager; to see the steps to do so, see the FTP Custom Authentication <customAuthentication> article on the IIS.NET website. However, if you want to add a custom FTP authentication provider to an FTP site by using the IIS Configuration Editor, you can do so by using the following steps.
Expand the security node under the ftpServer node for an FTP site, then expand the authentication node, and then expand the customAuthentication node; this collection defines the custom authentication providers for an FTP site. When you highlight the providers row, an ellipsis [...] will appear:

When you click the ellipsis [...], IIS will display the Collection Editor dialog box for your custom authentication providers. When you click Add in the Actions pane, you need to enter the name of an FTP authentication provider that you entered by following the instructions in Part 1 of this blog series:

Once you enter the name of your FTP authentication provider in the Collection Editor dialog box for your custom authentication providers, you can close that dialog box. The Collection Editor for your sites will reflect the updated authentication provider count for your FTP site:

When you close the Collection Editor dialog box for your sites, you need to click Apply in the Actions pane to commit the changes to your IIS settings:
Summary and Parting Thoughts
As I mentioned in part 1 of this series, I admit that this might seem like a lot of steps to go through, but it's not that difficult once you understand how the configuration settings are organized and you get the hang of using the IIS Configuration Editor to add or modify these settings.
Disabling Custom User Isolation
In the Add a custom FTP provider to an FTP site that is not used for authentication section of this blog, I added a step to specify Custom as the User Isolation mode. Since this is something of an advanced feature, there is no user interface for enabling custom user isolation; this was a design decision to keep people from breaking their FTP sites. Here's why: if you enable custom user isolation and you don't install a custom Home Directory provider for FTP, all users will be denied access to your FTP site.
That being said, once you have enabled custom user isolation, the option to disable custom user isolation will "magically" appear in the FTP User Isolation feature in the IIS Manager. To see this for yourself, you would first need to follow the steps to custom user isolation in the Add a custom FTP provider to an FTP site that is not used for authentication section of this blog.
Once you have enabled custom user isolation, highlight your FTP site in the list of Sites pane of IIS Manager, then open the FTP User Isolation feature:

When you open the FTP User Isolation feature, you will see that an option for Custom now appears in the list of user isolation modes:

This option will appear as long as custom user isolation is enabled. If you change the user isolation mode to something other than Custom, this option will continue appear in the list of user isolation modes until you navigate somewhere else in IIS Manager. Once you have changed the user isolation mode to one of the built-in modes and you navigate somewhere else, the Custom option will not show up in the FTP User Isolation feature until you follow the steps to re-enable custom user isolation.
Additional Information
If you want additional information about configuring the settings for FTP providers, you can find detailed reference documentation at the following URLs:
- FTP Custom Features <customFeatures>
http://www.iis.net/configreference/system.applicationhost/sites/site/ftpserver/customfeatures - FTP Custom Authentication <customAuthentication>
http://www.iis.net/configreference/system.applicationhost/sites/site/ftpserver/security/authentication/customauthentication
Each of these articles contain "How-To" steps, detailed information about each of the configuration settings, and code samples for AppCmd.exe, C#/VB.NET, and JavaScript/VBScript.
As always, let me know if you have any questions. ;-]
Note: This blog was originally posted at http://blogs.msdn.com/robert_mcmurray/
Feedback Request for Curated Content Views
30 April 2013 • by Bob • IIS, Content
Publishing technical documentation is an interesting business, and a lot of discussion & deliberation goes into the creation process for articles and videos that we produce at Microsoft. For example, when I am writing an article for IIS, should I publish that on www.iis.net, or technet.microsoft.com, or msdn.microsoft.com? Or should I just write a blog about it? And after I have published an article, how will my intended audience find it? As we continue to publish hundreds of technical articles to the websites that I just mentioned, the navigation hierarchy becomes increasingly complex, and content discoverability suffers.
Some time ago a few of our writers began to experiment with a new way to consolidate lists of related content into something that we called a "Content Map." The following pages will show you an example of what the Content Map concept looks like:
Each of these articles received a great deal of positive feedback from customers, but our team wanted to see if there was a way that customers could help us to improve on this design. We know that there is a great deal of third-party content on the Internet, and we wanted a way to recognize that. We also asked several customers about what kinds of content they need to be successful, and we added their suggestions to our deliberation process.
As a result of our collective discussions, we came up with an idea for what we are internally calling "Curated Content Views." These "views" are lists of related content topics that are organized to answer a particular question or customer need. A view is assembled by someone at Microsoft based on input from anyone who thinks that an article, blog, video, or code sample might be beneficial as part of the view.
With that in mind, here are three conceptual content views that a few of the writers on our content team have assembled:
- How to deploy an ASP.NET web application to a Windows Azure Web Site using Visual Studio
- How to secure an ASP.NET MVC app
- How Do I Configure FTP Security in IIS?
Our team is requesting feedback from members of the community regarding these conceptual views with regard to the level of detail that is included in each view, the conceptual layouts that were used, and any thoughts about how this content compares with existing table of contents topics or content maps. You can reply to our content team via email, or you can post a response to this blog.
While we are interested in any feedback you may have, our team has put together the following list of specific questions to think about:
- Each curated view/content map includes a list of suggested content links. Below is a list of additional information that could be provided with each link. Which of these are most important?
- Date that the content was posted.
- Type of content (video, article, code sample, etc.).
- Author name.
- Short description.
- Level of difficulty of the content.
- Version of software/framework or SDK the content refers to.
- Website the content appears on.
- Number of likes or positive reviews.
- Rating assigned to the content by the community.
- If you opened a page similar to one of these curated views/content maps from Google or Bing search results, would you be likely to try the links on this page or just return to search results?
- If Microsoft and community experts published a large set of content views similar to these on a website, would you visit that site first when you had technical questions, or would you do an Internet search on Google/Bing first?
- Do the questions addressed by each curated view seem too narrow or too broad in scope to be helpful? If so, which ones?
- Do any of the curated views/content maps provide too much or too little detail for each link in the list? If so, which ones?
- Do you find it helpful to see the profile of the person who created the curated view/content map?
- If we provided an easy way for you to publish your own curated views (with attribution) to a common site together with the Microsoft-created curated views, would you be interested in doing so? Why or why not?
- If we provided an easy way for you to suggest new content items to add to content views/content maps that have already been published, would you be interested in doing so? Why or why not?
- What would make these content views/content maps more helpful?
Thanks!
Note: This blog was originally posted at http://blogs.msdn.com/robert_mcmurray/
IIS 6.0 WebDAV and Compound Document Format Files Revisited with Workarounds
24 April 2013 • by Bob • IIS, WebDAV, IIS 6
A few years ago I wrote the following blog, wherein I described how the WebDAV functionality in IIS 6.0 worked with files that are Compound Document format:
IIS 6.0 WebDAV and Compound Document Format Files
As I explained in that blog post, WebDAV needs somewhere to store "properties" for files that are uploaded to the server, and WebDAV uses the compound document format to accomplish this according to the following implementation logic:
- If the file is already in the compound document file format, IIS simply adds the WebDAV properties to the existing file. This data will not be used by the application that created the file - it will only be used by WebDAV. However, the file size will increase because WebDAV properties are added to the compound document.
- For other files, WebDAV stores a compound document in an NTFS alternate data stream that is attached to the file. You will never see this additional data from any directory listing, and the file size doesn't change because it's in an alternate data stream.
I recently had a customer contact me in order to ask if there was a way to disable this functionality since he didn't want his files modified in order to store the WebDAV properties. Unfortunately there is no built-in option for IIS that will disable this functionality, but there are a few workarounds.
Workaround #1 - Change the File Type
First and foremost - you can change your file type to something other than the compound document format. For example, if you are uploading files that were created in Microsoft Office, if you can upload your files in the newer Office Open XML formats, then you will not run into this problem. By way of explanation, older Microsoft Office files are in compound document format, whereas files that are that are created with Microsoft Office 2010 and later are in a zipped, XML-based file format. These files will have extensions like *.DOCX for Microsoft Word documents, *.XLSX for Microsoft Excel spreadsheets, and *.PPTX for Microsoft PowerPoint presentations.
Workaround #2 - Wrap Compound Document Files in a Separate File Type
If you are using a file that must be in compound document format, like a setup package in Microsoft Installer (*.MSI) format, you can upload the file in a *.ZIP file, or you can wrap the setup package inside a self-extracting executable by using a technology like Microsoft's IExpress Wizard (which ships as a built-in utility with most versions of Windows).
Workaround #3 - Block WebDAV Properties
If you absolutely cannot change your document from compound document format, I have a completely unsupported workaround that I can suggest. Since the problem arises when properties are added to a file, you can find a way to intercept the WebDAV commands that try to set properties. The actual HTTP verb that is used is PROPPATCH, so if you can find a way to keep this command from being used, then you can prevent files from being modified. Unfortunately you cannot simply suppress PROPPATCH commands by using a security tool like Microsoft's UrlScan to block the command, because this will cause many WebDAV clients to fail.
Instead, what I did as a workaround was to write an example ISAPI filter for IIS 6.0 that intercepts incoming PROPPATCH commands and always sends a successful (e.g. "200 OK") response to the WebDAV client, but in reality the filter does nothing with the properties and ends the request processing. This tricks a WebDAV client into thinking that it succeeded, and it prevents your files in compound document format from being modified. However, this also means that no WebDAV properties will ever be stored with your files; but if that's acceptable to you, (and it usually should be), then you can use this workaround.
With that in mind, here's the C++ code for my example ISAPI filter, and please remember that this is a completely unsupported workaround that is intended for use only when you cannot repackage your files to use something other than the compound document format.
#define _WIN32_WINNT 0x0400

#include <windows.h>
#include <httpfilt.h>

#define STRSAFE_LIB
#include <strsafe.h>

#define BUFFER_SIZE 2048

const char xmlpart1[] = "<?xml version=\"1.0\"?>"
  "<a:multistatus xmlns:a=\"DAV:\">"
  "<a:response>"
  "<a:href>";

const char xmlpart2[] = "</a:href>"
  "<a:propstat>"
  "<a:status>HTTP/1.1 200 OK</a:status>"
  "</a:propstat>"
  "</a:response>"
  "</a:multistatus>";

BOOL WINAPI GetFilterVersion(PHTTP_FILTER_VERSION pVer)
{
  HRESULT hr = S_OK;
  // Set the filter's version.
  pVer->dwFilterVersion = HTTP_FILTER_REVISION;
  // Set the filter's description.
  hr = StringCchCopyEx(
    pVer->lpszFilterDesc,256,"PROPPATCH",
    NULL,NULL,STRSAFE_IGNORE_NULLS);
  if (FAILED(hr)) return FALSE;
  // Set the filter's flags.
  pVer->dwFlags = SF_NOTIFY_ORDER_HIGH | SF_NOTIFY_PREPROC_HEADERS;
  return TRUE;
}

DWORD WINAPI HttpFilterProc(
  PHTTP_FILTER_CONTEXT pfc,
  DWORD NotificationType,
  LPVOID pvNotification )
{
  // Verify the correct notification.
  if ( NotificationType == SF_NOTIFY_PREPROC_HEADERS)
  {
    PHTTP_FILTER_PREPROC_HEADERS pHeaders;
    HRESULT hr = S_OK;

    bool fSecure = false;

    char szServerName[BUFFER_SIZE] = "";
    char szSecure[2] = "";
    char szResponseXML[BUFFER_SIZE] = "";
    char szResponseURL[BUFFER_SIZE] = "";
    char szRequestURL[BUFFER_SIZE] = "";
    char szMethod[BUFFER_SIZE] = "";

    DWORD dwBuffSize = 0;

    pHeaders = (PHTTP_FILTER_PREPROC_HEADERS) pvNotification;

    // Get the method of the request
    dwBuffSize = BUFFER_SIZE-1;
    // Exit with an error status if a failure occured.
    if (!pfc->GetServerVariable(
      pfc, "HTTP_METHOD", szMethod, &dwBuffSize))
      return SF_STATUS_REQ_ERROR;

    if (strcmp(szMethod, "PROPPATCH") == 0)
    {
      // Send the HTTP status to the client.
      if (!pfc->ServerSupportFunction(
        pfc, SF_REQ_SEND_RESPONSE_HEADER,"207 Multi-Status", 0, 0))
        return SF_STATUS_REQ_ERROR;

      // Get the URL of the request.
      dwBuffSize = BUFFER_SIZE-1;
      if (!pfc->GetServerVariable(
        pfc, "URL", szRequestURL, &dwBuffSize))
        return SF_STATUS_REQ_ERROR;

      // Determine if request was sent over secure port.
      dwBuffSize = 2;
      if (!pfc->GetServerVariable(
        pfc, "SERVER_PORT_SECURE", szSecure, &dwBuffSize))
        return SF_STATUS_REQ_ERROR;
      fSecure = (szSecure[0] == '1');

      // Get the server name.
      dwBuffSize = BUFFER_SIZE-1;
      if (!pfc->GetServerVariable(
        pfc, "SERVER_NAME", szServerName, &dwBuffSize))
        return SF_STATUS_REQ_ERROR;

      // Set the response URL.
      hr = StringCchPrintf(
        szResponseURL,BUFFER_SIZE-1, "http%s://%s/%s",
        (fSecure ? "s" : ""), szServerName, &szRequestURL[1]);
      // Exit with an error status if a failure occurs.
      if (FAILED(hr)) return SF_STATUS_REQ_ERROR;

      // Set the response body.
      hr = StringCchPrintf(
        szResponseXML,BUFFER_SIZE-1, "%s%s%s",
        xmlpart1, szResponseURL, xmlpart2);
      // Exit with an error status if a failure occurs.
      if (FAILED(hr)) return SF_STATUS_REQ_ERROR;

      // Write the response body to the client.
      dwBuffSize = strlen(szResponseXML);
      if (!pfc->WriteClient(
        pfc, szResponseXML, &dwBuffSize, 0))
        return SF_STATUS_REQ_ERROR;

      // Flag the request as completed.
      return SF_STATUS_REQ_FINISHED;
    }
  }

  return SF_STATUS_REQ_NEXT_NOTIFICATION;
}
I hope this helps. ;-]
Note: This blog was originally posted at http://blogs.msdn.com/robert_mcmurray/
Adding Custom FTP Providers with the IIS Configuration Editor - Part 1
31 March 2013 • by Bob • Extensibility, FTP, IIS
I've written a lot of walkthroughs and blog posts about creating custom FTP providers over the past several years, and I usually include instructions for adding these custom providers to IIS. When you create a custom FTP authentication provider, IIS has a user interface for adding that provider to FTP. But if you are adding a custom home directory or logging provider, there is no dedicated user interface for adding those types of FTP providers. In addition, if you create a custom FTP provider that requires settings that are stored in your IIS configuration, there is no user interface to add or manage those settings.
With this in mind, I include instructions in my blogs and walkthroughs that describe how to add those type of providers by using AppCmd.exe from a command line. For example, if you take a look at my How to Use Managed Code (C#) to Create an FTP Authentication and Authorization Provider using an XML Database walkthrough, I include the following instructions:
Adding the Provider
- Determine the assembly information for the extensibility provider:
- In Windows Explorer, open your "C:\Windows\assembly" path, where C: is your operating system drive.
- Locate the FtpXmlAuthorization assembly.
- Right-click the assembly, and then click Properties.
- Copy the Culture value; for example: Neutral.
- Copy the Version number; for example: 1.0.0.0.
- Copy the Public Key Token value; for example: 426f62526f636b73.
- Click Cancel.
- Using the information from the previous steps, add the extensibility provider to the global list of FTP providers and configure the options for the provider:
- At the moment there is no user interface that enables you to add properties for custom authentication or authorization modules, so you will have to use the following command line:
cd %SystemRoot%\System32\Inetsrv

appcmd.exe set config -section:system.ftpServer/providerDefinitions /+"[name='FtpXmlAuthorization',type='FtpXmlAuthorization,FtpXmlAuthorization,version=1.0.0.0,Culture=neutral,PublicKeyToken=426f62526f636b73']" /commit:apphost

appcmd.exe set config -section:system.ftpServer/providerDefinitions /+"activation.[name='FtpXmlAuthorization']" /commit:apphost

appcmd.exe set config -section:system.ftpServer/providerDefinitions /+"activation.[name='FtpXmlAuthorization'].[key='xmlFileName',value='C:\Inetpub\XmlSample\Users.xml']" /commit:apphost - Note: The file path that you specify in the xmlFileName attribute must match the path where you saved the "Users.xml" file on your computer in the earlier in this walkthrough.
- At the moment there is no user interface that enables you to add properties for custom authentication or authorization modules, so you will have to use the following command line:
This example adds a custom FTP provider, and then it adds a custom setting for that provider that is stored in your IIS configuration settings.
That being said, there is actually a way to add custom FTP providers with settings like the ones that I have just described through the IIS interface by using the IIS Configuration Editor. This feature was first available through the IIS Administration Pack for IIS 7.0, and is built-in for IIS 7.5 and IIS 8.0.
Before I continue, if would probably be prudent to take a look at the settings that we are trying to add, because these settings might help you to understand the rest of steps in this blog. Here is an example from my applicationhost.config file for three custom FTP authentication providers; the first two providers are installed with the FTP service, and the third provider is a custom provider that I created with a single provider-specific configuration setting:
<system.ftpServer>
  <providerDefinitions>
    <add name="IisManagerAuth" type="Microsoft.Web.FtpServer.Security.IisManagerAuthenticationProvider, Microsoft.Web.FtpServer, version=7.5.0.0, Culture=neutral, PublicKeyToken=31bf3856ad364e35" />
    <add name="AspNetAuth" type="Microsoft.Web.FtpServer.Security.AspNetFtpMembershipProvider, Microsoft.Web.FtpServer, version=7.5.0.0, Culture=neutral, PublicKeyToken=31bf3856ad364e35" />
    <add name="FtpXmlAuthorization" type="FtpXmlAuthorization, FtpXmlAuthorization, version=1.0.0.0, Culture=neutral, PublicKeyToken=426f62526f636b73" />
    <activation>
      <providerData name="FtpXmlAuthorization">
        <add key="xmlFileName" value="C:\inetpub\FtpUsers\Users.xml" />
      </providerData>
    </activation>
  </providerDefinitions>
</system.ftpServer>
With that in mind, in part 1 of this blog series, I will show you how to use the IIS Configuration Editor to add a custom FTP provider with provider-specific configuration settings.
Step 1 - Open the IIS Manager and click on the Configuration Editor at feature the server level:
Step 2 - Click the Section drop-down menu, expand the the system.ftpServer collection, and then highlight the providerDefinitions node:

Step 3 - A default installation IIS with the FTP service should show a Count of 2 providers in the Collection row, and no settings in the activation row:

Step 4 - If you click on the Collection row, an ellipsis [...] will appear, and when you click that, IIS will display the Collection Editor dialog for FTP providers. By default you should see just the two built-in providers for the IisManagerAuth and AspNetAuth providers:

Step 5 - When you click Add in the Actions pane, you can enter the registration information for your provider. At a minimum you must provide a name for your provider, but you will need to enter either the clsid for a COM-based provider or the type for a managed-code provider:

Step 6 - When you close the Collection Editor dialog, the Count of providers in the Collection should now reflect the provider that we just added; click Apply in the Actions pane to save the changes:

Step 7 - If you click on the activation row, an ellipsis [...] will appear, and when you click that, IIS will display the Collection Editor dialog for provider data; this is where you will enter provider-specific settings. When you click Add in the Actions pane, you must specify the name for your provider's settings, and this name must match the exact name that you provided in Step 5 earlier:

Step 8 - If you click on the Collection row, an ellipsis [...] will appear, and when you click that, IIS will display the Collection Editor dialog for the activation data for an FTP provider. At a minimum you must provide a key for your provider, which will depend on the settings that your provider expects to retrieve from your configuration settings. (For example, in the XML file that I provided earlier, my FtpXmlAuthorization provider expects to retrieve the path to an XML that contains a list of users, roles, and authorization rules.) You also need to enter the either the value or encryptedValue for your provider; although you can specify either setting, should generally specify the value when the settings are not sensitive in nature, and specify the encryptedValue for settings like usernames and passwords:

Step 9 - When you close the Collection Editor dialog for the activation data, the Count of key/value pairs in the Collection should now reflect the value that we just added:

Step 10 - When you close the Collection Editor dialog for the provider data, the Count of provider data settings in the activation row should now reflect the custom settings that we just added; click Apply in the Actions pane to save the changes:

That's all that there is to adding a custom FTP provider with provider-specific settings; I admit that it might seem like a lot of steps until you get the hang of it.
In the next blog for this series, I will show you how to add custom providers to FTP sites by using the IIS Configuration Editor.
Note: This blog was originally posted at http://blogs.msdn.com/robert_mcmurray/
Automating the Creation of FTP User Isolation Folders
28 March 2013 • by Bob • IIS, Scripting, FTP
A customer asked me a question a little while ago that provided me the opportunity to recycle some code that I had written many years ago. In so doing, I also made a bunch of updates to the code to make it considerably more useful, and I thought that it would make a great blog.
Here's the scenario: a customer had hundreds of user accounts created, and he wanted to use the FTP service's User Isolation features to restrict each user to a specific folder on his FTP site. Since it would take a long time to manually create a folder for each user account, the customer wanted to know if there was a way to automate the process. As it turns out, I had posted a very simple script in the IIS.net forums several years ago that did something like what he wanted; and that script was based off an earlier script that I had written for someone else back in the IIS 6.0 days.
One quick reminder - FTP User Isolation uses a specific set of folders for user accounts, which are listed in the table below.
| User Account Types | Home Directory Syntax |
|---|---|
| Anonymous users | %FtpRoot%\LocalUser\Public |
| Local Windows user accounts
(Requires Basic authentication.) |
%FtpRoot%\LocalUser\%UserName% |
| Windows domain accounts
(Requires Basic authentication.) |
%FtpRoot%\%UserDomain%\%UserName% |
Note: %FtpRoot% is the root directory for your FTP site: for example, C:\Inetpub\Ftproot.
That being said, I'm a big believer in recycling code, so I found the last version of that script that I gave to someone and I made a bunch of changes to it so it would be more useful for the customer. What that in mind, here's the resulting script, and I'll explain a little more about what it does after the code sample.
Option Explicit

' Define the root path for the user isolation folders.
' This should be the root directory for your FTP site.
Dim strRootPath : strRootPath = "C:\Inetpub\wwwroot\"

' Define the name of the domain or the computer to use.
' Leave this blank for the local computer.
Dim strComputerOrDomain : strComputerOrDomain = ""

' Define the remaining script variables.
Dim objFSO, objCollection, objUser, objNetwork, strContainerName

' Create a network object; used to query the computer name.
Set objNetwork = WScript.CreateObject("WScript.Network")

' Create a file system object; used to creat folders.
Set objFSO = CreateObject("Scripting.FileSystemObject")

' Test if the computer name is null.
If Len(strComputerOrDomain)=0 Or strComputerOrDomain="." Then
  ' If so, define the local computer name as the account repository.
  strComputerOrDomain = objNetwork.ComputerName
End If

' Verify that the root path exists.
If objFSO.FolderExists(strRootPath) Then

  ' Test if the script is using local users.
  If StrComp(strComputerOrDomain,objNetwork.ComputerName,vbTextCompare)=0 Then
    ' If so, define the local users container path.
    strContainerName = "LocalUser"
    ' And define the users collection as local.
    Set objCollection = GetObject("WinNT://.")
  Else
    ' Otherwise, use the source name as the path.
    strContainerName = strComputerOrDomain
    ' And define the users collection as remote.
    Set objCollection = GetObject("WinNT://" & strComputerOrDomain & "")
  End If

  ' Append trailing backslash if necessary.
  If Right(strRootPath,1)<>"\" Then strRootPath = strRootPath & "\"
  ' Define the adjusted root path for the container folder.
  strRootPath = strRootPath & strContainerName & "\"

  ' Test if the container folder already exists.
  If objFSO.FolderExists(strRootPath)=False Then
    ' Create the container folder if necessary.
    objFSO.CreateFolder(strRootPath)
  End If

  ' Specify the collection filter for user objects only.
  objCollection.Filter = Array("user")

  ' Loop through the users collection.
  For Each objUser In objCollection
    ' Test if the user's account is enabled.
    If objUser.AccountDisabled = False Then
      ' Test if the user's folder already exists.
      If objFSO.FolderExists(strRootPath & "\" & objUser.Name)=False Then
        ' Create the user's folder if necessary.
           objFSO.CreateFolder(strRootPath & "\" & objUser.Name)
         End If
       End If
     Next

End If
I documented this script in great detail, so it should be self-explanatory for the most part. But just to be on the safe side, here's an explanation of what this script is doing when you run it on your FTP server:
- Defines two user-updatable variables:
- strRootPath - which specifies the physical path to the root of your FTP site.
- strComputerOrDomain - which specifies the computer name or the domain name where your user accounts are located. (Note: You can leave this blank if you are using local user accounts on your FTP server.)
- Creates a few helper objects and determines the local computer name if necessary.
- Checks to see if the physical path to the root of your FTP site actually exists before continuing.
- Creates a connection to the user account store (local or domain).
- Determines the container folder name that be the parent directory of user account folders, and creates it if necessary. (See my earlier note about the folder names.)
- Defines a filter for user objects in the specifies account repository. (This removes computer accounts and such from the operation.)
- Loops through the collection of user accounts, checks each account to see if it is enabled, and creates a folder for each user account if it does not already exist.
That's all for now. ;-]
Note: This blog was originally posted at http://blogs.msdn.com/robert_mcmurray/
Using Classic ASP and URL Rewrite for Dynamic SEO Functionality
31 December 2012 • by Bob • IIS, URL Rewrite, SEO, Classic ASP
I had another interesting situation present itself recently that I thought would make a good blog: how to use Classic ASP with the IIS URL Rewrite module to dynamically generate Robots.txt and Sitemap.xml files.
Overview
Here's the situation: I host a website for one of my family members, and like everyone else on the Internet, he wanted some better SEO rankings. We discussed a few things that he could do to improve his visibility with search engines, and one of the suggestions that I gave him was to keep his Robots.txt and Sitemap.xml files up-to-date. But there was an additional caveat - he uses two separate DNS names for the same website, and that presents a problem for absolute URLs in either of those files. Before anyone points out that it's usually not a good idea to host multiple DNS names on the same content, there are times when this is acceptable; for example, if you are trying to decide which of several DNS names is the best to use, you might want to bind each name to the same IP address and parse your logs to find out which address is getting the most traffic.
In any event, the syntax for both Robots.txt and Sitemap.xml files is pretty easy, so I wrote a couple of simple Classic ASP Robots.asp and Sitemap.asp pages that output the correct syntax and DNS-specific URLs for each domain name, and I wrote some simple URL Rewrite rules that rewrite inbound requests for Robots.txt and Sitemap.xml files to the ASP pages, while blocking direct access to the Classic ASP pages themselves.
All of that being said, there are a couple of quick things that I would like to mention before I get to the code:
- First of all, I chose Classic ASP for the files because it allows the code to run without having to load any additional framework; I could have used ASP.NET or PHP just as easily, but either of those would require additional overhead that isn't really required.
- Second, the specific website for which I wrote these specific examples consists of all static content that is updated a few times a month, so I wrote the example to parse the physical directory structure for the website's URLs and specified a weekly interval for search engines to revisit the website. All of these options can easily be changed; for example, I reused this code a little while later for a website where all of the content was created dynamically from a database, and I updated the code in the Sitemap.asp file to create the URLs from the dynamically-generated content. (That's really easy to do, but outside the scope of this blog.)
That being said, let's move on to the actual code.
Creating the Required Files
There are three files that you will need to create for this example:
- A Robots.asp file to which URL Rewrite will send requests for Robots.txt
- A Sitemap.asp file to which URL Rewrite will send requests for Sitemap.xml
- A Web.config file that contains the URL Rewrite rules
Step 1 - Creating the Robots.asp File
You need to save the following code sample as Robots.asp in the root of your website; this page will be executed whenever someone requests the Robots.txt file for your website. This example is very simple: it checks for the requested hostname and uses that to dynamically create the absolute URL for the website's Sitemap.xml file.
<%
    Option Explicit
    On Error Resume Next

    Dim strUrlRoot
    Dim strHttpHost
    Dim strUserAgent

    Response.Clear
    Response.Buffer = True
    Response.ContentType = "text/plain"
    Response.CacheControl = "public"

    Response.Write "# Robots.txt" & vbCrLf
    Response.Write "# For more information on this file see:" & vbCrLf
    Response.Write "# http://www.robotstxt.org/" & vbCrLf & vbCrLf

    strHttpHost = LCase(Request.ServerVariables("HTTP_HOST"))
    strUserAgent = LCase(Request.ServerVariables("HTTP_USER_AGENT"))
    strUrlRoot = "http://" & strHttpHost

    Response.Write "# Define the sitemap path" & vbCrLf
    Response.Write "Sitemap: " & strUrlRoot & "/sitemap.xml" & vbCrLf & vbCrLf

    Response.Write "# Make changes for all web spiders" & vbCrLf
    Response.Write "User-agent: *" & vbCrLf
    Response.Write "Allow: /" & vbCrLf
    Response.Write "Disallow: " & vbCrLf
    Response.End
%>
Step 2 - Creating the Sitemap.asp File
The following example file is also pretty simple, and you would save this code as Sitemap.asp in the root of your website. There is a section in the code where it loops through the file system looking for files with the *.html file extension and only creates URLs for those files. If you want other files included in your results, or you want to change the code from static to dynamic content, this is where you would need to update the file accordingly.
<%
    Option Explicit
    On Error Resume Next

    Response.Clear
    Response.Buffer = True
    Response.AddHeader "Connection", "Keep-Alive"
    Response.CacheControl = "public"

    Dim strFolderArray, lngFolderArray
    Dim strUrlRoot, strPhysicalRoot, strFormat
    Dim strUrlRelative, strExt

    Dim objFSO, objFolder, objFile

    strPhysicalRoot = Server.MapPath("/")
    Set objFSO = Server.CreateObject("Scripting.Filesystemobject")

    strUrlRoot = "http://" & Request.ServerVariables("HTTP_HOST")

    ' Check for XML or TXT format.
    If UCase(Trim(Request("format")))="XML" Then
        strFormat = "XML"
        Response.ContentType = "text/xml"
    Else
        strFormat = "TXT"
        Response.ContentType = "text/plain"
    End If

    ' Add the UTF-8 Byte Order Mark.
    Response.Write Chr(CByte("&hEF"))
    Response.Write Chr(CByte("&hBB"))
    Response.Write Chr(CByte("&hBF"))

    If strFormat = "XML" Then
        Response.Write "<?xml version=""1.0"" encoding=""UTF-8""?>" & vbCrLf
        Response.Write "<urlset xmlns=""http://www.sitemaps.org/schemas/sitemap/0.9"">" & vbCrLf
    End if

    ' Always output the root of the website.
    Call WriteUrl(strUrlRoot,Now,"weekly",strFormat)

    ' --------------------------------------------------
    ' This following section contains the logic to parse
    ' the directory tree and return URLs based on the
    ' static *.html files that it locates. This is where
    ' you would change the code for dynamic content.
    ' --------------------------------------------------
    strFolderArray = GetFolderTree(strPhysicalRoot)

    For lngFolderArray = 1 to UBound(strFolderArray)
        strUrlRelative = Replace(Mid(strFolderArray(lngFolderArray),Len(strPhysicalRoot)+1),"\","/")
        Set objFolder = objFSO.GetFolder(Server.MapPath("." & strUrlRelative))
        For Each objFile in objFolder.Files
            strExt = objFSO.GetExtensionName(objFile.Name)
            If StrComp(strExt,"html",vbTextCompare)=0 Then
                If StrComp(Left(objFile.Name,6),"google",vbTextCompare)<>0 Then
                    Call WriteUrl(strUrlRoot & strUrlRelative & "/" & objFile.Name, objFile.DateLastModified, "weekly", strFormat)
                End If
            End If
        Next
    Next

    ' --------------------------------------------------
    ' End of file system loop.
    ' --------------------------------------------------
    If strFormat = "XML" Then
        Response.Write "</urlset>"
    End If

    Response.End

    ' ======================================================================
    '
    ' Outputs a sitemap URL to the client in XML or TXT format.
    '
    ' tmpStrFreq = always|hourly|daily|weekly|monthly|yearly|never
    ' tmpStrFormat = TXT|XML
    '
    ' ======================================================================

    Sub WriteUrl(tmpStrUrl,tmpLastModified,tmpStrFreq,tmpStrFormat)
        On Error Resume Next
        Dim tmpDate : tmpDate = CDate(tmpLastModified)
        ' Check if the request is for XML or TXT and return the appropriate syntax.
        If tmpStrFormat = "XML" Then
            Response.Write " <url>" & vbCrLf
            Response.Write " <loc>" & Server.HtmlEncode(tmpStrUrl) & "</loc>" & vbCrLf
            Response.Write " <lastmod>" & Year(tmpLastModified) & "-" & Right("0" & Month(tmpLastModified),2) & "-" & Right("0" & Day(tmpLastModified),2) & "</lastmod>" & vbCrLf
            Response.Write " <changefreq>" & tmpStrFreq & "</changefreq>" & vbCrLf
            Response.Write " </url>" & vbCrLf
        Else
            Response.Write tmpStrUrl & vbCrLf
        End If
    End Sub

    ' ======================================================================
    '
    ' Returns a string array of folders under a root path
    '
    ' ======================================================================

    Function GetFolderTree(strBaseFolder)
        Dim tmpFolderCount,tmpBaseCount
        Dim tmpFolders()
        Dim tmpFSO,tmpFolder,tmpSubFolder
        ' Define the initial values for the folder counters.
        tmpFolderCount = 1
        tmpBaseCount = 0
        ' Dimension an array to hold the folder names.
        ReDim tmpFolders(1)
        ' Store the root folder in the array.
        tmpFolders(tmpFolderCount) = strBaseFolder
        ' Create file system object.
        Set tmpFSO = Server.CreateObject("Scripting.Filesystemobject")
        ' Loop while we still have folders to process.
        While tmpFolderCount <> tmpBaseCount
            ' Set up a folder object to a base folder.
            Set tmpFolder = tmpFSO.GetFolder(tmpFolders(tmpBaseCount+1))
              ' Loop through the collection of subfolders for the base folder.
            For Each tmpSubFolder In tmpFolder.SubFolders
                ' Increment the folder count.
                tmpFolderCount = tmpFolderCount + 1
                ' Increase the array size
                ReDim Preserve tmpFolders(tmpFolderCount)
                ' Store the folder name in the array.
                tmpFolders(tmpFolderCount) = tmpSubFolder.Path
            Next
            ' Increment the base folder counter.
            tmpBaseCount = tmpBaseCount + 1
        Wend
        GetFolderTree = tmpFolders
    End Function
%>
Note: There are two helper methods in the preceding example that I should call out:
- The GetFolderTree() function returns a string array of all the folders that are located under a root folder; you could remove that function if you were generating all of your URLs dynamically.
- The WriteUrl() function outputs an entry for the sitemap file in either XML or TXT format, depending on the file type that is in use. It also allows you to specify the frequency that the specific URL should be indexed (always, hourly, daily, weekly, monthly, yearly, or never).
Step 3 - Creating the Web.config File
The last step is to add the URL Rewrite rules to the Web.config file in the root of your website. The following example is a complete Web.config file, but you could merge the rules into your existing Web.config file if you have already created one for your website. These rules are pretty simple, they rewrite all inbound requests for Robots.txt to Robots.asp, and they rewrite all requests for Sitemap.xml to Sitemap.asp?format=XML and requests for Sitemap.txt to Sitemap.asp?format=TXT; this allows requests for both the XML-based and text-based sitemaps to work, even though the Robots.txt file contains the path to the XML file. The last part of the URL Rewrite syntax returns HTTP 404 errors if anyone tries to send direct requests for either the Robots.asp or Sitemap.asp files; this isn't absolutely necesary, but I like to mask what I'm doing from prying eyes. (I'm kind of geeky that way.)
<?xml version="1.0" encoding="UTF-8"?>
<configuration>
  <system.webServer>
    <rewrite>
      <rewriteMaps>
        <clear />
        <rewriteMap name="Static URL Rewrites">
          <add key="/robots.txt" value="/robots.asp" />
          <add key="/sitemap.xml" value="/sitemap.asp?format=XML" />
          <add key="/sitemap.txt" value="/sitemap.asp?format=TXT" />
        </rewriteMap>
        <rewriteMap name="Static URL Failures">
          <add key="/robots.asp" value="/" />
          <add key="/sitemap.asp" value="/" />
        </rewriteMap>
      </rewriteMaps>
      <rules>
        <clear />
        <rule name="Static URL Rewrites" patternSyntax="ECMAScript" stopProcessing="true">
          <match url=".*" ignoreCase="true" negate="false" />
          <conditions>
            <add input="{Static URL Rewrites:{REQUEST_URI}}" pattern="(.+)" />
          </conditions>
          <action type="Rewrite" url="{C:1}" appendQueryString="false" redirectType="Temporary" />
        </rule>
        <rule name="Static URL Failures" patternSyntax="ECMAScript" stopProcessing="true">
          <match url=".*" ignoreCase="true" negate="false" />
          <conditions>
            <add input="{Static URL Failures:{REQUEST_URI}}" pattern="(.+)" />
          </conditions>
          <action type="CustomResponse" statusCode="404" subStatusCode="0" />
        </rule>
        <rule name="Prevent rewriting for static files" patternSyntax="Wildcard" stopProcessing="true">
          <match url="*" />
          <conditions>
             <add input="{REQUEST_FILENAME}" matchType="IsFile" />
          </conditions>
          <action type="None" />
        </rule>
      </rules>
    </rewrite>
  </system.webServer>
</configuration>
Summary
That sums it up for this blog; I hope that you get some good ideas from it.
For more information about the syntax in Robots.txt and Sitemap.xml files, see the following URLs:
Note: This blog was originally posted at http://blogs.msdn.com/robert_mcmurray/