Extensibility Updates in the FTP 8.0 Service
20 April 2012 • by Bob • IIS, FTP, Extensibility
A few years ago I wrote a blog that was titled "FTP 7.5 Service Extensibility References", in which I discussed the extensibility APIs that we added in FTP 7.5. Over the next couple of years I followed that initial blog with a series of walkthroughs on IIS.net and several related blog posts. Here are just a few examples:
- How to use Managed Code (C#) to create an FTP Home Directory Provider that is based on the Remote Client IP Address
- How to Use Managed Code (C#) to Create an FTP Home Directory Provider for the Days of the Week
- FTP and LDAP - How to Use Managed Code (C#) to Create an FTP Authentication Provider that uses an LDAP Server
- How to Create an Authentication Provider for FTP 7.5 using BlogEngine.NET's XML Membership Files
- Merging FTP Extensibility Walkthroughs - Part 1
- Merging FTP Extensibility Walkthroughs - Part 2
- Automatically Creating Checksum Files for FTP Uploads
- Changing the Identity of the FTP 7 Extensibility Process
- etc.
In today's blog I'd like to discuss some of the extensibility features that we added in FTP 8.0, and show you how you can use those in your FTP providers.
Custom FTP Authorization
In FTP 7.5 we provided interfaces for IFtpAuthenticationProvider and IFtpRoleProvider, which respectively allowed developers to create FTP providers that performed user and role lookups. In FTP 8.0 we added a logical extension to that API set with IFtpAuthorizationProvider interface, which allows developers to create FTP providers that perform authorization tasks.
With that in mind, I wrote the following walkthrough on the IIS.net web site:
The title pretty much says it all: the provider that I describe in that walkthrough will walk you through the steps that are required to create an FTP provider that provides custom user authentication, verification of role memberships, and authorization lookups on a per-path basis.
Custom FTP Event Handling
In FTP 7.5 if you wanted your provider to respond to specific user activity, the best way to do so was to implement the IFtpLogProvider.Log() interface and use that to provide a form of pseudo-event handling. In FTP 8.0 we add two event handling interfaces, IFtpPreprocessProvider and IFtpPostprocessProvider, which respectively allow developers to write providers that implement functionality before or after events have occurred.
With that in mind, I wrote the following walkthrough on the IIS.net web site:
Once again, the title says it all: the provider that I describe in that walkthrough will walk you through the steps that are required to create an FTP provider that prevents FTP clients from downloading more files per-session than you have allowed in your configuration settings.
Happy coding!
Note: This blog was originally posted at http://blogs.msdn.com/robert_mcmurray/
Changing the Identity of the FTP 7 Extensibility Process
01 December 2011 • by Bob • FTP, Extensibility, IIS
Many IIS 7 FTP developers may not have noticed, but all custom FTP 7 extensibility providers execute through COM+ in a DLLHOST.exe process, which runs as NETWORK SERVICE by default. That being said, NETWORK SERVICE does not always have the right permissions to access some of the areas on your system where you may be attempting to implement custom functionality. What this means is, some of the custom features that you try to implement may not work as expected.
For example, if you look at the custom FTP logging provider in following walkthrough, the provider may not have sufficient permissions to create log files in the folder that you specify:
How to Use Managed Code (C#) to Create a Simple FTP Logging Provider
There are a couple of ways that you can resolve this issue:
- First of all, you could grant NETWORK SERVICE permissions to the destination folder.
- Second, you could change the identity of the FTP extensibility process so that it runs as a user that has permissions for the destination folder.
For what it's worth, I usually change the identity of the FTP 7 extensibility process on my servers so that I can set custom permissions for situations like this.
Here's how you do that:
- Create a user account that is only a member of the built-in Guests group, that way you're always using an extremely low-privileged account on your system. (You can also set custom security policies for that account, but that's outside the cope of this blog.)
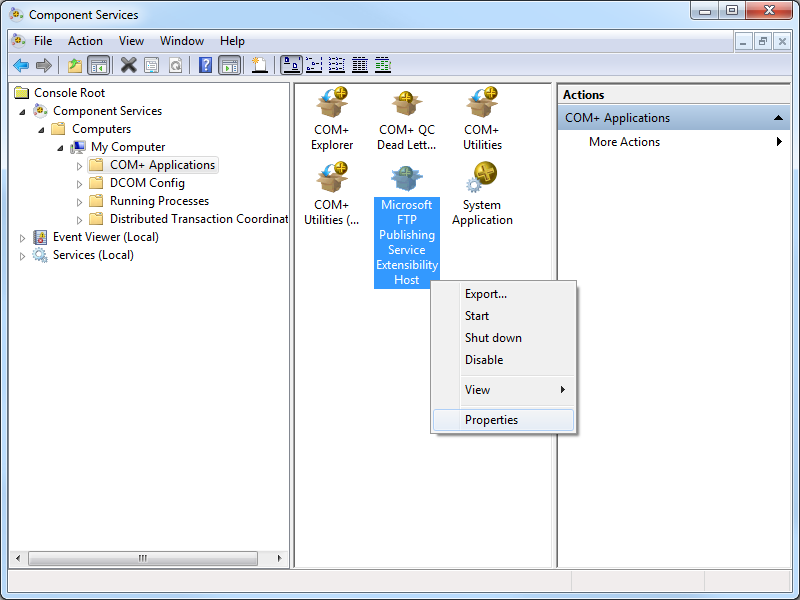
- Open Administrative Tools on your Windows system and double-click Component Services.

- Expand Component Services, then expand Computers, then My Computer, and then highlight COM+ Applications.

- Right-click Microsoft FTP Publishing Service Extensibility Host and then click Properties.
- Click the Identity tab, and then click the This userradio button.
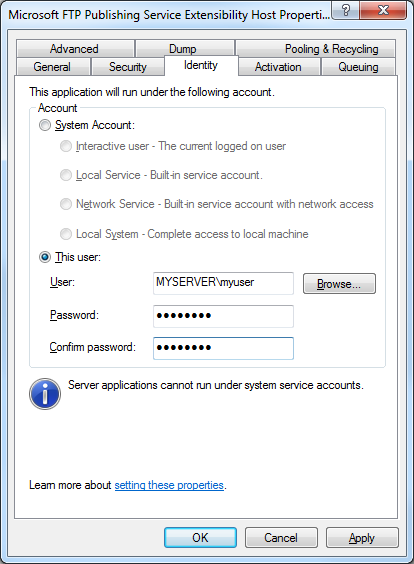
- Enter the credentials for the low-privileged user account that you created earlier, and then click OK.
Once you have done this, you can set permissions for this account whenever you need to specify permissions for situations like I described earlier.
Personally, I prefer to change the identity of the FTP 7 extensibility process instead of granting NETWORK SERVICE more permissions than it probably needs.
Note: This blog was originally posted at http://blogs.msdn.com/robert_mcmurray/
How to use Managed Code (C#) to create an FTP Home Directory Provider that is based on the Remote Client IP Address
02 November 2011 • by Bob • FTP, IIS
I recently had an interesting scenario that was presented to me by a customer: they had a business requirement where they needed to give the same username and password to a group of people, but they didn't want any two people to be able to see anyone else's files. This seemed like an unusual business requirement to me; the whole point of keeping users separate is one of the reasons why we added user isolation to the FTP service.
With that in mind, my first suggestion was - of course - to rethink their business requirement, assign different usernames and passwords to everyone, and use FTP user isolation. But that wasn't going to work for them; their business requirement for giving out the same username and password could not be avoided. So I said that I would get back to them, and I spent the next few days experimenting with a few ideas.
One of my early ideas that seemed somewhat promising was to write a custom home directory provider that dynamically created unique home directories that were based on the session IDs for the individual FTP sessions, and the provider would use those directories to isolate the users. That seemed like a good idea, but when I analyzed the results I quickly saw that it wasn't going to work; as each user logged in, they would get a new session ID, and they wouldn't see their files from their last session. On top of that, the FTP server would rapidly start to collect a large number of session-based directories, with no garbage collection. So it was back to the drawing board for me.
After some discussions with the customer, we reasoned that the best suggestion for their particular environment was to leverage some of the code that I had written for my session-based home directory provider in order to create home directory provider that dynamically created home directories that are based on the remote IP of the FTP client.
I have to stress, however, that this solution will not work in all situations. For example:
- If multiple FTP clients are accessing your FTP server through the same firewall, their remote IP might appear to be the same.
- If an FTP client is moving between geographic locations, such as traveling with a laptop, then the remote IP address will change, and the client will not see their files from their previous session.
That being said, the customer felt that those limitations were acceptable for their environment, so I created a home directory provider that dynamically created home directories that were based on the remote IP address of their FTP clients. I agree that it's not a perfect solution, but their business requirement made this scenario considerably difficult to work around.
Note: I wrote and tested the steps in this blog using both
In This Blog
- Step 1: Set up the Project Environment
- Step 2: Create the Extensibility Class
- Step 3: Add the Demo Provider to FTP
- Summary
Prerequisites
The following items are required to complete the procedures in this blog:
- The following version of IIS must be installed on your Windows computer, and the Internet Information Services (IIS) Manager must also be installed:
- IIS 7.0 must be installed on Windows Server 2008
- IIS 7.5 must be installed on Windows Server 2008 R2 or Windows 7
- The new FTP 7.5 service must be installed. To install FTP 7.5, follow the instructions in the following topic:
- You must have FTP publishing enabled for a site. To create a new FTP site, follow the instructions in the following topic:
- Set the content permissions to allow access for the COM+ process identity that handles extensibility:
- Open a command prompt.
- Type the following command:
ICACLS "%SystemDrive%\inetpub\ftproot" /Grant "Network Service":M /T
Where "%SystemDrive%\inetpub\ftproot" is the home directory for your FTP site. - Close the command prompt.
Step 1: Set up the Project Environment
In this step, you will create a project in
- Open Visual Studio 2008 or Visual Studio 2010.
- Click the File menu, then New, then Project.
- In the New Projectdialog box:
- Choose Visual C# as the project type.
- Choose Class Library as the template.
- Type FtpRemoteIPHomeDirectory as the name of the project.
- Click OK.
- When the project opens, add a reference path to the FTP extensibility library:
- Click Project, and then click FtpRemoteIPHomeDirectory Properties.
- Click the Reference Paths tab.
- Enter the path to the FTP extensibility assembly for your version of Windows, where C: is your operating system drive.
- For Windows Server 2008 and Windows Vista:
- C:\Windows\assembly\GAC_MSIL\Microsoft.Web.FtpServer\7.5.0.0__31bf3856ad364e35
- For 32-bit Windows 7 and Windows Server 2008 R2:
- C:\Program Files\Reference Assemblies\Microsoft\IIS
- For 64-bit Windows 7 and Windows Server 2008 R2:
- C:\Program Files (x86)\Reference Assemblies\Microsoft\IIS
- For Windows Server 2008 and Windows Vista:
- Click Add Folder.
- Add a strong name key to the project:
- Click Project, and then click FtpRemoteIPHomeDirectory Properties.
- Click the Signing tab.
- Check the Sign the assembly check box.
- Choose <New...> from the strong key name drop-down box.
- Enter FtpRemoteIPHomeDirectoryKey for the key file name.
- If desired, enter a password for the key file; otherwise, clear the Protect my key file with a password check box.
- Click OK.
- Note: FTP 7.5 Extensibility does not support the .NET Framework 4.0; if you are using Visual Studio 2010, or you have changed your default framework version, you may need to change the framework version for this project. To do so, use the following steps:
- Click Project, and then click FtpRemoteIPHomeDirectory Properties.
- Click the Application tab.
- Choose .NET Framework 3.5 in the Target framework drop-down menu.
- Save, close, and re-open the project.
- Optional: You can add a custom build event to add the DLL automatically to the Global Assembly Cache (GAC) on your development computer:
- Click Project, and then click FtpRemoteIPHomeDirectory Properties.
- Click the Build Events tab.
- Enter the appropriate commands in the Post-build event command linedialog box, depending on your version of Visual Studio:
- If you are using Visual Studio 2010:
net stop ftpsvc
call "%VS100COMNTOOLS%\vsvars32.bat">null
gacutil.exe /if "$(TargetPath)"
net start ftpsvc - If you are using Visual Studio 2008:
net stop ftpsvc
call "%VS90COMNTOOLS%\vsvars32.bat">null
gacutil.exe /if "$(TargetPath)"
net start ftpsvc
- If you are using Visual Studio 2010:
- Save the project.
Step 2: Create the Extensibility Class
In this step, you will implement the extensibility interfaces for the demo provider.
- Add the necessary references to the project:
- Click Project, and then click Add Reference...
- On the .NET tab, click Microsoft.Web.FtpServer.
- Click OK.
- Add the code for the authentication class:
- In Solution Explorer, double-click the Class1.cs file.
- Remove the existing code.
- Paste the following code into the editor:
using System;
using System.Collections.Generic;
using System.Collections.Specialized;
using System.IO;
using Microsoft.Web.FtpServer;

public class FtpRemoteIPHomeDirectory :
    BaseProvider,
    IFtpHomeDirectoryProvider,
    IFtpLogProvider
{
    // Create a dictionary object that will contain
    // session IDs and remote IP addresses.
    private static Dictionary<string, string> _sessionList = null;

    // Store the path to the default FTP folder.
    private static string _defaultDirectory = string.Empty;

    // Override the default initialization method.
    protected override void Initialize(StringDictionary config)
    {
        // Test if the session dictionary has been created.
        if (_sessionList == null)
        {
            // Create the session dictionary.
            _sessionList = new Dictionary<string, string>();
        }
        // Retrieve the default directory path from configuration.
        _defaultDirectory = config["defaultDirectory"];
        // Test for the default home directory (Required).
        if (string.IsNullOrEmpty(_defaultDirectory))
        {
            throw new ArgumentException(
              "Missing default directory path in configuration.");
        }
    }

    // Define the home directory provider method.
    string IFtpHomeDirectoryProvider.GetUserHomeDirectoryData(
        string sessionId,
        string siteName,
        string userName)
    {
        // Create a string with the folder name.
        string _sessionDirectory = String.Format(
            @"{0}\{1}", _defaultDirectory,
            _sessionList[sessionId]);
        try
        {
            // Test if the folder already exists.
            if (!Directory.Exists(_sessionDirectory))
            {
                // Create the physical folder. Note: NETWORK SERVICE
                // needs write permissions to the default folder in
                // order to create each remote IP's home directory.
                Directory.CreateDirectory(_sessionDirectory);
            }
        }
        catch (Exception ex)
        {
            throw ex;
        }
        // Return the path to the session folder.
        return _sessionDirectory;
    }
    // Define the log provider method.
    public void Log(FtpLogEntry logEntry)
    {
        // Test if the USER command was entered.
        if (logEntry.Command.Equals(
            "USER",
            StringComparison.InvariantCultureIgnoreCase))
        {
            // Reformat the remote IP address.
            string _remoteIp = logEntry.RemoteIPAddress
                .Replace(':', '-')
                .Replace('.', '-');
            // Add the remote IP address to the session dictionary.
            _sessionList.Add(logEntry.SessionId, _remoteIp);
        }
        // Test if the command channel was closed (end of session).
        if (logEntry.Command.Equals(
            "CommandChannelClosed",
            StringComparison.InvariantCultureIgnoreCase))
        {
            // Remove the closed session from the dictionary.
            _sessionList.Remove(logEntry.SessionId);
        }
    }
}
- Save and compile the project.
Note: If you did not use the optional steps to register the assemblies in the GAC, you will need to manually copy the assemblies to your IIS 7 computer and add the assemblies to the GAC using the Gacutil.exe tool. For more information, see the following topic on the Microsoft MSDN Web site:
Step 3: Add the Demo Provider to FTP
In this step, you will add your provider to the global list of custom providers for your FTP service, configure your provider's settings, and enable your provider for an FTP site.
Adding your Provider to FTP
- Determine the assembly information for your extensibility provider:
- In Windows Explorer, open your "C:\Windows\assembly" path, where C: is your operating system drive.
- Locate the FtpRemoteIPHomeDirectory assembly.
- Right-click the assembly, and then click Properties.
- Copy the Culture value; for example: Neutral.
- Copy the Version number; for example: 1.0.0.0.
- Copy the Public Key Token value; for example: 426f62526f636b73.
- Click Cancel.
- Add the extensibility provider to the global list of FTP authentication providers:
- Open the Internet Information Services (IIS) Manager.
- Click your computer name in the Connections pane.
- Double-click FTP Authentication in the main window.
- Click Custom Providers... in the Actions pane.
- Click Register.
- Enter FtpRemoteIPHomeDirectory for the provider Name.
- Click Managed Provider (.NET).
- Enter the assembly information for the extensibility provider using the information that you copied earlier. For example:
FtpRemoteIPHomeDirectory,FtpRemoteIPHomeDirectory,version=1.0.0.0,Culture=neutral,PublicKeyToken=426f62526f636b73 - Click OK.
- Clear the FtpRemoteIPHomeDirectory check box in the providers list.
- Click OK.
Note: If you prefer, you could use the command line to add the provider to FTP by using syntax like the following example:
cd %SystemRoot%\System32\Inetsrv

 appcmd.exe set config -section:system.ftpServer/providerDefinitions /+"[name='FtpRemoteIPHomeDirectory',type='FtpRemoteIPHomeDirectory,FtpRemoteIPHomeDirectory,version=1.0.0.0,Culture=neutral,PublicKeyToken=426f62526f636b73']" /commit:apphost
Configuring your Provider's Settings
At the moment there is no user interface that allows you to configure properties for a custom home directory provider, so you will have to use the following command line:
cd %SystemRoot%\System32\Inetsrv

 appcmd.exe set config -section:system.ftpServer/providerDefinitions /+"activation.[name='FtpRemoteIPHomeDirectory']" /commit:apphost

 appcmd.exe set config -section:system.ftpServer/providerDefinitions /+"activation.[name='FtpRemoteIPHomeDirectory'].[key='defaultDirectory',value='C:\Inetpub\ftproot']" /commit:apphost
Note: The highlighted area contains the value that you need to update with the root directory of your FTP site.
Enabling your Provider for an FTP site
At the moment there is no user interface that allows you to enable a custom home directory provider for an FTP site, so you will have to use the following command line:
cd %SystemRoot%\System32\Inetsrv

 appcmd.exe set config -section:system.applicationHost/sites /+"[name='My FTP Site'].ftpServer.customFeatures.providers.[name='FtpRemoteIPHomeDirectory']" /commit:apphost

 appcmd.exe set config -section:system.applicationHost/sites /"[name='My FTP Site'].ftpServer.userIsolation.mode:Custom" /commit:apphost
Note: The highlighted areas contain the name of the FTP site where you want to enable the custom home directory provider.
Summary
In this blog I showed you how to:
- Create a project in Visual Studio 2010 or Visual Studio 2008 for a custom FTP home directory provider.
- Implement the extensibility interface for custom FTP home directories.
- Add a custom home directory provider to your FTP service.
When users connect to your FTP site, the FTP service will create a directory that is based on their remote IP address, and it will drop their session in the corresponding folder for their remote IP address. They will not be able to change to the root directory, or a directory for a different remote IP address.
For example, if the root directory for your FTP site is "C:\Inetpub\ftproot" and a client connects to your FTP site from 192.168.0.100, the FTP home directory provider will create a folder that is named "C:\Inetpub\ftproot\192-168-0-100", and the FTP client's sessions will be isolated in that directory; the FTP client will not be able to change directory to "C:\Inetpub\ftproot" or the home directory for another remote IP.
Once again, there are limitations to this approach, and I agree that it's not a perfect solution in all scenarios; but this provider works as expected when you have to use the same username and password for all of your FTP clients, and you know that your FTP clients will use unique remote IP addresses.
Note: This blog was originally posted at http://blogs.msdn.com/robert_mcmurray/
How to Use Managed Code (C#) to Create an FTP Home Directory Provider for the Days of the Week
29 September 2011 • by Bob • FTP, Extensibility
I had a question from someone that had an interesting scenario: they had a series of reports that their manufacturing company generates on a daily basis, and they wanted to automate uploading those files over FTP from their factory to their headquarters. Their existing automation created report files with names like Widgets.log, Sprockets.log, Gadgets.log, etc.
But they had an additional request: they wanted the reports dropped into folders based on the day of the week. People in their headquarters could retrieve the reports from a share on their headquarters network where the FTP server would drop the files, and anyone could look at data from anytime within the past seven days.
This seemed like an extremely trivial script for me to write, so I threw together the following example batch file for them:
@echo off
pushd "C:\Reports"
for /f "usebackq delims= " %%a in (`date /t`) do (
  echo open MyServerName>ftpscript.txt
  echo MyUsername>>ftpscript.txt
  echo MyPassword>>ftpscript.txt
  echo mkdir %%a>>ftpscript.txt
  echo cd %%a>>ftpscript.txt
  echo asc>>ftpscript.txt
  echo prompt>>ftpscript.txt
  echo mput *.log>>ftpscript.txt
  echo bye>>ftpscript.txt
)
ftp.exe -s:ftpscript.txt
del ftpscript.txt
popd
This would have worked great for most scenarios, but they pointed out a few problems in their specific environment: manufacturing and headquarters were in different geographical regions of the world, therefore in different time zones, and they wanted the day of the week to be based on the day of the week where their headquarters was located. They also wanted to make sure that if anyone logged in over FTP, they would only see the reports for the current day, and they didn't want to take a chance that something might go wrong with the batch file and they might overwrite the logs from the wrong day.
With all of those requirements in mind, this was beginning to look like a problem for a custom home directory provider to tackle. Fortunately, this was a really easy home directory provider to write, and I thought that it might make a good blog.
Note: I wrote and tested the steps in this blog using both Visual Studio 2010 and Visual Studio 2008; if you use an different version of Visual Studio, some of the version-specific steps may need to be changed.
In This Blog
- Step 1: Set up the Project Environment
- Step 2: Create the Extensibility Class
- Step 3: Add the Demo Provider to FTP
- Summary
Prerequisites
The following items are required to complete the procedures in this blog:
- The following version of IIS must be installed on your Windows computer, and the Internet Information Services (IIS) Manager must also be installed:
- IIS 7.0 must be installed on Windows Server 2008
- IIS 7.5 must be installed on Windows Server 2008 R2 or Windows 7
- The new FTP 7.5 service must be installed. To install FTP 7.5, follow the instructions in the following topic:
- You must have FTP publishing enabled for a site. To create a new FTP site, follow the instructions in the following topic:
- You need to create the folders for the days of the week under your FTP root directory; for example, Sunday, Monday, Tuesday, etc.
Step 1: Set up the Project Environment
In this step, you will create a project in Microsoft Visual Studio for the demo provider.
- Open Visual Studio 2008 or Visual Studio 2010.
- Click the File menu, then New, then Project.
- In the New Projectdialog box:
- Choose Visual C# as the project type.
- Choose Class Library as the template.
- Type FtpDayOfWeekHomeDirectory as the name of the project.
- Click OK.
- When the project opens, add a reference path to the FTP extensibility library:
- Click Project, and then click FtpDayOfWeekHomeDirectory Properties.
- Click the Reference Paths tab.
- Enter the path to the FTP extensibility assembly for your version of Windows, where C: is your operating system drive.
- For Windows Server 2008 and Windows Vista:
- C:\Windows\assembly\GAC_MSIL\Microsoft.Web.FtpServer\7.5.0.0__31bf3856ad364e35
- For 32-bit Windows 7 and Windows Server 2008 R2:
- C:\Program Files\Reference Assemblies\Microsoft\IIS
- For 64-bit Windows 7 and Windows Server 2008 R2:
- C:\Program Files (x86)\Reference Assemblies\Microsoft\IIS
- For Windows Server 2008 and Windows Vista:
- Click Add Folder.
- Add a strong name key to the project:
- Click Project, and then click FtpDayOfWeekHomeDirectory Properties.
- Click the Signing tab.
- Check the Sign the assembly check box.
- Choose <New...> from the strong key name drop-down box.
- Enter FtpDayOfWeekHomeDirectoryKey for the key file name.
- If desired, enter a password for the key file; otherwise, clear the Protect my key file with a password check box.
- Click OK.
- Note: FTP 7.5 Extensibility does not support the .NET Framework 4.0; if you are using Visual Studio 2010, or you have changed your default framework version, you may need to change the framework version for this project. To do so, use the following steps:
- Click Project, and then click FtpDayOfWeekHomeDirectory Properties.
- Click the Application tab.
- Choose .NET Framework 3.5 in the Target framework drop-down menu.
- Save, close, and re-open the project.
- Optional: You can add a custom build event to add the DLL automatically to the Global Assembly Cache (GAC) on your development computer:
- Click Project, and then click FtpDayOfWeekHomeDirectory Properties.
- Click the Build Events tab.
- Enter the appropriate commands in the Post-build event command linedialog box, depending on your version of Visual Studio:
- If you are using Visual Studio 2010:
net stop ftpsvc
call "%VS100COMNTOOLS%\vsvars32.bat">null
gacutil.exe /if "$(TargetPath)"
net start ftpsvc - If you are using Visual Studio 2008:
net stop ftpsvc
call "%VS90COMNTOOLS%\vsvars32.bat">null
gacutil.exe /if "$(TargetPath)"
net start ftpsvc
- If you are using Visual Studio 2010:
- Save the project.
Step 2: Create the Extensibility Class
In this step, you will implement the extensibility interfaces for the demo provider.
- Add the necessary references to the project:
- Click Project, and then click Add Reference...
- On the .NET tab, click Microsoft.Web.FtpServer.
- Click OK.
- Add the code for the authentication class:
- In Solution Explorer, double-click the Class1.cs file.
- Remove the existing code.
- Paste the following code into the editor:
using System;
using System.Collections.Generic;
using System.Collections.Specialized;
using Microsoft.Web.FtpServer;

public class FtpDayOfWeekHomeDirectory :
    BaseProvider,
    IFtpHomeDirectoryProvider
{
    // Store the path to the default FTP folder.
    private static string _defaultDirectory = string.Empty;

    // Override the default initialization method.
    protected override void Initialize(StringDictionary config)
    {
        // Retrieve the default directory path from configuration.
        _defaultDirectory = config["defaultDirectory"];
        // Test for the default home directory (Required).
        if (string.IsNullOrEmpty(_defaultDirectory))
        {
            throw new ArgumentException(
              "Missing default directory path in configuration.");
        }
    }

    // Define the home directory provider method.
    string IFtpHomeDirectoryProvider.GetUserHomeDirectoryData(
        string sessionId,
        string siteName,
        string userName)
    {
        // Return the path to the folder for the day of the week.
        return String.Format(
            @"{0}\{1}",
            _defaultDirectory,
            DateTime.Today.DayOfWeek);
    }
}
- Save and compile the project.
Note: If you did not use the optional steps to register the assemblies in the GAC, you will need to manually copy the assemblies to your IIS 7 computer and add the assemblies to the GAC using the Gacutil.exe tool. For more information, see the following topic on the Microsoft MSDN Web site:
Step 3: Add the Demo Provider to FTP
In this step, you will add your provider to the global list of custom providers for your FTP service, configure your provider's settings, and enable your provider for an FTP site.
Adding your Provider to FTP
- Determine the assembly information for your extensibility provider:
- In Windows Explorer, open your "C:\Windows\assembly" path, where C: is your operating system drive.
- Locate the FtpDayOfWeekHomeDirectory assembly.
- Right-click the assembly, and then click Properties.
- Copy the Culture value; for example: Neutral.
- Copy the Version number; for example: 1.0.0.0.
- Copy the Public Key Token value; for example: 426f62526f636b73.
- Click Cancel.
- Add the extensibility provider to the global list of FTP authentication providers:
- Open the Internet Information Services (IIS) Manager.
- Click your computer name in the Connections pane.
- Double-click FTP Authentication in the main window.
- Click Custom Providers... in the Actions pane.
- Click Register.
- Enter FtpDayOfWeekHomeDirectory for the provider Name.
- Click Managed Provider (.NET).
- Enter the assembly information for the extensibility provider using the information that you copied earlier. For example:
FtpDayOfWeekHomeDirectory,FtpDayOfWeekHomeDirectory,version=1.0.0.0,Culture=neutral,PublicKeyToken=426f62526f636b73 - Click OK.
- Clear the FtpDayOfWeekHomeDirectory check box in the providers list.
- Click OK.
Note: If you prefer, you could use the command line to add the provider to FTP by using syntax like the following example:
cd %SystemRoot%\System32\Inetsrv

appcmd.exe set config -section:system.ftpServer/providerDefinitions /+"[name='FtpDayOfWeekHomeDirectory',type='FtpDayOfWeekHomeDirectory,FtpDayOfWeekHomeDirectory,version=1.0.0.0,Culture=neutral,PublicKeyToken=426f62526f636b73']" /commit:apphost
Configuring your Provider's Settings
At the moment there is no user interface that allows you to configure properties for a custom home directory provider, so you will have to use the following command line:
cd %SystemRoot%\System32\Inetsrv

appcmd.exe set config -section:system.ftpServer/providerDefinitions /+"activation.[name='FtpDayOfWeekHomeDirectory']" /commit:apphost

appcmd.exe set config -section:system.ftpServer/providerDefinitions /+"activation.[name='FtpDayOfWeekHomeDirectory'].[key='defaultDirectory',value='C:\Inetpub\ftproot']" /commit:apphost
Note: The highlighted area contains the value that you need to update with the root directory of your FTP site.
Enabling your Provider for an FTP site
At the moment there is no user interface that allows you to enable a custom home directory provider for an FTP site, so you will have to use the following command line:
cd %SystemRoot%\System32\Inetsrv

appcmd.exe set config -section:system.applicationHost/sites /+"[name='My FTP Site'].ftpServer.customFeatures.providers.[name='FtpDayOfWeekHomeDirectory']" /commit:apphost

appcmd.exe set config -section:system.applicationHost/sites /"[name='My FTP Site'].ftpServer.userIsolation.mode:Custom" /commit:apphost
Note: The highlighted areas contain the name of the FTP site where you want to enable the custom home directory provider.
Summary
In this blog I showed you how to:
- Create a project in Visual Studio 2010 or Visual Studio 2008 for a custom FTP home directory provider.
- Implement the extensibility interface for custom FTP home directories.
- Add a custom home directory provider to your FTP service.
When users connect to your FTP site, the FTP service will drop their session in the corresponding folder for the day of the week under the home directory for your FTP site, and they will not be able to change to the root directory or a directory for a different day of the week.
Note: This blog was originally posted at http://blogs.msdn.com/robert_mcmurray/
FTP and LDAP - Part 1: How to Use Managed Code (C#) to Create an FTP Authentication Provider that uses an LDAP Server
16 September 2011 • by Bob • FTP, Extensibility
Over the past few years I've created a series of authentication providers for the FTP 7.5 service that ships with Windows Server 2008 R2 and Windows 7, and is available for download for Windows Server 2008. Some of these authentication providers are available on the http://learn.iis.net/page.aspx/590/developing-for-ftp-75/ website, while others have been in my blog posts.
With that in mind, I had a question a little while ago about using an LDAP server to authenticate users for the FTP service, and it seemed like that would make a great subject for another custom FTP authentication provider blog post.
The steps in this blog will lead you through the steps to use managed code to create an FTP authentication provider that uses a server running Active Directory Lightweight Directory Services (AD LDS) that is located on your local network.
Note: I wrote and tested the steps in this blog using both Visual Studio 2010 and Visual Studio 2008; if you use an different version of Visual Studio, some of the version-specific steps may need to be changed.
In This Blog
- Step 1: Set up the Project Environment
- Step 2: Create the Extensibility Class
- Step 3: Add the Demo Provider to FTP
- Summary
Prerequisites
The following items are required to complete the procedures in this blog:
- The following version of IIS must be installed on your Windows computer, and the Internet Information Services (IIS) Manager must also be installed:
- IIS 7.0 must be installed on Windows Server 2008
- IIS 7.5 must be installed on Windows Server 2008 R2 or Windows 7
- The new FTP 7.5 service must be installed. To install FTP 7.5, follow the instructions in the following topic:
- You must have FTP publishing enabled for a site. To create a new FTP site, follow the instructions in the following topic:
- You must have an AD LDS server available on your local network. Note: See my How to Set Up an Active Directory Lightweight Directory Services (AD LDS) Server blog post for more information.
Note: To test this blog, I used AD LDS on Windows Server 2008; if you use a different LDAP server, you may need to change some of the LDAP syntax in the code samples. To get started using AD LDS, see the following topics:
- AD LDS Getting Started Step-by-Step Guide
http://technet.microsoft.com/en-us/library/cc770639.aspx - Create a New AD LDS Instance
http://technet.microsoft.com/en-us/library/cc816778.aspx
I tested this blog by using the user objects from both the MS-User.LDF and MS-InetOrgPerson.LDF Lightweight Directory interchange Format (LDIF) files.
Important
To help improve the performance for authentication requests, the FTP service caches the credentials for successful logins for 15 minutes by default. This means that if you change the password in your AD LDS server, this change may not be reflected for the cache duration. To alleviate this, you can disable credential caching for the FTP service. To do so, use the following steps:
- Open a command prompt.
- Type the following commands:
cd /d "%SystemRoot%\System32\Inetsrv"
Appcmd.exe set config -section:system.ftpServer/caching /credentialsCache.enabled:"False" /commit:apphost
Net stop FTPSVC
Net start FTPSVC
- Close the command prompt.
Step 1: Set up the Project Environment
In this step, you will create a project in Visual Studio 2008 for the demo provider.
- Open Microsoft Visual Studio 2008.
- Click the File menu, then New, then Project.
- In the New Projectdialog box:
- Choose Visual C# as the project type.
- Choose Class Library as the template.
- Type FtpLdapAuthentication as the name of the project.
- Click OK.
- When the project opens, add a reference path to the FTP extensibility library:
- Click Project, and then click FtpLdapAuthentication Properties.
- Click the Reference Paths tab.
- Enter the path to the FTP extensibility assembly for your version of Windows, where C: is your operating system drive.
- For Windows Server 2008 and Windows Vista:
- C:\Windows\assembly\GAC_MSIL\Microsoft.Web.FtpServer\7.5.0.0__31bf3856ad364e35
- For 32-bit Windows 7 and Windows Server 2008 R2:
- C:\Program Files\Reference Assemblies\Microsoft\IIS
- For 64-bit Windows 7 and Windows Server 2008 R2:
- C:\Program Files (x86)\Reference Assemblies\Microsoft\IIS
- For Windows Server 2008 and Windows Vista:
- Click Add Folder.
- Add a strong name key to the project:
- Click Project, and then click FtpLdapAuthentication Properties.
- Click the Signing tab.
- Check the Sign the assembly check box.
- Choose <New...> from the strong key name drop-down box.
- Enter FtpLdapAuthenticationKey for the key file name.
- If desired, enter a password for the key file; otherwise, clear the Protect my key file with a password check box.
- Click OK.
- Note: FTP 7.5 Extensibility does not support the .NET Framework 4.0; if you are using Visual Studio 2010, or you have changed your default framework version, you may need to change the framework version. To do so, use the following steps:
- Click Project, and then click FtpLdapAuthentication Properties.
- Click the Application tab.
- Choose .NET Framework 3.5 in the Target framework drop-down menu.
- Save, close, and re-open the project.
- Optional: You can add a custom build event to add the DLL automatically to the Global Assembly Cache (GAC) on your development computer:
- Click Project, and then click FtpLdapAuthentication Properties.
- Click the Build Events tab.
- Enter the appropriate commands in the Post-build event command linedialog box, depending on your version of Visual Studio:
- If you are using Visual Studio 2010:
net stop ftpsvc
call "%VS100COMNTOOLS%\vsvars32.bat">null
gacutil.exe /if "$(TargetPath)"
net start ftpsvc - If you are using Visual Studio 2008:
net stop ftpsvc
call "%VS90COMNTOOLS%\vsvars32.bat">null
gacutil.exe /if "$(TargetPath)"
net start ftpsvc
- If you are using Visual Studio 2010:
- Save the project.
Step 2: Create the Extensibility Class
In this step, you will implement the authentication and role extensibility interfaces for the demo provider.
- Add the necessary references to the project:
- Click Project, and then click Add Reference...
- On the .NET tab, click Microsoft.Web.FtpServer.
- Click OK.
- Repeat the above steps to add the following references to the project:
- System.Configuration
- System.DirectoryServices
- System.DirectoryServices.AccountManagement
- Add the code for the authentication class:
- In Solution Explorer, double-click the Class1.cs file.
- Remove the existing code.
- Paste the following code into the editor:
using System;
using System.Collections.Specialized;
using System.Configuration.Provider;
using System.DirectoryServices;
using System.DirectoryServices.AccountManagement;
using Microsoft.Web.FtpServer;

public class FtpLdapAuthentication :
  BaseProvider,
  IFtpAuthenticationProvider,
  IFtpRoleProvider
{
  private static string _ldapServer = string.Empty;
  private static string _ldapPartition = string.Empty;
  private static string _ldapAdminUsername = string.Empty;
  private static string _ldapAdminPassword = string.Empty;

  // Override the default initialization method.
  protected override void Initialize(StringDictionary config)
  {
    // Retrieve the provider settings from configuration.
    _ldapServer = config["ldapServer"];
    _ldapPartition = config["ldapPartition"];
    _ldapAdminUsername = config["ldapAdminUsername"];
    _ldapAdminPassword = config["ldapAdminPassword"];

    // Test for the LDAP server name (Required).
    if (string.IsNullOrEmpty(_ldapServer) || string.IsNullOrEmpty(_ldapPartition))
    {
      throw new ArgumentException(
        "Missing LDAP server values in configuration.");
    }
  }

  public bool AuthenticateUser(
    string sessionId,
    string siteName,
    string userName,
    string userPassword,
    out string canonicalUserName)
  {
    canonicalUserName = userName;
    // Attempt to look up the user and password.
    return LookupUser(true, userName, string.Empty, userPassword);
  }

  public bool IsUserInRole(
    string sessionId,
    string siteName,
    string userName,
    string userRole)
  {
    // Attempt to look up the user and role.
    return LookupUser(false, userName, userRole, string.Empty);
  }

  private static bool LookupUser(
    bool isUserLookup,
    string userName,
    string userRole,
    string userPassword)
  {
    PrincipalContext _ldapPrincipalContext = null;
    DirectoryEntry _ldapDirectoryEntry = null;

    try
    {
      // Create the context object using the LDAP connection information.
      _ldapPrincipalContext = new PrincipalContext(
        ContextType.ApplicationDirectory,
        _ldapServer,

        _ldapPartition,
        ContextOptions.SimpleBind,
        _ldapAdminUsername,
        _ldapAdminPassword);

      // Test for LDAP credentials.
      if (string.IsNullOrEmpty(_ldapAdminUsername) || string.IsNullOrEmpty(_ldapAdminPassword))
      {
        // If LDAP credentials do not exist, attempt to create an unauthenticated directory entry object.
        _ldapDirectoryEntry = new DirectoryEntry("LDAP://" + _ldapServer + "/" + _ldapPartition);
      }
      else
      {
        // If LDAP credentials exist, attempt to create an authenticated directory entry object.
        _ldapDirectoryEntry = new DirectoryEntry("LDAP://" + _ldapServer + "/" + _ldapPartition,
          _ldapAdminUsername, _ldapAdminPassword, AuthenticationTypes.Secure);
      }

      // Create a DirectorySearcher object from the cached DirectoryEntry object.
      DirectorySearcher userSearcher = new DirectorySearcher(_ldapDirectoryEntry);
      // Specify the the directory searcher to filter by the user name.
      userSearcher.Filter = String.Format("(&(objectClass=user)(cn={0}))", userName);
      // Specify the search scope.
      userSearcher.SearchScope = SearchScope.Subtree;
      // Specify the directory properties to load.
      userSearcher.PropertiesToLoad.Add("distinguishedName");
      // Specify the search timeout.
      userSearcher.ServerTimeLimit = new TimeSpan(0, 1, 0);
      // Retrieve a single search result.
      SearchResult userResult = userSearcher.FindOne();
      // Test if no result was found.
      if (userResult == null)
      {
        // Return false if no matching user was found.
        return false;
      }
      else
      {
        if (isUserLookup == true)
        {
          try
          {
            // Attempt to validate credentials using the username and password.
            return _ldapPrincipalContext.ValidateCredentials(userName, userPassword, ContextOptions.SimpleBind);
          }
          catch (Exception ex)
          {
            // Throw an exception if an error occurs.
            throw new ProviderException(ex.Message);
          }
        }
        else
        {
          // Retrieve the distinguishedName for the user account.
          string distinguishedName = userResult.Properties["distinguishedName"][0].ToString();

          // Create a DirectorySearcher object from the cached DirectoryEntry object.
          DirectorySearcher groupSearcher = new DirectorySearcher(_ldapDirectoryEntry);
          // Specify the the directory searcher to filter by the group/role name.
          groupSearcher.Filter = String.Format("(&(objectClass=group)(cn={0}))", userRole);
          // Specify the search scope.
          groupSearcher.SearchScope = SearchScope.Subtree;
          // Specify the directory properties to load.
          groupSearcher.PropertiesToLoad.Add("member");
          // Specify the search timeout.
          groupSearcher.ServerTimeLimit = new TimeSpan(0, 1, 0);
          // Retrieve a single search result.
          SearchResult groupResult = groupSearcher.FindOne();

          // Loop through the member collection.
          for (int i = 0; i < groupResult.Properties["member"].Count; ++i)
          {
            string member = groupResult.Properties["member"][i].ToString();
            // Test if the current member contains the user's distinguished name.
            if (member.IndexOf(distinguishedName, StringComparison.OrdinalIgnoreCase) > -1)
            {
              // Return true (role lookup succeeded) if the user is found.
              return true;
            }
          }
          // Return false (role lookup failed) if the user is not found for the role.
          return false;
        }
      }
    }
    catch (Exception ex)
    {
      // Throw an exception if an error occurs.
      throw new ProviderException(ex.Message);
    }
  }
}
- Save and compile the project.
Note: If you did not use the optional steps to register the assemblies in the GAC, you will need to manually copy the assemblies to your IIS 7 computer and add the assemblies to the GAC using the Gacutil.exe tool. For more information, see the following topic on the Microsoft MSDN Web site:
Step 3: Add the Demo Provider to FTP
In this step, you will add your provider to the list of providers for your FTP service, configure your provider for your LDAP server, and enable your provider to authenticate users for an FTP site.
Adding your Provider to FTP
- Determine the assembly information for your extensibility provider:
- In Windows Explorer, open your "C:\Windows\assembly" path, where C: is your operating system drive.
- Locate the FtpLdapAuthentication assembly.
- Right-click the assembly, and then click Properties.
- Copy the Culture value; for example: Neutral.
- Copy the Version number; for example: 1.0.0.0.
- Copy the Public Key Token value; for example: 426f62526f636b73.
- Click Cancel.
- Add the extensibility provider to the global list of FTP authentication providers:
- Open the Internet Information Services (IIS) Manager.
- Click your computer name in the Connections pane.
- Double-click FTP Authentication in the main window.
- Click Custom Providers... in the Actions pane.
- Click Register.
- Enter FtpLdapAuthentication for the provider Name.
- Click Managed Provider (.NET).
- Enter the assembly information for the extensibility provider using the information that you copied earlier. For example:
FtpLdapAuthentication,FtpLdapAuthentication,version=1.0.0.0,Culture=neutral,PublicKeyToken=426f62526f636b73 - Click OK.
- Clear the FtpLdapAuthentication check box in the providers list.
- Click OK.
Configuring your Provider's Settings
- Determine the connection information for your LDAP server; there are four pieces of information that you will need to know in order to configure the extensibility provider to talk to your LDAP server:
- Server Name and TCP/IP Port: This is the name (or IP address) of the server that is hosting your LDAP service; the port is usually 389. These will be added to your provider using the "SERVERNAME:PORT" syntax.
- LDAP Partition: This is the LDAP path within your LDAP service to your data, for example: "CN=ServerName,DC=DomainName,DC=DomainExtension."
- LDAP Username: This is a username that has access to your LDAP server; this is not the name of an account that you will use for FTP access, and it does not have to be a Windows account.
- LDAP Password: This is the password that is associated with the LDAP username.
- Using the information from the previous steps, configure the options for the provider:
- At the moment there is no user interface that enables you to add properties for a custom authentication module, so you will have to use the following command line. You will need to update the highlighted areas with the information from the previous steps and the information for your LDAP server:
cd %SystemRoot%\System32\Inetsrv

appcmd.exe set config -section:system.ftpServer/providerDefinitions /+"activation.[name='FtpLdapAuthentication']" /commit:apphost

appcmd.exe set config -section:system.ftpServer/providerDefinitions /+"activation.[name='FtpLdapAuthentication'].[key='ldapServer',value='MYSERVER:389']" /commit:apphost

appcmd.exe set config -section:system.ftpServer/providerDefinitions /+"activation.[name='FtpLdapAuthentication'].[key='ldapPartition',value='CN=MyServer,DC=MyDomain,DC=local']" /commit:apphost

appcmd.exe set config -section:system.ftpServer/providerDefinitions /+"activation.[name='FtpLdapAuthentication'].[key='ldapAdminUsername',encryptedValue='MyAdmin']" /commit:apphost

appcmd.exe set config -section:system.ftpServer/providerDefinitions /+"activation.[name='FtpLdapAuthentication'].[key='ldapAdminPassword',encryptedValue='MyPassword1']" /commit:apphost - Note: The highlighted areas are the values for the ldapServer, ldapPartition, ldapAdminUsername, and ldapAdminPassword settings, which configure your network environment for your LDAP server.
- At the moment there is no user interface that enables you to add properties for a custom authentication module, so you will have to use the following command line. You will need to update the highlighted areas with the information from the previous steps and the information for your LDAP server:
Enabling your Provider for an FTP site
- Add the custom authentication provider for an FTP site:
- Open an FTP site in the Internet Information Services (IIS) Manager.
- Double-click FTP Authentication in the main window.
- Click Custom Providers... in the Actions pane.
- Check FtpLdapAuthentication in the providers list.
- Click OK.
- Add an authorization rule for the authentication provider:
- Double-click FTP Authorization Rules in the main window.
- Click Add Allow Rule... in the Actions pane.
- You can add either of the following authorization rules:
- For a specific user:
- Select Specified users for the access option.
- Enter a user name that you created in your AD LDS partition.
- For a role or group:
- Select Specified roles or user groups for the access option.
- Enter the role or group name that you created in your AD LDS partition.
- Select Read and/or Write for the Permissions option.
- For a specific user:
- Click OK.
Summary
In this blog I showed you how to:
- Create a project in Visual Studio 2010 or Visual Studio 2008 for a custom FTP authentication provider.
- Implement the extensibility interface for custom FTP authentication.
- Add a custom authentication provider to your FTP service.
When users connect to your FTP site, the FTP service will attempt to authenticate users from your LDAP server by using your custom authentication provider.
Additional Information
The PrincipalContext.ValidateCredentials() method will validate the user name in the userName parameter with the value of the userPrincipalName attribute of the user object in AD LDS. Because of this, the userPrincipalName attribute for a user object is expected to match the name of the user account that an FTP client will use to log in, which will should be the same value as the cn attribute for the user object. Therefore, when you create a user object in AD LDS, you will need to set the corresponding userPrincipalName attribute for the user object. In addition, when you create a user object in AD LDS, the msDS-UserAccountDisabled attribute is set to TRUE by default, so you will need to change the value of that attribute to FALSE before you attempt to log in.
For more information, see my follow-up blog that is titled FTP and LDAP - Part 2: How to Set Up an Active Directory Lightweight Directory Services (AD LDS) Server.
Note: This blog was originally posted at http://blogs.msdn.com/robert_mcmurray/
Scripting MIDI Events in Sibelius
11 May 2007 • by Bob • Scripting, MIDI
OK - I have to admit, when you realize that you are making software choices based on scripting language support you start to get the feeling that there are times when you just have to accept the fact that you are a geek.
Here's a case in point: I write music as a hobby, and when shopping for a program to write sheet music with, I chose Sibelius because I discovered that they have a really cool scripting language called "ManuScript". OK - so the name is kind of silly, but it's pretty cool to write code with.
The way it works is that you create what Sibelius calls a "plug-in", and you assign it to a category that will be used as the menu under which your plug-in will be displayed. Once you've done all that, you can start writing code.
For example, I needed to add sustain pedal MIDI events to an entire piano score, and doing so manually would have been a tedious exercise. So I made my life easier and created a quick plug-in that adds the MIDI events to apply the sustain pedal at full level to the beginning of every measure, and then adds the MIDI events to lift the sustain pedal at the end of every measure:
// Verify that a score is open.
if (Sibelius.ScoreCount=0)
{
   Sibelius.MessageBox("Please open a score.");
   return false;
}

// Retrieve a score object for the active score.
score = Sibelius.ActiveScore;
// Retrieve an object for the current selection.
selection = score.Selection;

if (selection.IsPassage)
{
   // Loop through the highlighted measures.
   for each Bar b in selection
   {
      // Add MIDI sustain pedal events.
      b.AddText(1,"~C64,127",TechniqueTextStyle);
      b.AddText(b.Length,"~C64,0",TechniqueTextStyle);
   }

   // Return a status message.
   Sibelius.MessageBox("Finished.");
}
I should point out, however, that this is meant to be a brief example of what you can do. Running this same plug-in on the same selection will re-add the sustain pedal events to your score; I didn't add any advanced logic to check for the existence of any prior sustain pedal events. If anyone wants to take on that challenge, have fun and don't forget to share your results!