Troubleshooting Custom FTP Providers with ETW
28 August 2012 • by Bob • FTP, Extensibility
I recently received a question from a customer about troubleshooting custom FTP providers, and I recommended using the FTP service's Event Tracing for Windows (ETW) features in order to help troubleshoot the problem. I've helped a lot of customers use this little-known feature of the FTP service, so I thought that it would make a great subject for a quick blog.
By way of explanation, the FTP service in IIS 7.5 and IIS 8.0 allows developers to write their own custom functionality, and over the past several years I have written several walkthroughs and blogs that illustrate how you can create your own custom FTP providers:
- Custom Authentication Providers:
- How to Use Managed Code (C#) to Create a Simple FTP Authentication Provider
- How to Use Native Code (C++) to Create a Simple FTP Authentication Provider
- How to Use Managed Code (C#) to Create an FTP Authentication Provider using an XML Database
- How to Use Managed Code (C#) to Create an FTP Authentication and Authorization Provider using an XML Database
- How to Use Managed Code (C#) to Create an FTP Authentication Provider with Dynamic IP Restrictions
- FTP and LDAP - Part 1: How to Use Managed Code (C#) to Create an FTP Authentication Provider that uses an LDAP Server
- How to Create an Authentication Provider for FTP 7.5 using BlogEngine.NET's XML Membership Files
- Custom Home Directory Providers:
- How to Use Managed Code (C#) to Create a Simple FTP Home Directory Provider
- How to Use Managed Code (Visual Basic) to Create a Simple FTP Home Directory Provider
- How to Use Native Code (C++) to Create a Simple FTP Home Directory Provider
- How to use Managed Code (C#) to create an FTP Home Directory Provider that is based on the Remote Client IP Address
- How to Use Managed Code (C#) to Create an FTP Home Directory Provider for the Days of the Week
- Custom Logging Providers:
- Custom Functionality Providers:
That being said, sometimes things go wrong, and when that happens, I use some FTP ETW troubleshooting tricks that I'd like to share.
Setting up FTP ETW Tracing
Several years ago I wrote a blog about FTP and ETW Tracing, where I described how to turn on the FTP service's ETW tracing through a batch file, and then it used Log Parser to render the output in a datagrid for analysis. In the interests of completeness, here is the batch file again:
| @echo off rem====================================================================== echo Verifying that LogParser.exe is in the path... LogParser -h >nul 2>nul if errorlevel 1 ( echo. echo Error: echo. echo LogParser.exe is was not found. It is required for parsing traces. echo. echo Recommended actions: echo. echo - If LogParser is installed then fix the PATH echo variable to include the LogParser directory echo. echo - If LogParser is not installed, then install echo it from the following location: echo. echo http://www.microsoft.com/downloads/details.aspx?FamilyID=890cd06b-abf8-4c25-91b2-f8d975cf8c07 echo. goto :EOF ) else ( echo Done. echo. ) rem====================================================================== echo Starting the ETW session for full FTP tracing... logman start "ftp" -p "IIS: Ftp Server" 255 5 -ets echo. echo Now reproduce your problem. echo. echo After you have reproduced your issue, hit any key to close the FTP echo tracing session. Your trace events will be displayed automatically. echo. pause>nul rem====================================================================== echo. echo Closing the ETW session for full FTP tracing... logman stop "ftp" -ets rem====================================================================== echo. echo Parsing the results - this may take a long time depending on the size of the trace... LogParser "select EventTypeName, UserData from ftp.etl" -e 2 -o:DATAGRID -compactModeSep " | " -rtp 20 |
When you save and run this batch file, it will display something like the following:
C:\FTP_ETW.cmd Verifying that LogParser.exe is in the path... Done. Starting the ETW session for full FTP tracing... The command completed successfully. Now reproduce your problem. After you have reproduced your issue, hit any key to close the FTP tracing session. Your trace events will be displayed automatically. |
When you see this displayed, you will need to reproduce your problem, and FTP's ETW tracing will record the troubleshooting information.
Once you have reproduced your problem, hit a key to end the ETW session, and you will see the following message displayed:
Closing the ETW session for full FTP tracing... The command completed successfully. Parsing the results - this may take a long time depending on the size of the trace... |
The batch file will eventually call Log Parser to parse the ETW events, and a dialog like the following will be displayed:
Troubleshooting Custom FTP Providers with ETW Tracing
Now that you know how to set up FTP's ETW tracing, let's examine what you should be looking for in the tracing information.In all of the examples in this blog, I am using the XML-based authentication provider that is documented in the How to Use Managed Code (C#) to Create an FTP Authentication Provider using an XML Database walkthrough.
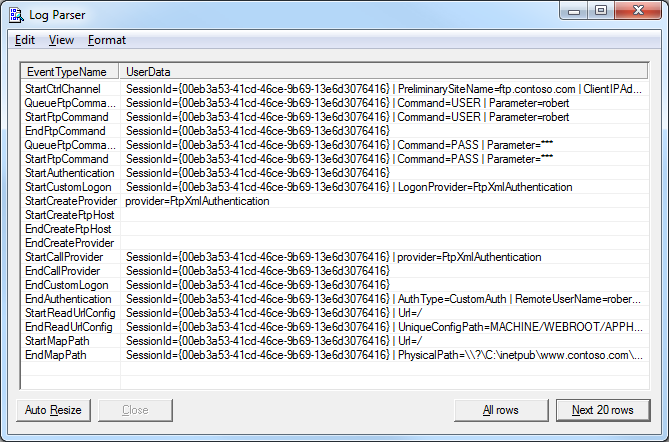
The following illustration highlights several lines that show the FTP service starting its authentication process, loading my custom authentication provider, and ending the authentication process after I have successfully logged in:

This example shows what everything looks like when it works as expected, so now let's look at what happens when something goes wrong.
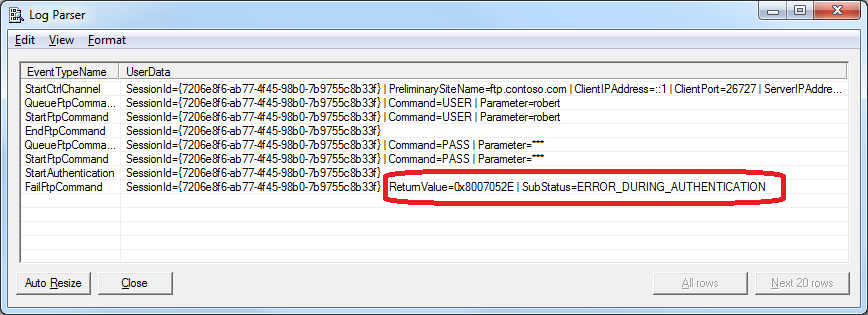
If I use the same provider, but I enter my username or password incorrectly, I will see the following lines in the trace:
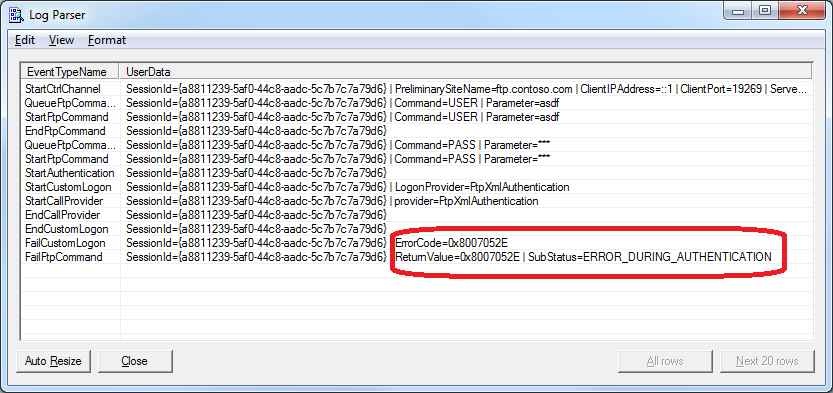
This example informs you that the provider was loaded successfully, but the logon failed. The error code that is returned is 0x8007052E - this hexadecimal 32-bit value can be split into 16-bit values:
- 8007 - This code informs you that this is a Win32 error.
- 052E - This code coverts to 1326 in decimal, and if you enter "NET HELPMSG 1326" from a command-prompt, that will tell you that the error was "
Logon failure: unknown user name or bad password."
If I continue to use the same provider as earlier, and I delete the XML file that my provider uses, then I will receive the following error:
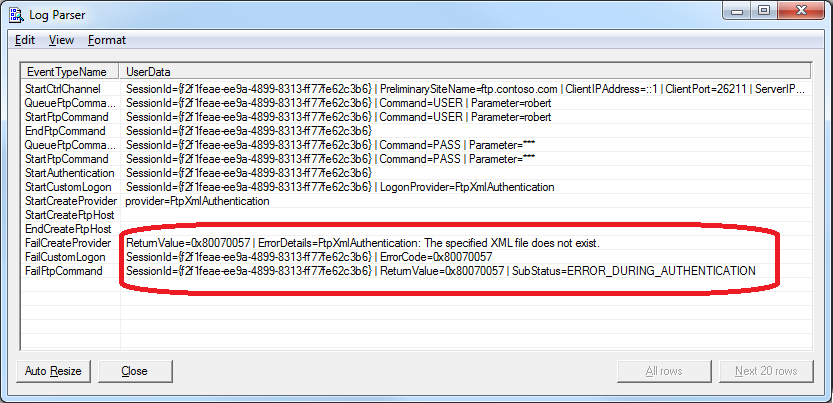
Once again, this example informs you that the provider was loaded successfully, but an error occurred. In this specific case you see the actual details that the XML file exists, and that is an error that is returned by a throw() statement in the provider. The error code that is returned is 0x80070057 - and once again this hexadecimal 32-bit value can be split into 16-bit values:
- 8007 - This code informs you that this is a Win32 error.
- 0057 - This code coverts to 87 in decimal, and if you enter "NET HELPMSG 87" from a command-prompt, that will tell you that the error was "
The parameter is incorrect."
If I replace the missing XML file for the provider, but I remove all of the permissions to the file, I get the following error:
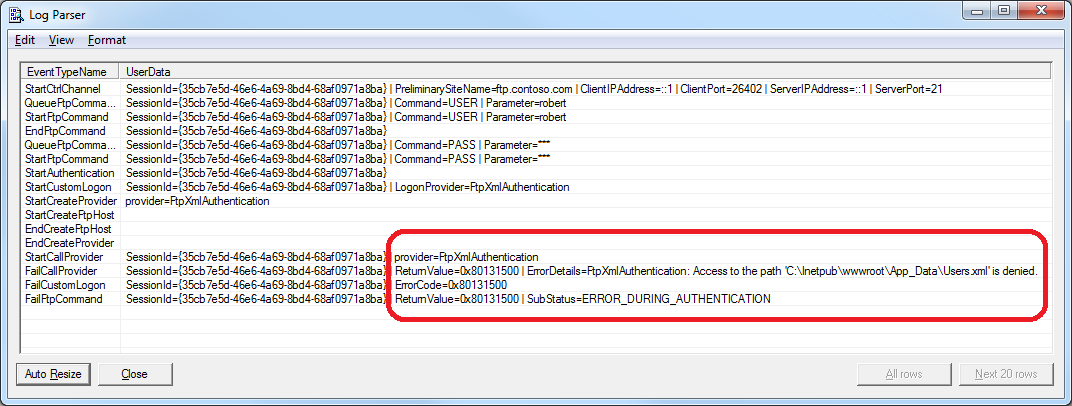
As in the previous examples, this informs you that the provider was loaded successfully, but an error occurred. You can't look up the 0x80131500 error code by using "NET HELPMSG" from a command-prompt, but that doesn't matter since the error description informs you of the problem - access to the path where the file is located was denied.
If I enter a bad provider name, I get the following error:

Unlike the previous examples, this informs you that the provider was not loaded successfully. The description for this error informs you that it could not load the provider, and it gives you the assembly information. In addition to the error description, the error code that is returned by the FTP service is 0x80070002 - and once again this hexadecimal 32-bit value can be split into 16-bit values:
- 8007 - This code informs you that this is a Win32 error.
- 0002 - This code is obviously 2 in decimal, so if you enter "NET HELPMSG 2" from a command-prompt, that will tell you that the error was "
The system cannot find the file specified."
So now let's look at a common perplexing problem:
This example shows the same 0x8007052E error code that we looked at in a previous example, but you'll notice that any reference to the provider is conspicuously absent from the trace - this means that the FTP service made no attempt to load the custom authentication provider. In this specific case, even though I had correctly registered my custom FTP authentication provider on the system, I had not added or enabled the custom authentication provider for my FTP site.
Summary
In this blog I showed you how to troubleshoot several different errors with FTP custom authentication providers by using FTP's ETW features.
As a parting thought, I should point out that the most-common error that I run into when creating my own providers is the last example. Believe it or not, I nearly always miss a step when I am creating a new provider and I forget to add a setting here or there which will cause the FTP service to completely ignore my provider. A perfect example is when I am writing custom home directory providers - I always remember to add the provider to the global list of FTP providers, and I usually remember to add the provider to the list of custom features for my FTP site, but I forget to configure my FTP site to use custom user isolation and my provider is ignored. (Darn, darn, darn...)
;-]
Note: This blog was originally posted at http://blogs.msdn.com/robert_mcmurray/
Working with the Different IIS Express Modes and HTTPS
03 July 2012 • by Bob • IIS Express, Scripting
I had another great question from a customer the other day, and I thought that his question was the perfect impetus for me to write blog that explained the different modes of IIS Express.
The customer's issue was that he was trying to run IIS Express from a command-line by specifying the path to a folder and he wanted to use that with SSL. He couldn't find a way to accomplish that, so he asked Scott Hanselman if there was a switch that he was missing, and Scott sent him my way. In the meantime, he was copying one of the IIS Express template ApplicationHost.config files and configuring SSL by modifying the XML programmatically.
First of all, the short answer is that there isn't some form of "/https" switch for IIS Express that the customer was asking about.
But that being said, this seemed like a great occasion for me to explain a little bit of design architecture for IIS Express, which might help everyone understand a little bit about what's going on behind the scenes when you run IIS Express.
In case you weren't aware, there are actually two modes that you can use with IIS Express:
- Personal Web Server Mode
- Application Server Mode
Having said that, I'll explain what both of those fancy titles actually mean, and how you can use IIS Express with SSL.
Personal Web Server Mode
When you are using Personal Web Server Mode, one ApplicationHost.config file is created per user by default, (unless an alternate file is specified on the command-line), and by default that ApplicationHost.config file is kept in your "%UserProfile%\Documents\IISExpress\config" folder.
In this mode, websites are persistent like they are with the full version of IIS, and the template that is used to create the per-user ApplicationHost.config file is located at:
"%ProgramFiles%\IIS Express\config\templates\PersonalWebServer\ApplicationHost.config"
Note: When you are using Personal Web Server Mode, your default website is named "WebSite1".
The general syntax for Personal Web Server Mode is:
iisexpress.exe [/config:config-file] [/site:site-name] [/systray:true|false] [/siteid:site-id] [/userhome:user-home]
If you are using IIS Express from a command-line with no parameters, or you are using IIS Express with WebMatrix or Visual Studio, then you are using Personal Web Server Mode. You can use SSL by enabling HTTPS in either WebMatrix or Visual Studio, or you can modify your ApplicationHost.config file directly and add an HTTPS binding to a website.
Application Server Mode
When you are using "Application Server Mode," a temporary ApplicationHost.config file generated when IIS Express starts in the user's "%TEMP%\iisexpress" folder.
In this mode, sites are transient like they are with Cassini, and the template that is used to create the temporary ApplicationHost.config file is located at:
"%ProgramFiles%\IIS Express\AppServer\ApplicationHost.config"
Note: When you are using Application Server Mode, your default website is named "Development Web Site".
The general syntax for Application Server Mode is:
iisexpress.exe /path:app-path [/port:port-number] [/clr:clr-version] [/systray:true|false]
If you are using IIS Express from a command-line by specifying the path to a folder, then you are using Application Server Mode, and unfortunately you can't use SSL with this mode.
Using SSL with IIS Express
As I have already mentioned, if you are using Personal Web Server Mode, you can use SSL by enabling HTTPS in WebMatrix or Visual Studio if you are using either of those tools, or you can modify your ApplicationHost.config file directly and add an HTTPS binding to a website.
However, there is no way to specify HTTPS for Application Server Mode; but that being said, there are definitely workarounds that you can use.
Copying the template file like the customer was doing is a good place to start. But I need to state an important warning: you should never modify the actual template files that are installed with IIS Express! However, if you copy the template files somewhere else on your system, you can modify the copied files as much as you want.
If you are using IIS 8 Express, we've made it possible to use AppCmd.exe with any ApplicationHost.config file by using the "/apphostconfig" switch. So instead of modifying the XML directly, you can use AppCmd.exe to make your changes for you.
For example, the following batch file creates a temporary website and sets it up for use with HTTPS:
@echo off
pushd "%~dp0"
REM Create the website's folders.
md %SystemDrive%\myhttpstemp
md %SystemDrive%\myhttpstemp\wwwroot
md %SystemDrive%\myhttpstemp\config
REM Copy the template configuration file.
copy "%ProgramFiles%\IIS Express\AppServer\ApplicationHost.config" %SystemDrive%\myhttpstemp\config
REM Configure the website's home directory.
"%ProgramFiles%\IIS Express\appcmd.exe" set config -section:system.ApplicationHost/sites /"[name='Development Web Site'].[path='/'].[path='/'].physicalPath:%SystemDrive%\myhttpstemp\wwwroot" /commit:apphost /apphostconfig:%SystemDrive%\myhttpstemp\config\ApplicationHost.config
REM Configure the website for SSL.
"%ProgramFiles%\IIS Express\appcmd.exe" set config -section:system.ApplicationHost/sites /+"[name='Development Web Site'].bindings.[protocol='https',bindingInformation='127.0.0.1:8443:']" /commit:apphost /apphostconfig:%SystemDrive%\myhttpstemp\config\ApplicationHost.config
REM Enable directory browsing so this example works without a home page.
"%ProgramFiles%\IIS Express\appcmd.exe" set config "Development Web Site" -section:system.webServer/directoryBrowse /enabled:"True" /commit:apphost /apphostconfig:%SystemDrive%\myhttpstemp\config\ApplicationHost.config
REM Run the website with IIS Express.
"%ProgramFiles%\IIS Express\iisexpress.exe" /config:%SystemDrive%\myhttpstemp\config\ApplicationHost.config /siteid:1 /systray:false
REM Clean up the website folders.
rd /q /s %SystemDrive%\myhttpstemp
popd
As you can see in the above example, this is a little more involved than simply invoking Application Server Mode with a switch to enable HTTPS, but it's still very easy to do. The changes that we've made in IIS 8 Express make it easy to script Personal Web Server Mode in order to enable SSL for a temporary website.
In Closing...
I hope this information makes using the various IIS Express modes and SSL a little clearer, and you can get IIS 8 Express by following the link in the following blog post:
Note: This blog was originally posted at http://blogs.msdn.com/robert_mcmurray/
Storing IIS 7.5 WebDAV Properties in NTFS Alternate Data Streams
30 December 2011 • by Bob • IIS, Scripting, WebDAV
Two months ago Microsoft published an update for the WebDAV module that shipped with IIS 7.5 in Windows 7 and Windows Server 2008 R2, and this update is documented in the Microsoft Knowledge Base article ID 2593591:
This update enables administrators to configure the IIS 7.5 WebDAV module to store WebDAV-based properties in NTFS alternate data streams instead of properties.dav files. By way of explanation, WebDAV has two HTTP methods - PROPFIND and PROPPATCH - which enable WebDAV clients to store custom properties on a WebDAV server. These properties may contain anything that makes sense to the WebDAV client. For example, if you were creating a WebDAV client that stored Microsoft Office documents on a WebDAV server, you could store metadata in WebDAV properties for each document, like the author's name, document abstract, etc.
By default, the IIS 7.5 WebDAV module stores properties in system files in each folder of a website that are called properties.dav. These files are essentially text-based INI files that contain the encoded WebDAV properties for the various files in each folder. In contrast, the WebDAV functionality in IIS 6 had used NTFS alternate data streams to store WebDAV properties, which are described in the following Microsoft TechNet article:
After we shipped IIS 6, we received a lot of complaints from customers who were losing their WebDAV properties when they were copying their website files between NTFS and FAT file systems. This was expected behavior - NTFS alternate data streams will be removed when you copy files from NTFS to FAT. To remedy this situation, in IIS 7.0 we decided to switch to using INI-based functionality in order to prevent losing custom WebDAV properties when files are copied between disparate file systems.
When we were designing IIS 7.5, we wanted to add optional support for storing WebDAV properties in NTFS alternate data streams, and we wanted to do so because NTFS alternate data streams might perform faster when you are working with larger websites; however, we ran out of time to implement that functionality before we shipped Windows 7 and Windows Server 2008 R2. That being said, we still wanted to implement the feature, and the update that I listed at the beginning of this blog contains the functionality that is required to enable storing WebDAV properties in NTFS alternate data streams.
Enabling Alternate Data Streams for WebDAV Properties
The above information is good news for anyone who is storing large quantities of WebDAV properties, so your next logical question might be: "How do I enable NTFS alternate data streams for WebDAV properties ?"
Actually, it's really simple. In the KB article that I listed in the beginning of this blog, I documented two methods that show you how to enable storing WebDAV properties in NTFS alternate data streams:
- By modifying your applicationHost.config file
- By using AppCmd.exe
For the sake of completeness, I will repost some of the information here.
Method #1: Modifying your applicationHost.config file
You can enable storing WebDAV properties in alternate data streams for the simple property provider by adding a "useAlternateDataStreams" attribute to the property provider’s registration settings in your applicationHost.config file, which is highlighted in the following global configuration snippet:
<webdav>
  <globalSettings>
    <propertyStores>
      <add name="webdav_simple_prop"
        image="%windir%\system32\inetsrv\webdav_simple_prop.dll"
        image32="%windir%\syswow64\inetsrv\webdav_simple_prop.dll"
        useAlternateDataStreams="true" />
    </propertyStores>
    <lockStores>
      <add name="webdav_simple_lock"
        image="%windir%\system32\inetsrv\webdav_simple_lock.dll"
        image32="%windir%\syswow64\inetsrv\webdav_simple_lock.dll" />
    </lockStores>
  </globalSettings>
  <authoring>
    <locks enabled="true" lockStore="webdav_simple_lock" />
    <properties>
      <clear />
      <add xmlNamespace="*" propertyStore="webdav_simple_prop" />
    </properties>
  </authoring>
  <authoringRules />
</webdav>
Once you have enabled the feature, you have to restart IIS in order for it to take effect.
Method #2: Using AppCmd.exe
I wrote the following batch file for the KB article, which uses AppCmd.exe to enable the NTFS alternate data streams functionality, and it automatically restarts IIS for you:
pushd "%SystemRoot%\System32\Inetsrv"
iisreset /stop
appcmd.exe set config -section:system.webServer/webdav/globalSettings -propertyStores.[name='webdav_simple_prop'].useAlternateDataStreams:true /commit:apphost
iisreset /start
popd
Migrating IIS 7 WebDAV Properties into Alternate Data Streams
Once you've enabled storing WebDAV properties in alternate data streams, you are presented with a new challenge: "How do I migrate my existing WebDAV properties?"
Here's the situation, once you have enabled the alternate data streams feature, the WebDAV property provider is going to ignore any properties that have already been set in properties.dav files. With this in mind, I wrote a script that will migrate all of the WebDAV properties from all of the properties.dav files in a website into their corresponding per-file NTFS alternate data streams.
To use the following script, you will need to update the folder path in the third line of the script with the path to your website. Once you have done that, you can run the script to migrate your existing WebDAV properties.
NOTE: You need to run this script as an administrator!
Option Explicit

Dim arrFolderTree, intFolderCount

arrFolderTree = BuildFolderTree("C:\inetpub\wwwroot")

For intFolderCount = 1 To UBound(arrFolderTree)
  MigratePropertiesToADS arrFolderTree(intFolderCount)
Next

Sub MigratePropertiesToADS(strFolderPath)
  On Error Resume Next

  ' Declare all our variables
  Dim objTempFSO, objTempFolder
  Dim objTempPropertiesFile, objTempAlternateDataStream
  Dim strTempLine, strTempObjectName, blnTempOpenStream
  Const strTempPropertiesDAV = "\properties.dav"
  Const strTempAlternateDataStream = ":properties.dav:$DATA"

  ' Create a file system object.
  Set objTempFSO = WScript.CreateObject("Scripting.FileSystemObject")

  ' Flag the function as having a closed output stream.
  blnTempOpenStream = False

  ' Retrieve a folder object for the path.
  Set objTempFolder = objTempFSO.GetFolder(strFolderPath)

  ' Check for a properties.dav file in the current folder.
  If objTempFSO.FileExists(objTempFolder.Path & strTempPropertiesDAV) Then
    ' Open the properties.dav file for the current folder.
    Set objTempPropertiesFile = objTempFSO.OpenTextFile(objTempFolder.Path & _
      strTempPropertiesDAV,1,False,-1)
    ' Loop through the properties.dav file.
    Do While Not objTempPropertiesFile.AtEndOfStream
      ' Retrieve a line from the properties.dav file.
      strTempLine = Trim(objTempPropertiesFile.ReadLine)
      ' Check if it's a section heading.
      If Left(strTempLine,1) = "[" And Right(strTempLine,1) = "]" Then
        ' Parse the name of the object (file/folder).
        strTempObjectName = Replace(Trim(Mid(strTempLine,2,Len(strTempLine)-2)),"/","\")
        ' Strip off a backslash from the parent folder.
        If Len(strTempObjectName) = 1 Then strTempObjectName = ""
        ' Check to see if the file/folder exists.
        If objTempFSO.FileExists(objTempFolder.Path & _
             strTempObjectName) Or objTempFSO.FolderExists(objTempFolder.Path & _
             strTempObjectName) Then
          ' Create a file object for the alternate data stream.
          Set objTempAlternateDataStream = objTempFSO.CreateTextFile(objTempFolder.Path & _
             strTempObjectName & _
             strTempAlternateDataStream,True,-1)
          ' Write the WebDAV section header.
          objTempAlternateDataStream.WriteLine "[WebDAV]"
          ' Flag the function as having an open output stream.
          blnTempOpenStream = True
        Else
          ' Flag the function as having a closed output stream.
          blnTempOpenStream = False
        End If
      Else
        ' Check if we have an open output stream.
        If blnTempOpenStream = True Then
          ' Output a property.
          objTempAlternateDataStream.WriteLine strTempLine
        End If
      End If
    Loop
    ' Close the properties.dav file.
    objTempPropertiesFile.Close
  End If
  Set objTempFSO = Nothing
End Sub

Function BuildFolderTree(strTempBaseFolder)
  On Error Resume Next

  ' Declare all our variables
  Dim objTempFSO
  Dim objTempFolder
  Dim objTempSubFolder
  Dim lngTempFolderCount
  Dim lngTempBaseCount

  ' Create our file system object.
  Set objTempFSO = WScript.CreateObject("Scripting.FileSystemObject")

  ' Define the initial values for our folder counters.
  lngTempFolderCount = 1
  lngTempBaseCount = 0

  ' Dimension an array to hold the folder names.
  ReDim strTempFolders(1)

  ' Store the root folder in our array.
  strTempFolders(lngTempFolderCount) = strTempBaseFolder

  ' Loop while we still have folders to process.
  While lngTempFolderCount <> lngTempBaseCount
    ' Set up a folder object to a base folder.
    Set objTempFolder = objTempFSO.GetFolder(strTempFolders(lngTempBaseCount+1))
    ' Loop through the collection of subfolders for the base folder.
    For Each objTempSubFolder In objTempFolder.SubFolders
      ' Increment our folder count.
      lngTempFolderCount = lngTempFolderCount + 1
      ' Increase our array size
      ReDim Preserve strTempFolders(lngTempFolderCount)
      ' Store the folder name in our array.
      strTempFolders(lngTempFolderCount) = objTempSubFolder.Path
    Next
    ' Increment the base folder counter.
    lngTempBaseCount = lngTempBaseCount + 1
  Wend

  ' Return the array of folder names.
  BuildFolderTree = strTempFolders

End Function
In Closing
I have a couple final notes for you to consider:
- Enabling NTFS alternate data streams is a global WebDAV setting; you cannot do this on a per-site basis.
- As with IIS 6, once you enable storing WebDAV properties in NTFS alternate data streams, you will lose your WebDAV properties if you copy your files between NTFS and FAT file systems.
Note: This blog was originally posted at http://blogs.msdn.com/robert_mcmurray/
How to Use Managed Code (C#) to Create an FTP Home Directory Provider for the Days of the Week
29 September 2011 • by Bob • FTP, Extensibility
I had a question from someone that had an interesting scenario: they had a series of reports that their manufacturing company generates on a daily basis, and they wanted to automate uploading those files over FTP from their factory to their headquarters. Their existing automation created report files with names like Widgets.log, Sprockets.log, Gadgets.log, etc.
But they had an additional request: they wanted the reports dropped into folders based on the day of the week. People in their headquarters could retrieve the reports from a share on their headquarters network where the FTP server would drop the files, and anyone could look at data from anytime within the past seven days.
This seemed like an extremely trivial script for me to write, so I threw together the following example batch file for them:
@echo off
pushd "C:\Reports"
for /f "usebackq delims= " %%a in (`date /t`) do (
  echo open MyServerName>ftpscript.txt
  echo MyUsername>>ftpscript.txt
  echo MyPassword>>ftpscript.txt
  echo mkdir %%a>>ftpscript.txt
  echo cd %%a>>ftpscript.txt
  echo asc>>ftpscript.txt
  echo prompt>>ftpscript.txt
  echo mput *.log>>ftpscript.txt
  echo bye>>ftpscript.txt
)
ftp.exe -s:ftpscript.txt
del ftpscript.txt
popd
This would have worked great for most scenarios, but they pointed out a few problems in their specific environment: manufacturing and headquarters were in different geographical regions of the world, therefore in different time zones, and they wanted the day of the week to be based on the day of the week where their headquarters was located. They also wanted to make sure that if anyone logged in over FTP, they would only see the reports for the current day, and they didn't want to take a chance that something might go wrong with the batch file and they might overwrite the logs from the wrong day.
With all of those requirements in mind, this was beginning to look like a problem for a custom home directory provider to tackle. Fortunately, this was a really easy home directory provider to write, and I thought that it might make a good blog.
Note: I wrote and tested the steps in this blog using both Visual Studio 2010 and Visual Studio 2008; if you use an different version of Visual Studio, some of the version-specific steps may need to be changed.
In This Blog
- Step 1: Set up the Project Environment
- Step 2: Create the Extensibility Class
- Step 3: Add the Demo Provider to FTP
- Summary
Prerequisites
The following items are required to complete the procedures in this blog:
- The following version of IIS must be installed on your Windows computer, and the Internet Information Services (IIS) Manager must also be installed:
- IIS 7.0 must be installed on Windows Server 2008
- IIS 7.5 must be installed on Windows Server 2008 R2 or Windows 7
- The new FTP 7.5 service must be installed. To install FTP 7.5, follow the instructions in the following topic:
- You must have FTP publishing enabled for a site. To create a new FTP site, follow the instructions in the following topic:
- You need to create the folders for the days of the week under your FTP root directory; for example, Sunday, Monday, Tuesday, etc.
Step 1: Set up the Project Environment
In this step, you will create a project in Microsoft Visual Studio for the demo provider.
- Open Visual Studio 2008 or Visual Studio 2010.
- Click the File menu, then New, then Project.
- In the New Projectdialog box:
- Choose Visual C# as the project type.
- Choose Class Library as the template.
- Type FtpDayOfWeekHomeDirectory as the name of the project.
- Click OK.
- When the project opens, add a reference path to the FTP extensibility library:
- Click Project, and then click FtpDayOfWeekHomeDirectory Properties.
- Click the Reference Paths tab.
- Enter the path to the FTP extensibility assembly for your version of Windows, where C: is your operating system drive.
- For Windows Server 2008 and Windows Vista:
- C:\Windows\assembly\GAC_MSIL\Microsoft.Web.FtpServer\7.5.0.0__31bf3856ad364e35
- For 32-bit Windows 7 and Windows Server 2008 R2:
- C:\Program Files\Reference Assemblies\Microsoft\IIS
- For 64-bit Windows 7 and Windows Server 2008 R2:
- C:\Program Files (x86)\Reference Assemblies\Microsoft\IIS
- For Windows Server 2008 and Windows Vista:
- Click Add Folder.
- Add a strong name key to the project:
- Click Project, and then click FtpDayOfWeekHomeDirectory Properties.
- Click the Signing tab.
- Check the Sign the assembly check box.
- Choose <New...> from the strong key name drop-down box.
- Enter FtpDayOfWeekHomeDirectoryKey for the key file name.
- If desired, enter a password for the key file; otherwise, clear the Protect my key file with a password check box.
- Click OK.
- Note: FTP 7.5 Extensibility does not support the .NET Framework 4.0; if you are using Visual Studio 2010, or you have changed your default framework version, you may need to change the framework version for this project. To do so, use the following steps:
- Click Project, and then click FtpDayOfWeekHomeDirectory Properties.
- Click the Application tab.
- Choose .NET Framework 3.5 in the Target framework drop-down menu.
- Save, close, and re-open the project.
- Optional: You can add a custom build event to add the DLL automatically to the Global Assembly Cache (GAC) on your development computer:
- Click Project, and then click FtpDayOfWeekHomeDirectory Properties.
- Click the Build Events tab.
- Enter the appropriate commands in the Post-build event command linedialog box, depending on your version of Visual Studio:
- If you are using Visual Studio 2010:
net stop ftpsvc
call "%VS100COMNTOOLS%\vsvars32.bat">null
gacutil.exe /if "$(TargetPath)"
net start ftpsvc - If you are using Visual Studio 2008:
net stop ftpsvc
call "%VS90COMNTOOLS%\vsvars32.bat">null
gacutil.exe /if "$(TargetPath)"
net start ftpsvc
- If you are using Visual Studio 2010:
- Save the project.
Step 2: Create the Extensibility Class
In this step, you will implement the extensibility interfaces for the demo provider.
- Add the necessary references to the project:
- Click Project, and then click Add Reference...
- On the .NET tab, click Microsoft.Web.FtpServer.
- Click OK.
- Add the code for the authentication class:
- In Solution Explorer, double-click the Class1.cs file.
- Remove the existing code.
- Paste the following code into the editor:
using System;
using System.Collections.Generic;
using System.Collections.Specialized;
using Microsoft.Web.FtpServer;

public class FtpDayOfWeekHomeDirectory :
    BaseProvider,
    IFtpHomeDirectoryProvider
{
    // Store the path to the default FTP folder.
    private static string _defaultDirectory = string.Empty;

    // Override the default initialization method.
    protected override void Initialize(StringDictionary config)
    {
        // Retrieve the default directory path from configuration.
        _defaultDirectory = config["defaultDirectory"];
        // Test for the default home directory (Required).
        if (string.IsNullOrEmpty(_defaultDirectory))
        {
            throw new ArgumentException(
              "Missing default directory path in configuration.");
        }
    }

    // Define the home directory provider method.
    string IFtpHomeDirectoryProvider.GetUserHomeDirectoryData(
        string sessionId,
        string siteName,
        string userName)
    {
        // Return the path to the folder for the day of the week.
        return String.Format(
            @"{0}\{1}",
            _defaultDirectory,
            DateTime.Today.DayOfWeek);
    }
}
- Save and compile the project.
Note: If you did not use the optional steps to register the assemblies in the GAC, you will need to manually copy the assemblies to your IIS 7 computer and add the assemblies to the GAC using the Gacutil.exe tool. For more information, see the following topic on the Microsoft MSDN Web site:
Step 3: Add the Demo Provider to FTP
In this step, you will add your provider to the global list of custom providers for your FTP service, configure your provider's settings, and enable your provider for an FTP site.
Adding your Provider to FTP
- Determine the assembly information for your extensibility provider:
- In Windows Explorer, open your "C:\Windows\assembly" path, where C: is your operating system drive.
- Locate the FtpDayOfWeekHomeDirectory assembly.
- Right-click the assembly, and then click Properties.
- Copy the Culture value; for example: Neutral.
- Copy the Version number; for example: 1.0.0.0.
- Copy the Public Key Token value; for example: 426f62526f636b73.
- Click Cancel.
- Add the extensibility provider to the global list of FTP authentication providers:
- Open the Internet Information Services (IIS) Manager.
- Click your computer name in the Connections pane.
- Double-click FTP Authentication in the main window.
- Click Custom Providers... in the Actions pane.
- Click Register.
- Enter FtpDayOfWeekHomeDirectory for the provider Name.
- Click Managed Provider (.NET).
- Enter the assembly information for the extensibility provider using the information that you copied earlier. For example:
FtpDayOfWeekHomeDirectory,FtpDayOfWeekHomeDirectory,version=1.0.0.0,Culture=neutral,PublicKeyToken=426f62526f636b73 - Click OK.
- Clear the FtpDayOfWeekHomeDirectory check box in the providers list.
- Click OK.
Note: If you prefer, you could use the command line to add the provider to FTP by using syntax like the following example:
cd %SystemRoot%\System32\Inetsrv

appcmd.exe set config -section:system.ftpServer/providerDefinitions /+"[name='FtpDayOfWeekHomeDirectory',type='FtpDayOfWeekHomeDirectory,FtpDayOfWeekHomeDirectory,version=1.0.0.0,Culture=neutral,PublicKeyToken=426f62526f636b73']" /commit:apphost
Configuring your Provider's Settings
At the moment there is no user interface that allows you to configure properties for a custom home directory provider, so you will have to use the following command line:
cd %SystemRoot%\System32\Inetsrv

appcmd.exe set config -section:system.ftpServer/providerDefinitions /+"activation.[name='FtpDayOfWeekHomeDirectory']" /commit:apphost

appcmd.exe set config -section:system.ftpServer/providerDefinitions /+"activation.[name='FtpDayOfWeekHomeDirectory'].[key='defaultDirectory',value='C:\Inetpub\ftproot']" /commit:apphost
Note: The highlighted area contains the value that you need to update with the root directory of your FTP site.
Enabling your Provider for an FTP site
At the moment there is no user interface that allows you to enable a custom home directory provider for an FTP site, so you will have to use the following command line:
cd %SystemRoot%\System32\Inetsrv

appcmd.exe set config -section:system.applicationHost/sites /+"[name='My FTP Site'].ftpServer.customFeatures.providers.[name='FtpDayOfWeekHomeDirectory']" /commit:apphost

appcmd.exe set config -section:system.applicationHost/sites /"[name='My FTP Site'].ftpServer.userIsolation.mode:Custom" /commit:apphost
Note: The highlighted areas contain the name of the FTP site where you want to enable the custom home directory provider.
Summary
In this blog I showed you how to:
- Create a project in Visual Studio 2010 or Visual Studio 2008 for a custom FTP home directory provider.
- Implement the extensibility interface for custom FTP home directories.
- Add a custom home directory provider to your FTP service.
When users connect to your FTP site, the FTP service will drop their session in the corresponding folder for the day of the week under the home directory for your FTP site, and they will not be able to change to the root directory or a directory for a different day of the week.
Note: This blog was originally posted at http://blogs.msdn.com/robert_mcmurray/
Batch File: Delete Duplicate Files
24 December 2008 • by Bob • Windows
Using this Batch File
Some time ago a friend of mine gave me a bunch of JPG files, but for some reason she had two copies of every image in the collection. The names of the images had all been randomized, and since there were hundreds of files in the collection it would have taken hours to find and delete the duplicates. With that in mind, I wrote the following batch file that loops through the collection of files and does a binary comparison to find and delete duplicate files.
To use the example code, copy the batch file code from below into Notepad and save it as "_del_dupes.cmd" in the folder where you have duplicate files
Note: As with many utilities that I write - this is a destructive operation, meaning that it will delete files without prompting, so you should always make a backup just in case something goes terribly wrong... ;-]
Batch File Example Code
@echo off

dir *.jpg /b > _del_dupes.1.txt

for /f "delims=|" %%a in (_del_dupes.1.txt) do (
   if exist "%%a" (
      dir *.jpg /b > _del_dupes.2.txt
      for /f "delims=|" %%b in (_del_dupes.2.txt) do (
         if not "%%a"=="%%b" (
            echo Comparing "%%a" to "%%b"...
            fc /b "%%a" "%%b">NUL
            if errorlevel 1 (
               echo DIFFERENT
            ) else (
               echo SAME
               del "%%b"
            )
         )
      )
   )
)

del _del_dupes.?.txt